|
Website
visitor Bob G. of Salt Lake City, Utah, wrote to request that I scan and post this PeeWee .020-powered free flight model
that appeared in the October 1969 edition of American Aircraft Modeler, called "Skyrida." Bob remembered seeing it in
the magazine when he was a kid and hands decided now that he is back into model airplanes, it would be nice to try his
hand at one. Model airframes are not all that Bob builds, however; he also likes to build the engines that power them.
Hopefully, one day a photo of his model Skyrida and his engine will grace this page.
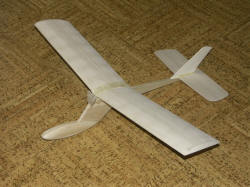 As
promised, Bob G. sent a photo of his complete Skyrida airframe. He says all he needs is to install the engine and get
a break in the snowy weather to be able to go fly it. As
promised, Bob G. sent a photo of his complete Skyrida airframe. He says all he needs is to install the engine and get
a break in the snowy weather to be able to go fly it. Skyrida
Gas-powered free flight offers an exciting challenge. This small-field flyer features rugged construction. Ray
Malmstrom
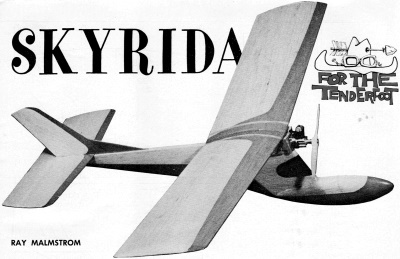 SOMETHING
different always catches the eye and this old saying is as true for the novice, as for the old-timer. As model aircrafts
go, "Skyrida" certainly possesses that excitingly different look, and when we tell you that you will find it easy to
build, and to fly, then our guess is that you are already reaching for that balsa knife. So let's go! SOMETHING
different always catches the eye and this old saying is as true for the novice, as for the old-timer. As model aircrafts
go, "Skyrida" certainly possesses that excitingly different look, and when we tell you that you will find it easy to
build, and to fly, then our guess is that you are already reaching for that balsa knife. So let's go! You will
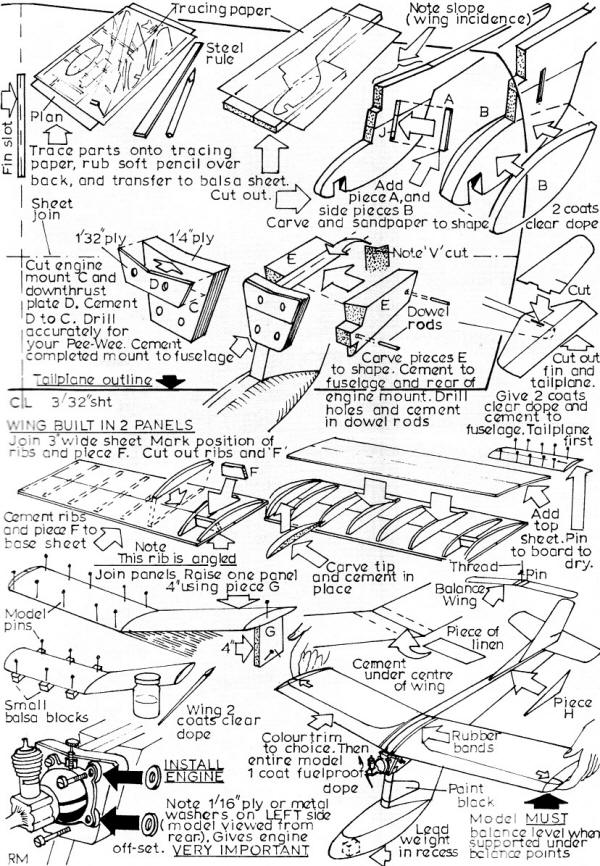
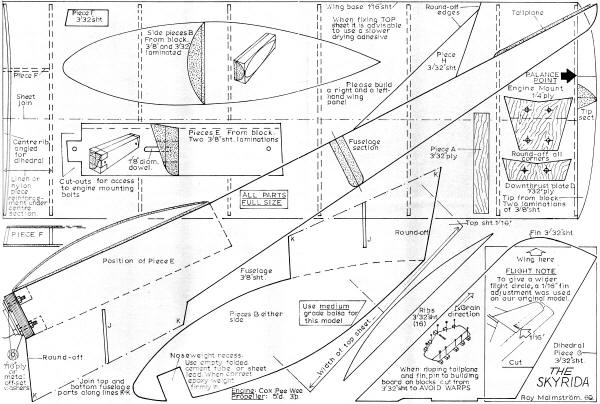
find the "easy-build" sketches will give you all the info you need to build yourself a Skyrida quickly and easily. Work
on a flat board (white pine, plywood, etc., are all suitable). Use a sharp knife (we prefer a really sharp single-edge
razor blade) and a medium and a fine grade of sandpaper for shaping and finishing the parts. Remember to sandpaper all
surfaces lightly between coats of dope. Only one side of the wing and stabilizer are shown, so simply reverse your tracing
for the opposite side. Easy! Check when you cement the stabilizer in position that it is at right angles to the fuselage,
and the fin is truly upright. A carpenter's square or small T- square come in real handy here. When bolting
in your Pee- Wee 020 engine, make sure you offset it to the right (model viewed from the rear) with either two 1/16"
ply or 1/16" - thick metal washers. This is most important. By the way, if a Pee-Wee 020 is a new engine to you, be
sure and run it on a test bench first, and familiarize yourself with the starting procedures and fuel setting.
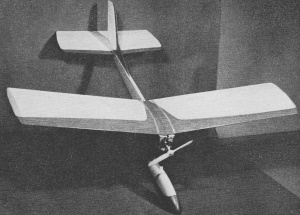
Fuel-proofing with several coats of clear dope is required for powered models. Easily started Pee Wee 02 engine is
recommended. MATERIALS LIST 4 sheets 1/16 x 3 x 36'" medium balsa 2 sheets
3/8 x 3 x 36" medium balsa 1 sheet 3/32 x 3 x 36" medium balsa 2" sq. piece 1/8" ply 1 x 3'" piece 3/32"
ply 1" sq. piece 1/16" ply (or 2, 1/16" thick metal washers) 1 x 2" piece 1/32" ply 4" length 1/8 diam.
dowel rod 1 piece linen or gauze 3 x 5-1/2" 1 tube balsa cement 1 bottle clear dope 1 small bottle
fuel-proof dope 1/2" brush for doping 1 small jar - color dope 1 small brush for color trim 4 nuts
and bolts (for Pee Wee) Small piece of lead for nose weight 1 sheet tracing paper Modeling pins
A word or two on "balancing." Because sheet balsa varies a great deal in weight from sheet to sheet, when you have built
your wing, it is a good idea to balance it. Suspend it upside down as shown in the sketches and see that the wing hangs
level. If one side is heavier than the other, add a very small amount of clay to the tip of the light side. And now
for the second and equal-ly important balancing act. When your Sky-rida is ready for flying, support it with the tips
of your forefinger, under the balance-point marks on the wing tips as shown on the plan, and in the easi-build sketches.
Your Sk yrida will need a little weight in the nose-weight recess. Add or take away weight until it balances level.
Avoid any suspicion of tail-heaviness. Choose a calm day (or evening) and some long grass for first glide and
power tests. From a shoulder-high launch (into any slight breeze there may be) with the nose pointing slightly downward,
the plane should touch-down about 15 yards ahead of you. Check to see that the glide is straight. A turn in either direction
can be checked by slightly warping the rear edge of the fin in the opposite direction to the turn. If your Skyrida dives,
gently warp the trailing edge of the stabilizer up and vice-versa. Make all adjustments no more than 1/32" at a time.
The fin and tail surfaces, like any well-designed real aircraft, are quite sensitive; so a little at a time.
Now comes "the moment." A first power-on flight! Start your Pee-Wee and adjust it for smooth running, then face
into the breeze and launch steadily and smoothly. Never in your excitement throw the model. The plane should climb steadily
away in a left-hand turn, and continue to climb in the same turn until the fuel runs out. It should then settle into
a fairly straight, flat glide. We found that by turning the rear edge of the fin just 1/16" to the right (viewed from
the rear) as shown on the plan, we got a wide left-hand turn under power, and a sweeping right-hand circle on the glide
- a most pleasing flight pattern. Skyrida is happiest when flying to the left under power, so keep her that way. All
the best, and high-flying to you.
Skyrida Assembly Drawing
Not only is construction sequence shown but also outlines for tailplane
right half. Reverse the outline for left half.
<click for larger version>
Skyrida Plans
<click for larger version>
Notice:
The AMA Plans Service offers a
full-size version of many of the plans show here at a very reasonable cost. They
will scale the plans any size for you. It is always best to buy printed plans because
my scanner versions often have distortions that can cause parts to fit poorly. Purchasing
plans also help to support the operation of the
Academy of Model Aeronautics - the #1
advocate for model aviation throughout the world. If the AMA no longer has this
plan on file, I will be glad to send you my higher resolution version.
Try my Scale Calculator for
Model Airplane Plans.
Posted
December 11, 2011
|


