|
Website
visitor Mike L. wrote to ask that I scan and post this "Snoopy"
article that appeared in the December 1972 edition of American
Aircraft Modeler. Mike liked the Snoopy so much that back in
the 1970s he built a couple of them. Now, 40-some years later, the
bug has bitten again and it's time to build another. Snoopy is a
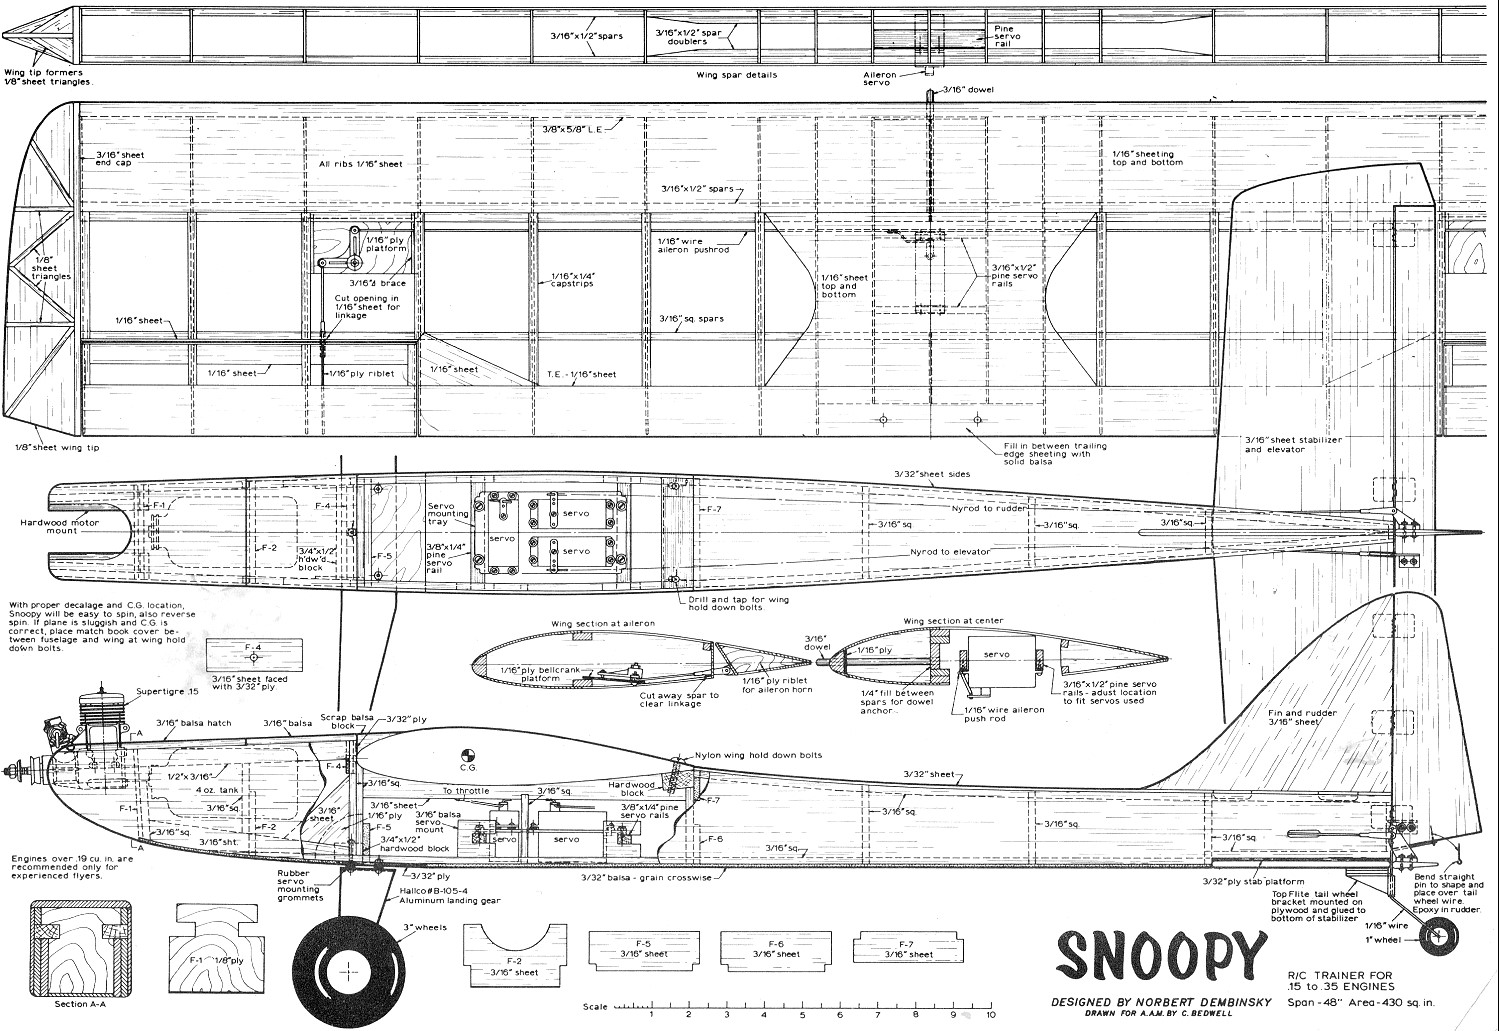
4-channel R/C sport aerobatic trainer model with a 48" wingspan,
using a .15 to .35 engine. It is all balsa and plywood construction.
Mike's original Snoopys were powered by a Veco .19 and used a Kraft
Sport 5 radio for guidance. Snoopy
 Fun
plane for owners of small, sporty cars and light, four-channel radio.
Modified Headmaster makes it lively - but forgiving Fun
plane for owners of small, sporty cars and light, four-channel radio.
Modified Headmaster makes it lively - but forgiving Norbert
Dembinsky The models presented in past magazine articles
tend to favor the contest type airplane. The medium size weekend
or sport type airplane has been somewhat forgotten. The Snoopy Trainer
was designed to fill the gap for the guys who like to fly the medium
size airplane for sport or relaxation on the weekends. The
Snoopy Trainer can be placed in the luggage compartment of automobiles
without removing the wing which eliminates carrying extra pieces
to and from the field. This design takes advantage of the small,
lightweight radio sets - the frontal area of the fuselage is low
in order to compensate for the thick airfoil section which is needed
for smooth and forgiving characteristics. A semi-symmetrical airfoil
section is used for better wind penetration, inverted flight and
easier handling. The ailerons have been added for lateral stability
and increase control due to the absence of dihedral in the wing.
The standard two wheel landing gear is used to keep the construction
and control linkages simplified. Many fliers would like to get away
from the trike gear high and low wing lookalikes but still have
good performance. Rough grass fields have been no detriment to the
ground handling ability of the Snoopy Trainer.

No dihedral, inset ailerons, thick semi-symmetrical wing
give Snoopy fine Sunday stuntabilty. |
The Top Flite Headmaster kit was used as the basis for the design
and modified into a not so lookalike. After the mods were made,
the model looked ugly and dead. A Snoopy pilot was carved from a
block of balsa and placed onto the top of the wing, the model livened
up, hence the name "Snoopy Trainer." A great deal can be learned
from flying this plane and it will forgive you for all but the most
egregious errors. Construction is so simple and straightforward
that you can build it from the plans without reference to any explanatory
text. There are a couple of points which might bring up a question
in your mind, so let's see if they can be cleared up beforehand.
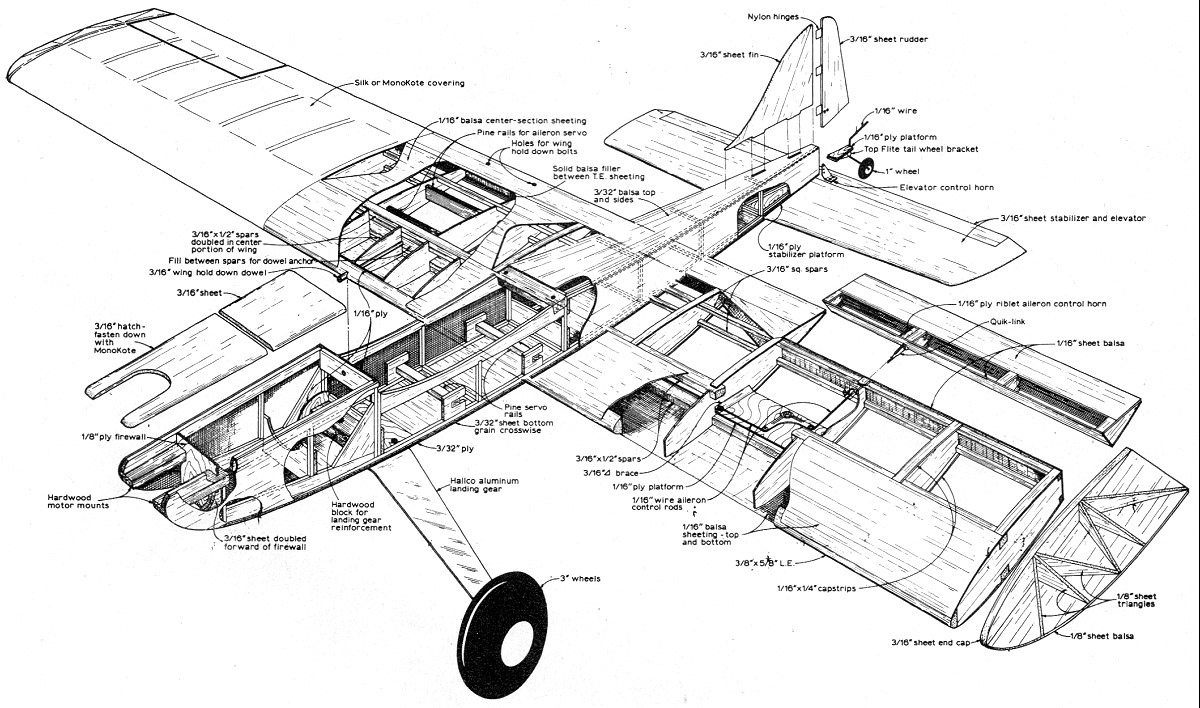
The fuselage is a typical "slabsider." but can be disguised.
The 3/16 square longerons give an excellent gluing surface for the
top and bottom sheeting; then when the box-like structure is completed,
the corners can be rounded. Section A-A shows the cross section
of the fuselage as it would appear at that point. The rounding of
the corners can be done all the way forward on the top of the rear
of the wing, and the full length of the bottom, fairing it out at
the plywood where the landing gear is mounted. The corners at the
top front forward fuselage hatch may be rounded as well. Spot glue
the hatch in place, round off the top and then cut the hatch away
when finished. Since there will be many different engine
installations suitable to the model, no specific mounting holes
are shown. Drill them to fit the engine and bolt using 3-48 or 4-40
bolts and blind nuts. The landing gear used was a Hallco
No. B105-4; a Top Flite Tauri/Headmaster wire landing gear can be
used with a little mounting modification. These landing gears are
available in most hobby shops. Another thing you might wonder
about is the servo linkage to the control surfaces. NyRods are used
due to the lack of sufficient space and, when installed per instructions,
work just fine. The wing is a modified Tauri wing or, to
be more exact, a Headmaster wing. Ailerons have been added and are
inset. There is no dihedral which makes the construction easier
twist free by being able to build on a straight flat surface. A
dowel rod glued in at the leading edge and nylon bolts used at the
trailing edge hold the wing to the fuselage instead of the customary
rubber band method of yesteryear. The added ailerons and absence
of dihedral give more control making inverted flight easier and
rolls smoother. The fin, rudder, stabilizer, and elevator
are constructed of 3/16 sheet balsa. This construction has proven
very sturdy and simple. Make slots for the hinges in the fin and
stabilizer trailing edges, and the leading edges of the rudder and
elevator. The hinges are glued into the slots after the covering
is applied, The same hinge technique is used in applying the ailerons
to the wing. The fin is butt glued to the top of the fuselage, but
before gluing, be sure the bottom of the fin fits snugly to the
top of the fuselage, then add the 3/16 inch square fillets before
gluing the fin in place. This makes it easier to shape the fillet
as shown in section A-A.
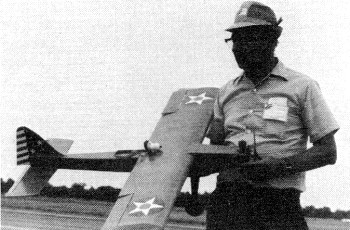
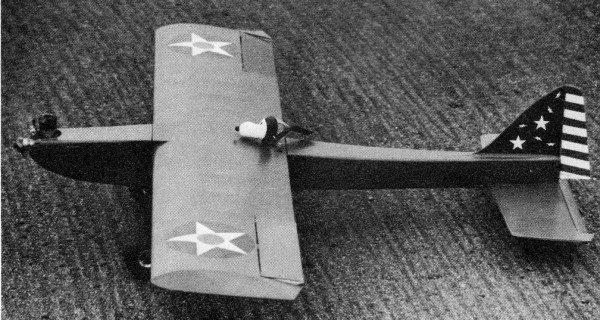
Sid Axelrod admires the flat olive green WW I MonoKoted
Snoopy. Where's the Red Baron? |
When it comes to covering, it's entirely up to you. There are so
many to choose from and each modeler seems to have his own choice.
As for me, I have become a booster of MonoKote, using MonoKote exclusively
to cover my airplanes for the last five years. MonoKote is the quickest
possible way to get an airplane finished and flying. Follow the
instructions supplied with the MonoKote and you can't go wrong.
The lack of compound curves will make this an ideal model to cover
with MonoKote if you have never used this fantastic covering material
before. Epoxy glue is used to seal the edges of the MonoKote in
the engine well area. This area may be colored to match the covering.
MonoKote trim sheets or MonoKote markings may be added to dress
up the finish. A clear polyurethane varnish may be used to seal
the edges of the sticky type trimming. If decals are used, allow
them to dry thoroughly before sealing the edges.
The
prototype, as shown on the plans, has a Kraft proportional control
system installed. The all-up weight of the prototype, with a Max
19 in the nose, is three and a quarter pounds. The first few test
flights proved out the value of proportional control. After taxiing
around a bit to gain the feel of the controls and the ground handling,
the power was advanced and the Snoopy Trainer went down the runway.
With a slight amount of up elevator the flight (fright) was under
way. Great! The model was out of trim and the transmitter trim levers
could not overcome the amount of adjustment needed, the flight had
to be concluded with the flying sticks about one third the way over
to maintain straight and level flight. An investigation proved the
push-rod clevises had not been adjusted properly. After the proper
adjustments had been made, the next flight had proved all the effort
was not for naught and a good performing airplane for the weekend
sport flyer was born. The Snoopy Trainer is capable of flying
with a Cox 09 or a Max 10 if kept on the light side. A 15 or a 19
engine will make the Snoopy Trainer perform quite well for you weekenders.
Eat your heart out Red.
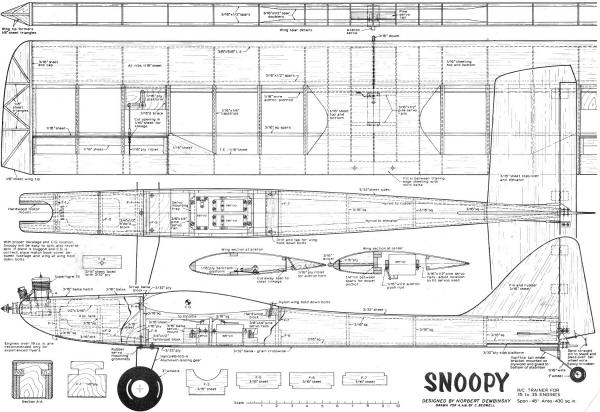
Snoopy Plans<click
for larger version>
Notice:
The AMA Plans Service offers a
full-size version of many of the plans show here at a very reasonable cost. They
will scale the plans any size for you. It is always best to buy printed plans because
my scanner versions often have distortions that can cause parts to fit poorly. Purchasing
plans also help to support the operation of the
Academy of Model Aeronautics - the #1
advocate for model aviation throughout the world. If the AMA no longer has this
plan on file, I will be glad to send you my higher resolution version.
Try my Scale Calculator for
Model Airplane Plans.
Posted December 21, 2013
|