  OK, I'm back in the helicopter business
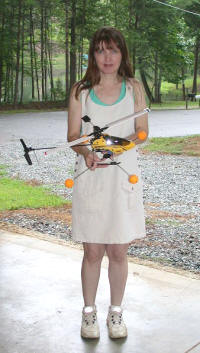
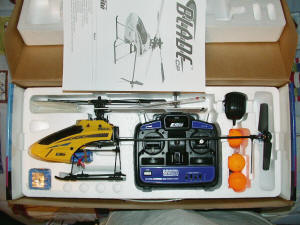
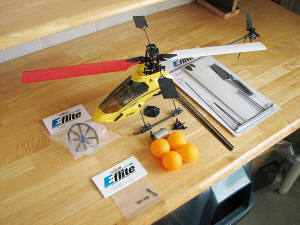
as of July 29, 2005, when I went to K-C Hobby Shop, in High Point, NC, and purchased a new E-flite Blade
CP. This chopper is amazing! As advertised, I charged the NiMH battery pack, put 8 AA cells in the transmitter,
and away it went. Since seven years have passed since flying (kind-of) the ECO 8, my initial couple
attempts were pretty embarrassing. By about the 3rd charge, I could hover for about 30 seconds. I was
continually trying different tail rotor gain and gyro settings to keep the tail under control. As it
turned out, the secret to keeping the tail under control is to actually control the tail with the stick!
Once I figured that out, hovering was a cinch! I found that
 34th flight of my Blade CP helicopter 34th flight of my Blade CP helicopter |
|
13th flight of my Blade CP helicopter |
|
correcting the tail excursions, along with very slight cyclic inputs allowed for extended hovers. Oh,
another tip is to slowly increment the throttle until the Blade CP gets light then throw in enough to
get it to jump into the air about a foot or more. That eliminates the adverse yaw from main rotor spin-up,
and get the beast out of the worst of the ground effect where everything is the slipperiest. After establishing
a stable hover, going back down into ground effect is easy to handle because the tail is already under
control. Of course, all of my flights have been inside a 4-car garage with no wind, so that has helped
in the learning process.
 As you can see in the August
8th video link at the top, by the 13th flight, I was in pretty good control of the Blade CP from a tail-in
hover standpoint. After recording the 20 second clip, I went on to fly out the remaining charge in the
stock 650 mAh NiMH battery pack in a single hovering session!. A second, and possibly third, battery
pack is in order to be able to fly for more than about 7-8 minutes before having to go charge the pack
for a couple hours (yeah, I could fast charge them, but don't want to sacrifice the lifespan). I tried
using my 2-cell, 1500 mAh Li-Poly pack, but the nominal 7.4 V output was not enough to even turn the
airborne system on. The 3-cell Li-Poly packs will definitely be required, but I'll hold off until I
am ready to try some hotdog outside maneuvering outdoors. As you can see in the August
8th video link at the top, by the 13th flight, I was in pretty good control of the Blade CP from a tail-in
hover standpoint. After recording the 20 second clip, I went on to fly out the remaining charge in the
stock 650 mAh NiMH battery pack in a single hovering session!. A second, and possibly third, battery
pack is in order to be able to fly for more than about 7-8 minutes before having to go charge the pack
for a couple hours (yeah, I could fast charge them, but don't want to sacrifice the lifespan). I tried
using my 2-cell, 1500 mAh Li-Poly pack, but the nominal 7.4 V output was not enough to even turn the
airborne system on. The 3-cell Li-Poly packs will definitely be required, but I'll hold off until I
am ready to try some hotdog outside maneuvering outdoors.
 My next step in
the learning process will be to try to fly to four corners in a square and hold a hover over each corner
with tail in. After that, I'll try nose-in hovering. That should be exciting. I'll keep you posted on
the progress. Just remember, if I can fly this machine, then just about anyone can! My next step in
the learning process will be to try to fly to four corners in a square and hold a hover over each corner
with tail in. After that, I'll try nose-in hovering. That should be exciting. I'll keep you posted on
the progress. Just remember, if I can fly this machine, then just about anyone can!
 OK, so I just put
in my 20th flight today (August 14, 2005). An adjustment to the flybar paddles really smoothed the whole
operation, and also made the controls even more sensitive than they were already. I removed moved all
three pushrods in by one hole on all three servos to tame the beast. It worked incredibly well! Now
I can almost control the Blade CP. Hovering in one spot is much, much easier now, and deliberately moving
forward, reverse, and sideways is actually doable. After about another 10 flights I should be ready
to try hovering nose-in. OK, so I just put
in my 20th flight today (August 14, 2005). An adjustment to the flybar paddles really smoothed the whole
operation, and also made the controls even more sensitive than they were already. I removed moved all
three pushrods in by one hole on all three servos to tame the beast. It worked incredibly well! Now
I can almost control the Blade CP. Hovering in one spot is much, much easier now, and deliberately moving
forward, reverse, and sideways is actually doable. After about another 10 flights I should be ready
to try hovering nose-in.
As of August 28, I have 43 logged flights and everything is working well. Vibration is very minimal
and flights are extremely consistent. All three pushrods have been moved
 into the inner servo
arm holes to tame down the response, and it makes a big difference, but still leaves a lot of control.
The battery packs both consistently give 10-11 minutes of hover time (I have never done more than slow
lateral movements in my garage). When there is about a minute left on the charge, it is necessary to
start feeding in right tail rotor. into the inner servo
arm holes to tame down the response, and it makes a big difference, but still leaves a lot of control.
The battery packs both consistently give 10-11 minutes of hover time (I have never done more than slow
lateral movements in my garage). When there is about a minute left on the charge, it is necessary to
start feeding in right tail rotor.
Water Break-In Method
for Electric Motors
 Since
the problem of suddenly having the power drop out persists, I decided to install a new motor, and to
use the water break-in method of seating the brushes. There is a plethora of information o n the Internet
forums detailing the procedure, so I will not duplicate it all here. Since
the problem of suddenly having the power drop out persists, I decided to install a new motor, and to
use the water break-in method of seating the brushes. There is a plethora of information o n the Internet
forums detailing the procedure, so I will not duplicate it all here.
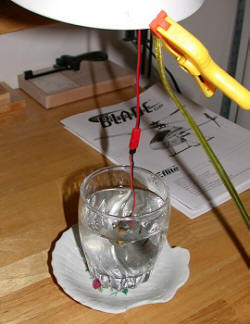
 Basically,
I applied about a volt and a half for around 12-15 minutes with the motor submersed in (softened) tap
water. It was then removed and dried with a Monokote shrinking blow gun, being careful not to get it
too hot, and shaking the motor to dislodge droplets trapped inside. Finally, a small amount of 3-in-1
oil was applied to the front and rear bushings. I learned the hard way a few year back to be careful
with oil on the bushing closest to the brushes, because it can easily creep onto the commutator and
ruin the brushes. Here are some pictures of my setup. Basically,
I applied about a volt and a half for around 12-15 minutes with the motor submersed in (softened) tap
water. It was then removed and dried with a Monokote shrinking blow gun, being careful not to get it
too hot, and shaking the motor to dislodge droplets trapped inside. Finally, a small amount of 3-in-1
oil was applied to the front and rear bushings. I learned the hard way a few year back to be careful
with oil on the bushing closest to the brushes, because it can easily creep onto the commutator and
ruin the brushes. Here are some pictures of my setup.
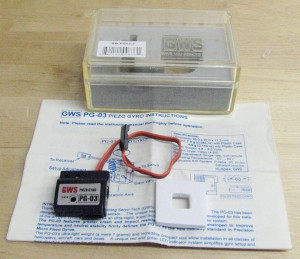
GWS PG-03 Gyro &
E-flite 2-in-1 Controller
 The GWS gyro and E-flite 2-in-1
Controller. See below on page for the installation I used when I had the Spektrum DX6 radio installed.
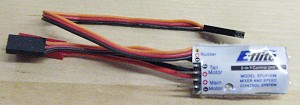
E-flite 2-in-1
Controller.


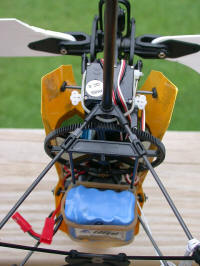
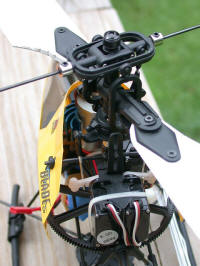
Modified E-flite Blade CP electric helicopter radio compartment for Spektrum DX6 radio, GWS gyro,
and 2-in-1 controller
...continued from above
In the near future I will be installing my
Spektrum
DX6 spread spectrum radio into my Blade CP. Stay tuned for details.
April 2006. I finally pulled my Blade CP out of its box and fired it back up. It flies well except
for still having the occasional power dropout for no apparent reason. I'm going to try replacing the
motor since I cannot force the radio system to glitch - that's with having the motor running and orienting
the transmitter antenna at all different angles relative to the receiver, and with holding the transmitter
still and rotating the Blade CP through all different angles. It's a strange problem that might just
be a flaky motor. Eventually installing a brushless motor would be nice.
October 2005 already! I haven't done much flying. So as to not totally waste time, I replaced the
main rotor shaft, swash plate, and main rotor blades. Everything has been meticulously balanced and
aligned now, and the Blade CP runs very smoothly. Now, I just need more hours in the day...
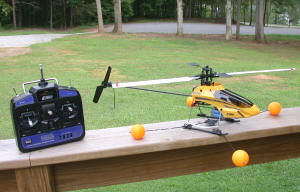
Today is September 12, 2005, and only a few flights have been added due to a lack of time. I did
manage to take it outside an get it up to around 20 feet a few times. All the outside flights have been
basically in the hover mode, with tail pointing in. Nose in is still in the works, and I'll be doing
all that practice in the garage where there is no wind and a nice smooth floor so tip-overs will not
be a problem. I did replace the main rotor blades because the dings were getting ugly. In the process,
a full balance procedure was performed per the article in the latest edition of Backyard Flyer magazine.
So, now there are strips of clear tape wrapped on the blades to achieve the balance both along the blade
lengths and overall balancing (weight added at the light blade's CG). After adjusting blade tracking,
it was back to a really smooth flight. I finally discovered the source of the squirrliness of the Blade
- the double-sided tape that used to hold the 4-in-1 to the vertical mount was torn loose. Replacing
the tape totally cured the problem. 10-12 minute flights are still the norm on the 650 mAh battery packs.
As of August 28, I have 43 logged flights and everything is working well. Vibration is very minimal
and flights are extremely consistent. All three pushrods have been moved into the inner servo arm holes
to tame down the response, and it makes a big difference, but still leaves a lot of control. The battery
packs both consistently give 10-11 minutes of hover time (I have never done more than slow lateral movements
in my garage). When there is about a minute left on the charge, it is necessary to start feeding in
right tail rotor.
|