|
Seaplanes
have always been a popular topic with modeler and full-size pilots
alike. There's something about watching an airplane take off from
or land on the water that is awe-inspiring. Flying without the constraints
of a narrow runway certainly has its advantages, but there is an
added element of risk with seaplanes because of potential damage
that can be caused by water entering the airframe or even damaging
it. The possibility of drowning, even after making an otherwise
perfect landing, exists for the full-scale pilot, and the modeler
can lose equipment that otherwise might be salvagable. This article
is pretty extensive and give a lot of food for thought concerning
taking on rise-off-water (ROW) operation. I looked up the tail number
(N3763C) of the Cessna 150 shown, but either it has been retired
or it hasn't changed owners in lo these many years. Rx for R.O.
W.
Having covered the floats and hulls in the last issues,
Part II discusses the important aspects of good model airplane design
for water operation. How to waterproof, converting land planes,
taxiing, landing and takeoff of seaplanes. By George
Wilson
Seaplane configurations. |
There are two approaches to seaplanes: 1) Convert a landplane to
a seaplane and, 2) build an airplane which is initially designed
to be a seaplane. Obviously, the latter approach should give the
most satisfactory results. On the other hand, it has been solidly
demonstrated that a landplane with floats added can be an excellent
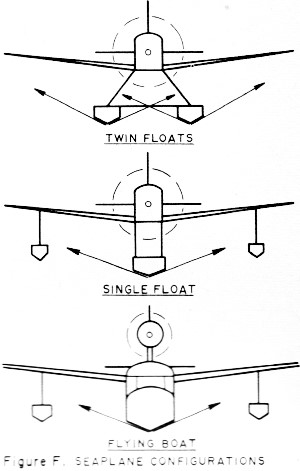
water performer. Seaplane Configurations: The first consideration
is whether to use one or two main floats. A single main float is
easier to build and causes less drag both on water and in the air.
A single main float - on a single-engined airplane - also has the
inherent advantage of minimizing the amount of spray that passes
through the propeller. Figure F shows configurations most frequently
used. Notice the spray paths that are possible during the early
part of takeoff run. At this time it is important that the propeller
devote all its effort to pulling (or pushing) the airplane through
the water. When spray goes through the propeller, power output is
seriously reduced. A seaplane riding on the step will often lose
this position and sink almost back to the waterline because of loss
of speed resulting from a splash of spray. An incidental factor,
is propeller erosion. If wooden props are used they will quickly
loose their tips as a result of water (spray) impinging upon them.
Nylon props appear to withstand this abuse. The superiority
of the single main float design is attested to by its choice for
full scale aircraft. Only on rare occasions such as the Italian
Savoia-Marchetti S-55 has a two pontoon seaplane design been evolved
except for conversion of a landplane to a seaplane. As an
aside for those interested in the engineering and mathematical side
of our hobby, the scale effects of hydraulics are not similar to
those of aerodynamics. In the latter case we have to deal with a
very non-linear situation (Reynold's number) which makes the application
of full-scale data to models completely impractical. The hydraulic
case is essentially linear - the equivalent to Reynold's number
is the Froude number - and, therefore, full-scaled data can be scaled
easily for model use. Another way of saying this is that water will
flow around model floats in the same manner that it flow around
full-scale floats. Airflow around models is quite different than
full-scale, requiring changes in area, dihedral angles, decalage,
etc. Single main floats require support on each side to
prevent the airplane from falling to one side or the other. This
is normally accomplished using "tip floats."

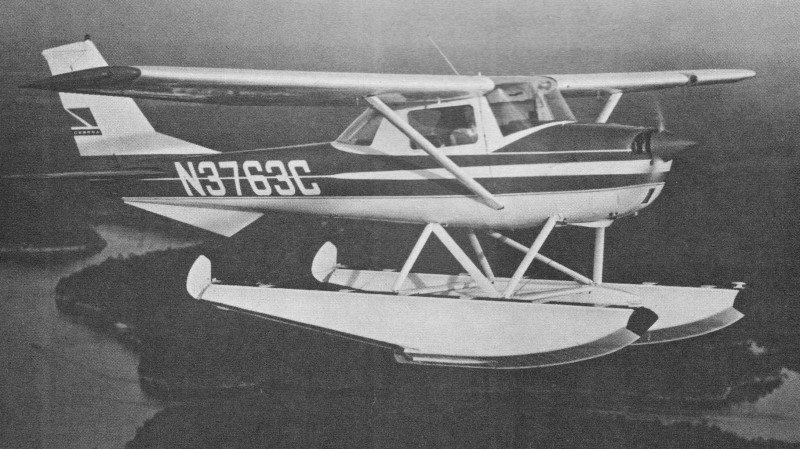
In many respects full-scale experience fits
typical model floatplane requirements- the 1967 Cessna 150 (for
example) on floats.
"Sponsons" attached to the main float have also been used
- like small wings mounted at the waterline, which provide the floatation
necessary to prevent capsizing while floating. Properly designed
sponsons provide some added lift. Sponsons never provide the positive
protection against capsizing that tip floats do. On the other hand,
it could be theorized that they would be less apt to cause "water
looping." As a practical matter, the tendency for seaplanes with
tip floats to water loop is very small. The drag caused by these
floats appear to be small with respect to that of the main float.
Additionally, the inertia of the fuselage and main float helps maintain
a near straight path even when a tip float touches first on landing
or digs in a bit on takeoff. Sponsons can be rigidly attached.
Tip floats should be attached flexibly and must have break-away
capability. All things considered - and perhaps for the basic reasons
that they are more like scale - the author prefers tip floats. It
should be noted here that the same rules apply to tip floats and
sponsons as apply to main floats. In either case their size should
be minimized to reduce drag both in the water and in the air.
Most flying boats make fine landplanes by the addition of
wheels. For temporary usage, these may be attached to the bottom
of the float using rubber bands. Care should be taken to prevent
the gear from marring the under surfaces of the float - a layer
of plastic foam will usually provide the necessary isolation.
Conversion of Landplanes: The easiest way to convert
a landplane is to add floats. The most popular system is to add
a pair of main floats - as is done in most full-scale conversions.
When a low-wing airplane (or biplane) is converted. it appears highly
desirable to consider the use of a single main float with tip floats
under the wings. In either case, three things must be considered:
1) additional fin area. 2) increased power, and 3) waterproofing.
The latter problem will be covered later, but it must be mentioned
here since it is critical to the decision of whether or not a conversion
should be attempted. If you are starting from scratch and not just
adding floats to an existing model, you can handle the waterproofing
properly. On the otherhand, if you are adding floats to an existing
airplane, have a look at the part of the article on waterproofing
before you proceed. It takes more than clipping your receiver in
a plastic bag to do a minimum waterproofing job. There is nothing
quite like a few soaking-wet balsa parts for changing the balance
of a model; or, worse yet, one section of the rudder or elevator
filled with water and not noticed until the model starts stalling
all over the sky shortly after takeoff. Because of the added
weight it will be well to use a little added power. You shouldn't
have to go more than one motor size higher if you use the proper
floats. Your model will tend to fly and take off slower with floats.
For this reason it may be well to try a propeller with less pitch
than you would normally use. Matching airspeed with propeller pitch
is something most of us do to maximize the motor's performance.
However, the choice of propeller should be reviewed as part of the
conversion.
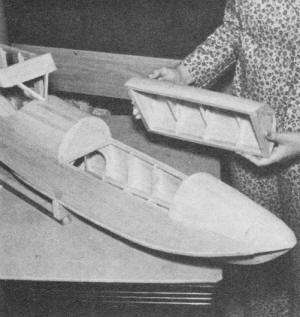
Waterproof hatch construction requires flat surfaces. Seal
it with silastic.
Waterproof toggle switches mounted on the hatch. Switch
on before starting engine.

Floats must be well braced, securely mounted and very durable.
Lots of dope and wax. |
Increased fin area is necessary to compensate for the profile area
added by the floats. The fin, and rudder of any airplane assures
that it will fly in a straight line if none of the control surfaces
are actuated. The basic rule states that the side area of the airplane
behind the center-of-gravity must be greater than the side area
in front of the CG. This is a fancy way of saying that the airplane
is like a weather vane; the area behind the CG makes the airplane
"weathercock" with its nose forward. A "sub-fin" located under the
normal fin and rudder, twin auxiliary fins near the elevator tips,
or auxiliary fins at the end of the float(s) are generally used.
An area about one-third that of the total fin plus rudder area is
generally satisfactory. If the model tends to wobble from
side to side in the glide and is over-sensitive to rudder commands,
additional fin area should be added. Many people agree that a larger
than necessary fin in this type of model is desirable to promote
added directional stability. In "thermal hunters" and airplanes
requiring extreme maneuverability it is not the case. In a seaplane,
inherent stability would appear to be an asset in any case. Although a number of stunts are possible with a seaplane, it is
not an ideal stunt configuration. Most seaplanes have a low CG which
results in what is known as a "pendulum" stability. The fuselage
and floats hang like a pendulum from the wing, It is interesting
to watch some seaplanes when they right themselves after a maneuver;
their lower sections actually swing back and forth like a pendulum.
At high speeds in turns this same pendulum effect can cause excess
banking. A docile airplane like the Seacat can lock itself into
a turn with its wings vertical if a tight, high speed turn is called
for. Once understood, the situation can be guarded against or, if
it happens accidentally, it can be "unwound." One wrong control
can cause a spectacular spiral dive, followed by a large splash.
In the first section of this article the necessity of rigid
float mounts was pointed out. We mention it again here to re-emphasize
importance. It would be a good starting point in your conversion
planning - along with the waterproofing investigation - to assure
yourself that rigid float struts can be added to your particular
model. In most cases no serious problems will be encountered, but
a little far-sighted planning at this stage can avoid disappointment
later. Taxiing the Seaplane: Perhaps the greatest joy in
seaplane flying is the takeoff and landing surface that water provides.
Most important are facts that takeoffs and landings can always be
into the wind and that the water is much softer than the hard ground.
With a water rudder and with the motor at a medium speed your model
seaplane becomes an "air-boat." It can be taxied from the shore
to a good spot for takeoff and, after landing, it can be taxied
back to the place on the shore where you are standing. "Proto" ground
handling in seaplanes is much easier than in landplanes and can
save a great deal of awkward handling in chase boats or wading in
muddy ponds. This can add greatly to your pleasure. Water
rudders can, and should be, small. A six-foot model will handle
well with a rudder 1/2" high and 1 1/2" long. Unlike air, water
is dense and, therefore, a control surface is much more effective
than air rudders of similar area. The rudder should be small to
minimize the water drag it causes. A balanced rudder with about
1/3 of its area in front of the rudder post is desirable, especially
if you are using low-power servos. If you are using rubber-driven
escapements, it is virtually impossible to make them powerful enough
to drive an underwater rudder. Incidentally, don't let this fact
stop you from trying escapement controlled seaplanes. Once up to
speeds where the air rudder becomes effective, a well designed escapement
con-trolled seaplane will handle well on the water and in the air.
Here again, the Sea-cat is an excellent example. Many of these models
have flown very well as originally designed with escapements.
Taxiing should be done at medium speeds - just short of
getting up in the step. At low speeds steering becomes sloppy and
weathervaning becomes a controlling factor. Therefore, at least
three-position motor control is desirable for effective water handling.
Note that with a well chosen medium speed many seaplanes without
water rudders will do a reasonable job of taxiing. In addition
to the water rudder and motor control, several other factors will
influence a seaplane's water handling characteristics. Since airplanes
with high wings tend to catch the wind easily and will weathercock
or actually capsize when broadside to the wind, they tend to have
the poorest water handling characteristics. With them it is often
impossible to turn it into the wind for takeoff, or to taxi back
to the starting point. Any seaplane pilot who has flown high wing
lightplanes on floats will tell of similar problems. One of the
best light seaplanes is the Colonial Skimmer. This plane has a low
profile when on the water; its propeller is well shielded from spray;
and it has won the praise of many pilots. This airplane should make
an excellent scale model seaplane; the plans from a Berkley kit
would be a good starting point. In any case, seaplane flying
is good fun but to get the most from it, water handling characteristics
should be carefully considered. The potentials in this area alone
make land flying relatively unattractive. Waterproofing:
This is one of the most important factors. The subject can be divided
into two major parts: first, waterproofing the seaplane itself and,
second, protecting the radio equipment. In. a well-designed model
seaplane, equipment protection may not be a problem if the airplane
provides water tight compartments for the equipment. If there is
any question about water reaching the equipment, it is best to wrap
it as much as possible in plastic bags closed with rubber bands
looped around the wires going to each unit. Receivers and batteries
lend themselves to this type of waterproofing. On the other hand,
servos do not since they must be mounted to the airframe and must
have both electrical and mechanical connections. It is therefore,
most desirable to design for "watertight" equipment compartments
- if possible. A major consideration in waterproofing is
the kind of water you will be operating from. Fresh water presents
little difficulty. Radio equipment has been thoroughly immersed
in fresh water, then dried carefully without any apparent deterioration.
Salt water is different and immersion should be avoided. If it does
occur, immediate flushing with good clean fresh water is in order,
followed by careful drying, using forced air if possible. Most vacuum
cleaners can be connected to blow rather than suck air. This is
a handy source of warm air for drying. Salt water will corrode all
common metals, including motors, fasteners, control linkages, landing
gear struts, switches, etc. If you fly from salt water, oil or grease
all exposed metal before and after flying and make sure you wipe
the salt water off metal parts as soon as possible after a flight
is made. Motors appear to cause little difficulty - if you
remember to run them immediately after they have been dunked! The
liberal amount of oil in the fuel provides considerable protection.
Motors start quite easily after being submerged and having ingested
water. A few flips of the propeller and a little shaking will remove
most of the water. Running out a prime or two (inserted through
the exhaust port) will cause the remaining water to be thrown out.
A wet motor sometimes starts better than a hot dry motor since the
wet motor is cool and is less liable to quickly boil-off or evaporate
the methanol in the fuel. Most wet motors will restart quickly,
quickly spitting out water, sputtering a bit and then operating
normally, all within a few seconds.
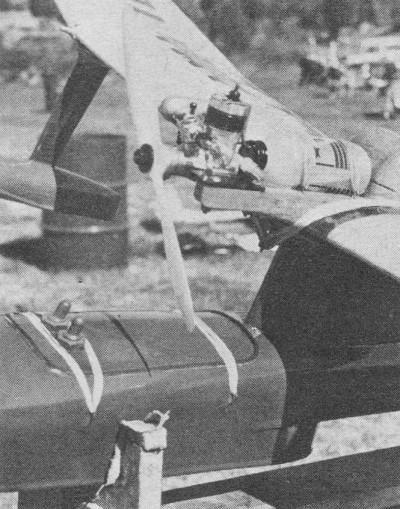
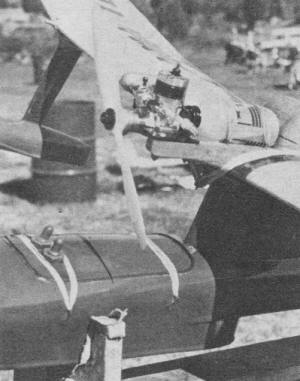
Long nylon pushrod guide keeps water out of fuselage.
|
The most fundamental problem in waterproofing is the plane itself.
The problem is to prevent the airplane from soaking up water. The
immediate effect of absorbing water is to change the balance - particularly
serious when the covering is punctured and water fills some of the
Volume within the structure, such as the Volume between two wing
ribs. And this Volume is quite significant. Because of this
probability it is well to recheck a seaplane's balance several times
during an extended flying session. A secondary problem is that of
drying out the structure (the balsa wood) once it has soaked up
water. Air circulation within the structure is poor. The water and
vapor is trapped, causing the drying process to take a long time.
To lessen the problem seal the inside of the structure, as well
as the outside. The framework should receive at least two coats
of dope, diluted no less than two parts dope to one part thinner.
Spraying will save time, but be sure to apply enough dope to thoroughly
seal the wood. It is desirable to use extra bulkheads in certain
cases to create compartments which are essentially watertight. Typically
this may be done to isolate the rear of a fuselage just in front
of the opening for the elevator. If practical, elevator and wing
openings should be permanently covered for obvious reasons.
As in landplanes the wings and occasionally the elevator of
a seaplane get knocked off. If this happens, the entrance or water
must be prevented. Gasketed covers can be mounted inside the fuselage
at these places, if equipment access through these openings is necessary.
In any case, a gasket should be installed around wing and elevator
openings. Liquid silastic rubber (General Electric "Clear Seal"
for example ) or a closed pore plastic or rubber foam make good
gasket materials.
Silastic
rubber gaskets are formed by applying a generous bead of the material
around the opening, covering it with a layer of Saran Wrap and then
mounting the wing or elevator with elastics, applying enough pressure
to flatten the bead of rubber and making it conform to the surface
of the wing or elevator. The excess rubber that oozes out should
be scraped away immediately; it can be trimmed after curing. but
it takes a real sharp razor edge to do the trick. Most plastic
and rubber foam seems to be the "open pore" type. This simply means
that it acts like a sponge and soaks up water. "Closed pore" sponges
or foams will not soak up liquids. Keep watch for the latter type
of material if you are planning to go the seaplane route. Oil-resistant,
closed-pore, foam-rubber sheet about 1/8" thick is available - if
you can find a place to buy it. This makes fine gaskets when cut
into 1/4" or 3/8" strips. Corners may be mitered and joined with
"Goo" or "Plio-bond." The latter adhesives also may be used to attach
the gasket to one side of the opening. Flat gaskets with
square outlines are desirable, since they can be made easily; and
they seal tightly with a minimum of pressure applied. A fairly simple
method of gasketing hatches in curved surfaces is shown in picture.
Double bulkheads are installed at the front and rear of the section
which will eventually be the hatch. After planking (or covering),
the hatch is cut free and a square gasket seat is installed in the
fuselage and on the bottom of the hatch. There will be slots between
the front and rear of the hatch and the fuselage; these may collect
a little water but this can be quickly removed by pulling the edge
of a rag through the slots. Hatches made in this manner can be held
down using rubber bands and dowels or wire hooks. Openings
required to pass control rods, switch-handle extensions, and similar
devices can best be waterproofed by passing the rod through a fairly
snug piece of metal or plastic tubing for several inches, as it
passes through the skin of the model. Grease may be used in the
tube to assure essentially perfect water seal for all eventualities
short of prolonged submersion. The grease can be omitted in most
cases if corrosion of the rod itself (within the tubing) is not
a problem. If your seaplane has its motor mounted on the
wing, consideration must be given to the installation of the motor
control servo and its leads. It must be possible for the wing to
break loose without breaking leads or leaving an entrance for water.
The recently available nylon tubing/flexible inner cable will allow
new systems to be devised for mounting the servo in the fuselage
and transmitting the control motion via the tube and cable. A break-loose
connection must be included in the tube and cable if this is done.
Another method is to use a slip-clutch-type servo which has an external
amplifier. The servo in this case requires only two leads that may
be connected using snap connections from a couple of old batteries
for a plug and connector that separates with little pull required.
In one case, connections were successfully built into the bottom
of the wing and top of the fuselage. When the wine was mounted,
contact was established via spring loaded fingers in the fuselage
and brass plates on the bottom of the wing. The waterproofing
problem is not half what it seems to be at first glance. The author's
venerable Seacat has now flown for eight years, and only on one
occasion has water entered the hatch in the fuselage. We learned
to fly radio control using this airplane and, needless to say, it
has had many rough landings, including cartwheels, full-speed vertical
dive-ins, nose-overs and others too complicated to describe. In
the one case of leakage, the hatch had not been "dogged" down with
enough rubber bands. CONCLUSIONS: With
small extra effort a well-designed seaplane will fly well. Water
takeoff should occur with ease if the foregoing suggestions are
followed. Briefly, the five points below should be remembered:
- Proper Design of the floats is essential for good takeoffs.
A landplane that flies well can be converted to a seaplane that
flies well. Seaplanes designed for the job will perform best.
- Proper trim of the floats and the airplane overall is essential.
Good design and construction of the float(s) will minimize float
trim problems.
- Rigid float mounts are essential for good takeoffs. Seaplane
floats must be rigidly attached; let the water absorb the landing
and takeoff shocks.
- Sharp chine edges are essential to reducing float drag and
shirring the water cleanly away from the floats.
- Polished float bottoms are essential to reduce float drag
and to let the model slip easily into the air.
- Waterproofing is essential to protect the radio equipment,
to preserve the airplane, and to maintain flight trim.
- A water rudder and motor control is essential to good taxiing
performance which is a major factor in the enjoyment of sea-plane
flying.
Posted May 12, 2013
|