|
Accompanying
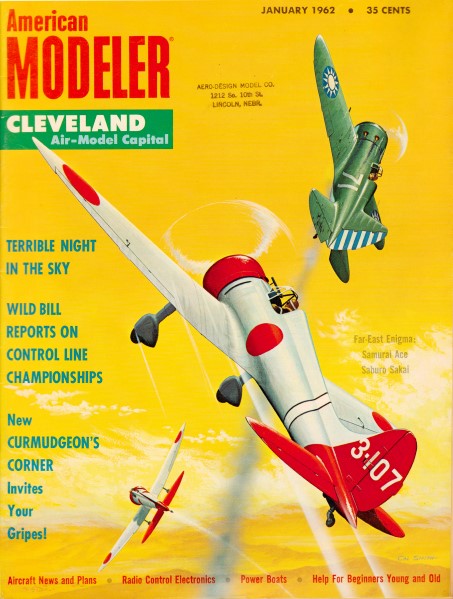
the article "Sakai: Japanese Ace" is a building article with plans
for Sakai's "Claude" airplane. It is designed by none other than
Walter Musciano, with a 36" wingspan for use with an OK Cub .19
engine. The elliptical wing planform is reminiscent of Britain's
beautiful Supermarine Spitfire. There is an interesting arrangement
of three bellcranks used for the control line configuration in order
to accommodate the wing's 3-piece section for dihedral. See
accompanying article, "Sakai:
Jappanese Ace." Another example of
Walter A. Musciano's fine scale detailed plans and construction
article appeared in the December 1947 edition of Air Trails,
for a DC-3 / C-47 titled "Build
Your Own Douglas C-47 World's Most Famous Plane," oh, and "Chance
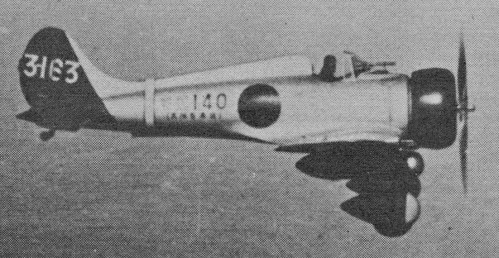
Vought "Corsair" F4U-1a." Sakai's "Claude" Mitsubishi Type
96
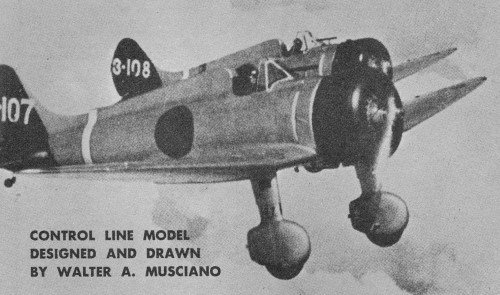
Ensign Sakai in Claude fighter (3-107) with wingman. Full size
drawings for Mitsubishi Type 96 are on Hobby Helpers' group
plan #162 (85 cants, from them).
Ensign Saburo Sakai, the leading living Japanese Ace of the second
world war, is the only one who never lost a wing man during five
years of aerial combat and more than 200 aerial engagements! Sakai
never over-shot a landing or crash-landed any of the fighters he
flew even when man and/or machine sustained extensive damage. Among
his 64 official victories were these planes: Curtiss P-36 and P-40;
Bell P-39; Grumman F4F, F6F and TBF; Lockheed Hudson; Brewster Buffalo;
Boeing B-17 and B-29; North American B-25; Martin B-26; Douglas
SBD.Although Sakai on several occasions shot down four planes
in one day - and three fighters in fifteen seconds - he never received
a decoration from his Government. This pilot saw action over China,
the Philippine Islands, Rabaul, Formosa, Lae, Guadalcanal, Tainan,
Surabaya, plus dozens of other famous battle areas in the South
and Central Pacific. Ensign Sakai has photographs and collaborating
witnesses to indicate that he shot down Captain Colin Kelly's B-17
Flying Fortress. This disputes our wartime claim that Kelly gave
his life by diving into a Japanese battleship! Sakai was
born on a tiny farm near Saga City on the Japanese island of Kyushu
on August 26, 1916. His family belonged to the Samurai class - professional
warriors dedicated to the defense of Japan. In 1929 young
Saburo moved to Tokyo to live with his uncle and attend school.
When 16 he joined the Imperial Japanese Navy and served as an apprentice
seaman on the battleship Kirishima. In 1937, Petty Officer Sakai
was accepted for pilot training, soon designated the outstanding
student pilot of the year, receiving the Emperor's silver watch.
With the rank of Naval Aviation Pilot, Second Class, Sakai went
into action over China flying the standard Japanese Navy Mitsubishi
Type 96 fighter. This is best known by its Allied code name "Claude."
His first victories came when Sakai shot down a Russian-built fighter
and twin-engine bomber. After Dec. 7, 1941, Sakai saw action
as part of the Japanese advance towards Borneo and New Guinea. Now
flying the new Mitsubishi "Zero," his "confirmed" list increased
steadily. Saburo Sakai never wore a parachute because it hindered
his movements in the cockpit. He removed radio equipment from his
plane to increase performance. Most of his fellow pilots followed
this practice - they considered it cowardly to bail out and be taken
prisoner. Any pilot who did not return to his base was presumed
dead. In August 1942 a powerful United States amphibious
force landed on Guadalcanal Island near New Guinea. Sakai was based
on Rabaul 560 miles away. His squadron was ordered to fly to Guadalcanal
and back as bomber escort without stopping to refuel. This was a
rough assignment because it meant that each fighter would fly for
over two hours, attack any intercepting USN "Wildcats," then return
to base - total flying distance, about 1,300 miles. It was customary
for these Jap Navy pilots to carry lunch and a bottle of soda during
such long range assignments. When the squadron took off early
in the morning the rising sun beating through the canopy made Sakai
thirsty. Forgetting that he was at 13,000' Saburo opened his soda
bottle...its pressurized contents sprayed the entire windshield
and his goggles. The cockpit air vent was open and the soda coating
turned into a sticky film. Without water it was impossible to wipe
clear goggles and windshield. Despite this Sakai shot down his 59th
and 60th victims - a Wildcat and a Dauntless during the fighting
over Guadalcanal.
 As
the Ace started back to Rabaul he spotted a formation of eight U.S.
Navy planes through the smeared windshield and identified them as
single-seat Wildcats. He began a surprise attack from below and
to the rear of the formation. As he came within firing range Sakai
found his targets not Wildcats but Avenger torpedo bombers fitted
with rear-firing turrets above and below the fuselage. It was too
late for the Zero pilot to take evasive action when eight .50 caliber
guns began spitting lead. As
the Ace started back to Rabaul he spotted a formation of eight U.S.
Navy planes through the smeared windshield and identified them as
single-seat Wildcats. He began a surprise attack from below and
to the rear of the formation. As he came within firing range Sakai
found his targets not Wildcats but Avenger torpedo bombers fitted
with rear-firing turrets above and below the fuselage. It was too
late for the Zero pilot to take evasive action when eight .50 caliber
guns began spitting lead. Sakai set two Avengers on fire
but the Zero's cockpit canopy was shattered and Sakai felt a stabbing
pain in his ears. Everything turned red and the Ace passed out as
his Zero plunged down through the low overcast. His wingmen followed
him until he disappeared into the clouds. Sakai regained
consciousness but could not see. Instinctively he leveled off, horrified
to find he could not move his left arm or leg. The slipstream biting
at his face through the smashed windshield brought tears to Saburo's
eyes. This enabled him to read his instruments. But blood ran down
his face from a deep head wound. Sakai tried to pack the wound with
first aid bandages but the slipstream ripped them loose. Finally
he dropped to his knees in the cramped cockpit to get out of the
slipstream and stuffed his silk scarf under his helmet. This staunched
the gory flow but then Saburo realized he could see only with his
left eye. Soon drowsiness overtook the homeward bound Sakai.
He would awake with a start to find his Zero skidding out of control
or flying almost inverted. He slapped his swollen face violently
to keep awake. The alternating pain and drowsiness soon took its
toll on the flyer's endurance. He decided to die like a Samurai
by diving into the first American ship he could find rather than
plunge into the lonely Pacific. He flew back to Guadalcanal but
could not locate a victim. So somehow he covered the 560 miles back
to Rabaul. After circling the airstrip four times Sakai made a dead-stick
landing and collapsed as he tried to climb out of the cockpit.
Sakai was hospitalized for months and underwent a series of
operations. During his convalescence he was promoted to Warrant
Officer. Just as the Americans turned the tide and began forcing
the Japanese back toward their home islands, Sakai returned to combat.
Based on Iwo Jima in June 1943 Sakai and his squadron mates waited
for the U.S. assault. When early warning radar spotted American
carrier craft the Zeros climbed to the defense of the tiny island.
In a tremendous dog-fight the one-eyed warrior shot down two Hellcats
then found himself surrounded by 15 of these potent Navy fighters.
He turned, rolled, dived and climbed to 14,000' in an effort to
evade the .50 caliber bullets which seemed to fill the air.
Suddenly he spotted a cloud above the water and dived into it.
This was a storm cloud in which the startled pilot and his Zero
were tossed and tumbled like a leaf in the wind until they emerged
- free of Hellcats. His fighter did not contain a single bullet
hole. As the Japanese forces retreated and our B-29 bombers
began to pound their home islands Sakai was assigned to interceptor
squadrons. He was promoted to Ensign and flew the high-performance
"Raiden." But nothing could stop the Americans and soon the war
was over. The post-war years were a bitter struggle for survival.
Sakai could not find employment. His profession was that of a fighter
pilot. The occupation rules grounded him. He eked out a bare existence
at manual labor. This hard life was too much for his wife. She died
and her illness was attributed to poor diet and unhappy times.
Saburo Sakai along with several widows and brothers of his comrades
who died in the war, now owns and operates a printing shop in Japan.
The personal story of this outstanding pilot is vividly described
in Saburo Sakai's book "Samurai" which was written with the cooperation
of Martin Caidin and Fred Saito. It is published by E.P. Dutton
of N.Y.C. No World War Two air enthusiast should miss it.
The Mitsubishi Type 96 or A5M series Japanese single seat Navy
fighter saw combat service from 1937 through 1942...it was replaced
by the Zero. Allied code name for Type 96 was "Claude." This was
the first service monoplane fighter in the Japanese Naval Air Force.
"Claude" took to the air in 1935 with an inverted gull wing.
Control problems caused abandonment of this feature in favor of
a straight center section. The first production model, the A5M1
Type 96, was fitted with a sliding cockpit canopy. However, test
flyers and fighter pilots complained that the canopy hindered visibility,
so it was discarded. Subsequent engine and armament modifications
resulted in the A5M2a and A5M2b models. These were followed by an
experimental ''V'' type liquid cooled engine powered version which
did not go in production. Third and final production model,
the Mitsubishi A5M4, had a maximum speed of 280 mph powered with
a 710 hp, 9-cylinder, air cooled Kotobuki radial 41 engine. Two
7.7-mm machine guns were fitted in the upper cowl, some also carried
two 66-lb bombs under the wing. The plane could reach 16,400' in
less than 8 minutes. Its airframe was extremely light; loaded weight
was less than 4,000 pounds! Range could be extended through the
use of a streamlined drop tank fabricated from "paper-mache" and
bamboo. The last Type 96 was constructed during 1940; at
that time almost a thousand A5M aircraft were in service. It saw
considerable action in China; during the early campaigns of World
War Two it operated from both land bases and carriers. Our
1" to l' scale copy of Saburo Sakai's "Claude" can be powered by
a glow plug or "diesel" engine from .19 to .35 cubic inch displacement.
The advanced scaler may prefer the smaller power plant for realistic
performance while the novice will find a .29 will produce moderate
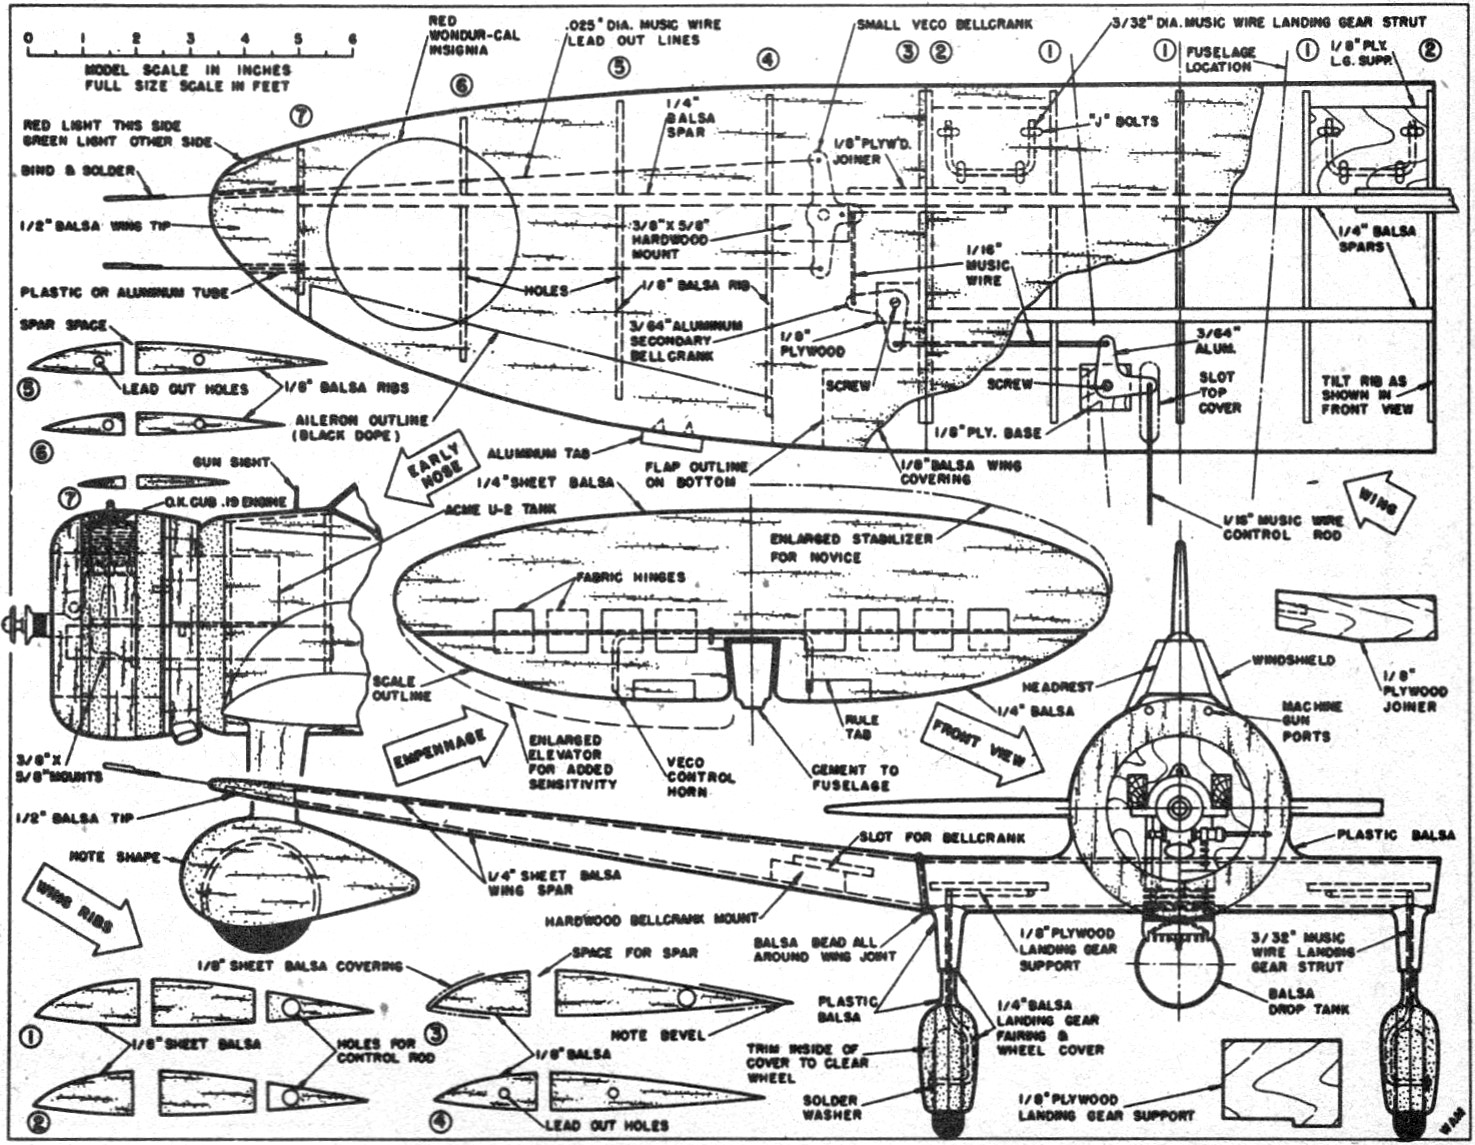
speeds to keep the model out on the lines. Construction begins
with the wing. Although the original wing was three sectioned we
construct ours in one piece to insure adequate strength. Cut spars
and joiners to shape, cement together forming correct dihedral.
Add ribs, when dry cement lower covering to spars and ribs...due
to the dihedral breaks install in three sections. Bend landing
gear struts, attach to plywood supports with "J" bolts. Make hole
in lower covering, slip struts through, then cement supports firmly
to lower covering, ribs and spar. Check for correct l.g. alignment,
apply several cement coats for strength.
To
achieve proper vertical location for bellcrank and not interfere
with standard fuel tank installations, we place it in outer wing
panel. This also hides the lead-out lines. The location means the
addition of two smaller bellcranks to transmit control action through
wing center section into fuselage. Main bellcrank firmly bolts to
hardwood mount which, in turn, is securely cemented to spar. The
two secondary bellcranks, not subjected to high stresses, can be
held in place with small round-head wood screws on a plywood square
cemented to lower covering. A washer goes between bellcranks and
mounts. The bellcrank holes which receive push rods should
fit rods exactly. A sloppy fit will result in erratic controls.
Install control rods, solder washer to ends to hold in place. Run
lead-out lines through holes in ribs. Check controls carefully.
Bevel leading and trailing portions of lower covering to follow
upper curvature of ribs. Cement upper covering to spars, ribs and
beveled portions of lower covering. This is applied in three sections
due to dihedral breaks. Trim where necessary before cementing in
place. Rough shape wing tips, drill holes for lead-out wires. After
inserting plastic tube cement tips in place. Set aside to dry thoroughly.
Sand entire wing smooth with 2/0 sand-paper. Cut keel, cement
in exact center of wing. Cut bulkheads, cement to keel - do not
cement bulkheads "A" through "D" at this time. Pass control rod
through each bulkhead hole as they cement in place. Hardwood
engine mounts cement in holes in bulkheads. Fuel tank is cemented
and wedged in place. Add bulkhead "D" by slipping it over engine
mounts. Add plastic tubing filling, vent, engine feed lines to tank
connections. Tape all tank openings to keep out dust. Trace
and cut tail surfaces. The experienced flyer can use the scale outlines,
but the novice should employ an enlarged stabilizer as illustrated
for additional longitudinal stability. Modelers who want a snappy,
sensitive performer can enlarge the elevators as shown. Attach control
horn to elevator halves. Wrap leading edge with silk or nylon. Hinge
elevator assembly to stab. Cement stab into keel slot. Check alignment.
Connect control rod to horn. Begin with lowermost hole; you
can graduate later to other holes for greater control sensitivity.
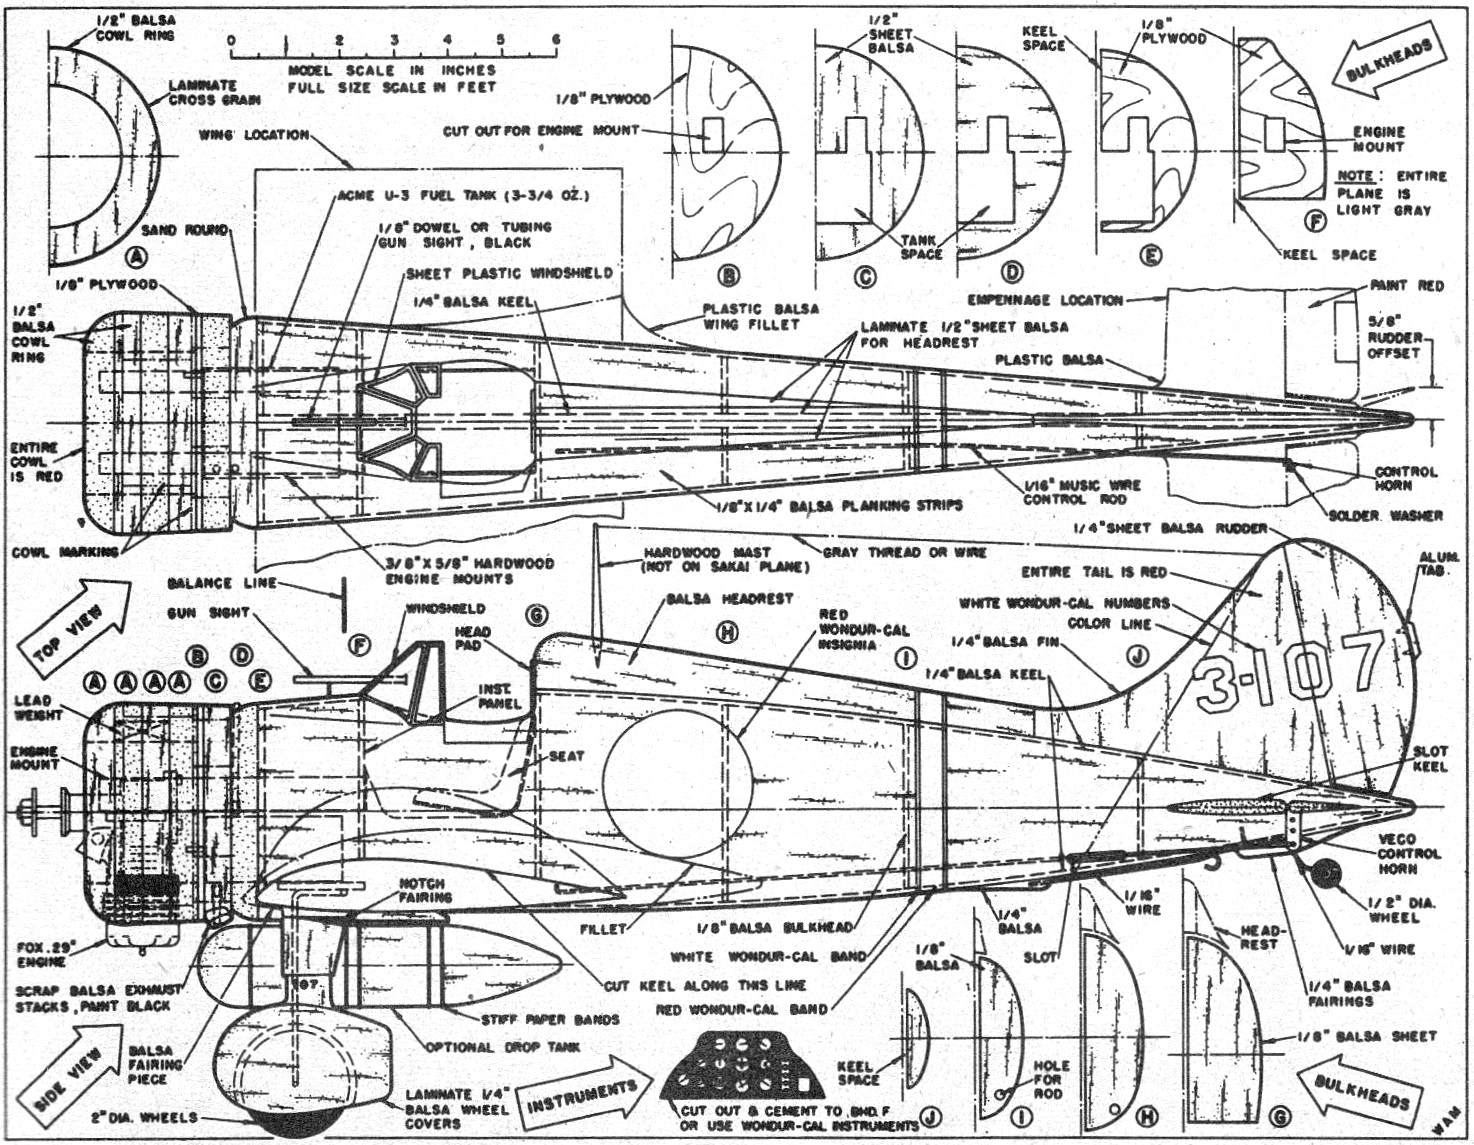
Check operation. Plank entire fuselage with l/8" x l/4" medium
balsa strips. Fill cracks with Plastic Balsa, pressing it in place
with the fingers. Use plenty of cement. When thoroughly dry sandpaper
entire fuselage until it is smooth. Note that balsa bulkhead "D"
is rounded on its forward side. Cut large headrest from three
balsa sheets laminated to obtain width. Shape, then cement to fuselage
top. Form Plastic Balsa fillets to fair headrest into fuselage.
Wing fillets are successive layers of Plastic Balsa shaped with
the fingers. Make oversize so it can be sandpapered to final shape.
Cut and assemble bulkheads "A", "B", and "C". Cement this assembly
to fuselage; smooth with a sanding block. Fin and rudder
are cut, sandpapered, and cemented in place. Note rudder off-set
and how fin fairs into headrest. Add wheels to axles, solder
washer to retain them. Cut wheel fairings and fit over wheels and
struts. Outer pieces must be hollowed slightly for unrestricted
wheel rotation. Inner pieces are cut to clear wheels. A slot for
wire strut holds fairing snugly. When dry, streamline wheel cover
and strut fairing and sand smooth. Cut "V" notch in rear of fairing
to permit wire landing gear to flex without damaging balsa fairing.
Be certain wheels rotate freely. Add tail wheel with struts and
fairings. After final light sandpapering, model is sealed
with Balsa Filler Coat. Brush several liberal coats over entire
plane, sand well after each is thoroughly dry. After fifth or sixth
application, switch to 8/0 wet sandpaper, but do not sand through
to bare wood when using water. Cut cowl engine access hatch.
Apply Balsa Filler Coat to cowl interior, engine mounts and bulkhead.
Engine should be trial fitted and these cowl openings cut out carefully:
exhaust port, needle valve, air intake openings. Seal all bare wood
surfaces. Remove engine to paint model. Plane is all light
grey except cowl and tail surfaces, which are bright red. So paint
the entire model gray, then mask around red portions for painting.
After at least four coats, model should be rubbed to rich luster
with Aero Gloss Rubbing Compound. Windshield can be cut and
bent from single piece of sheet plastic. Make certain fit is exact
before cementing in place. Install seat and instrument panel. Insignia
and markings, cut from red and white Wondur-Cal decal sheets, are
applied as shown. Control outlines and cowl markings are drawn carefully
with thin black dope in a draftsman's inexpensive ruling pen.
Install engine, balance model at point shown. Due to short nose
moment arm it should be necessary to add lead weight to extreme
front of cowl interior for correct balance. Do not fly model if
tail heavy! Use flight lines thirty-five to sixty feet. These must
be at least .012 inches diameter. A smooth flying site is needed
because of wheel location and wheel covers. At touch-down drop tail
quickly to avoid a nose-over.
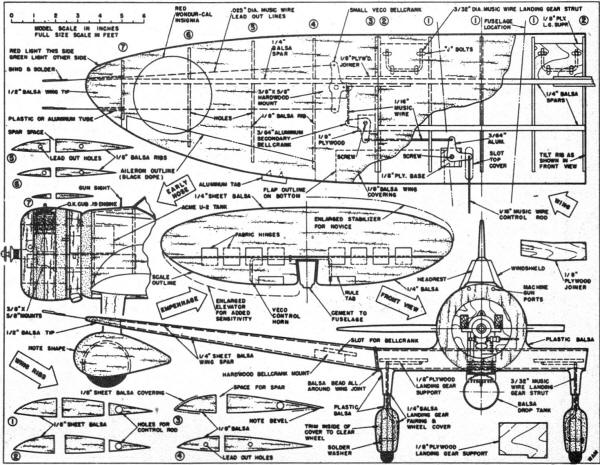
Sakai's "Claude" Mitsubishi Type
96 Plans - Sheet 1
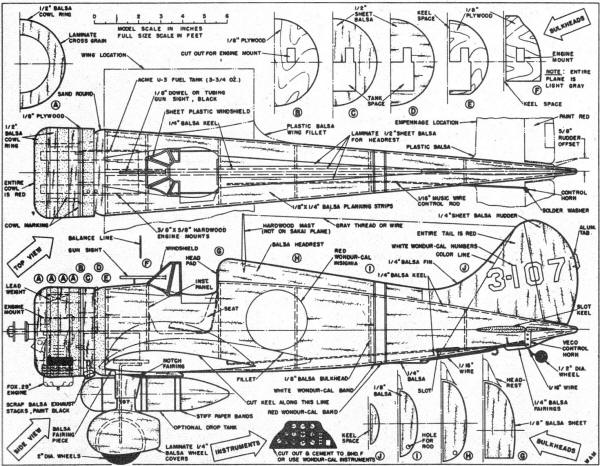
Sakai's "Claude" Mitsubishi Type
96 Plans - Sheet 2Mitsubishi "Claude" Materials (Balsa unless
otherwise noted) One 1/4" x 3" x 36" for fuselage keel; elevator,
spar, stabilizer, rudder, wheel covers; (1) 1/2" x 2" x 36" for
wing tips, head rest, cowl, fuselage former; (4) 1/8" x 3" X 36"
for wing ribs, wing covering, fuselage formers; (12) 1/8" x 1/4"
x 36" for fuselage planking; (1) 1/8" x 6" x 12" plywood for bulkheads,
landing gear supports, joiners, secondary bellcrank foundations;
(1) 3/32" dia. x 18" music wire for landing gear; (1) 1/16" dia.
x 36" music wire for control rods, tall wheel strut; (1) 3/8" x
5/8" x 12" hardwood for engine mounts; bellcrank mount. Miscellaneous:
8 oz. Aero Gloss Balsa Filler Coat; 4 oz. Aero Gloss Light Grey
dope; 2 oz. Aero Gloss Stearman Red Dope; can Aero Gloss Rubbing
Compound; 1/0, 2/0, 3/0, and 8/0 wet sandpaper; bellcrank and horn;
Acme fuel tank; medium size plastic tubing; straight pins; large
tube Ambroid cement; red and white Wondur-Cal decal sheets; 3/64"
thick aluminum sheet for secondary bellcranks.
AcknowledgmentThe author
thanks Ed Ferko and Martin Caldin for their kind cooperation which
made this article possible.
Posted April 28, 2013
|