|
Here is the article and plans
for the "Insect" that I electronically scanned from my purchased copy of the April
1970 American Aircraft Modeler magazine.
Rogallo Wings
were all the rage in the 1970s as hang gliding was really gaining in popularity,
so the modeling world joined in the fun. An article for the R/C
Flexi-Flier, complete
with a G.I. Joe pilot, was published four years after this free flight model. Plans
for this fine model were drawn by Bill Warner. Because they spanned two pages, I
had to adjust the size and alignment a bit to get the halves to line up properly.
They were printed full-size in the magazine, so to get the right size when printing,
you will need to do some trial and error. There really is no need to even print
plans, because dimensions for the parasol components are shown, and the remaining
few pieces can be scaled accordingly.
Insect
Watch out - it's really thermal happy!
Harold W. Warner
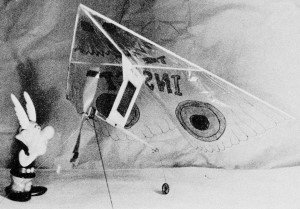
Chrome Mylar flasher on pylon makes model visible when 600 feet
in air. This Insect flew for 7'/2 minutes.
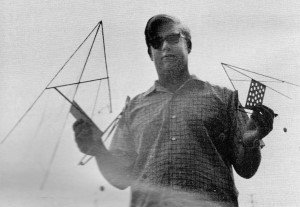
Bill Watson holds his own flying-wing type model in right hand,
author's Insect in left. Holes in pylon were punched two at a time until correct
power turn obtained. Big pylon overcomes left turn due to prop torque.
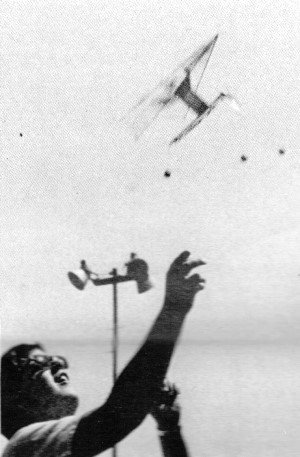
Watson launches Insect No. 3 for power climb on 5/32" Pirelli
rubber.
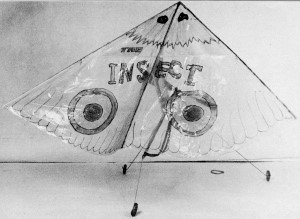
Rear view of No. 3 shows markings which make it so impressive
in flight. Use Marks-A-Lot felt pens of different colors.
THE 135 degree sand, and the sharp weed stubble having just about finished the soles
of my bare feet, I thought to myself, "This is a real Tenderfoot project." I had
just retrieved Insect No.3 from a 7½-minute flight across the Los Angeles River.
(The original model, using a 10" loop of Pirelli rubber vanished 2,000 feet high
after 14 minutes. -Editor.) My shoes, left on the bank for easier fording, had disappeared
when I returned, precious thermal-riding Insect in hand. The difficulty of explaining
this to my wife as I limped home was almost as hard as explaining to the uninitiated
why such a simple flying machine could do such fantastic things!
The Insect was developed as a Rogallo-Wing demonstration for a class I was teaching
in Flying Machines at the junior high school level. It grew out of Ron Moulton's
"Project Parasol" in Aeromodeller and an excellent article in the 1964-5
Zaic Annual by John Worth. The Rogallo-Wing (parawing, sailwing, flex-wing) was
tested by NASA with an eye to space vehicle re-entry, but really makes a bang-up
crowd-pleaser which gives a high return on your investment!
The secret of this machine is the proper center-of-gravity (CG) location. Many
modelers forget that the center of gravity is a three-dimensional thing and not
just a point on the wing where you balance your Piper Cub "front-to-back." Actually,
the CG is the point where the model balances in any direction, and the vertical
or "up-down" position must be taken into account on the Rogallo-wing design. A lower
CG tends to give the same anti-stall effect as a forward CG, and is obtained through
the use of long landing gear with wheels or clay a long way below the fuselage.
The landing gear can be made shorter, but you will have to use heavier wheels to
compensate and keep the CG where it belongs: on the thrust-line (right where the
rubber motor goes).
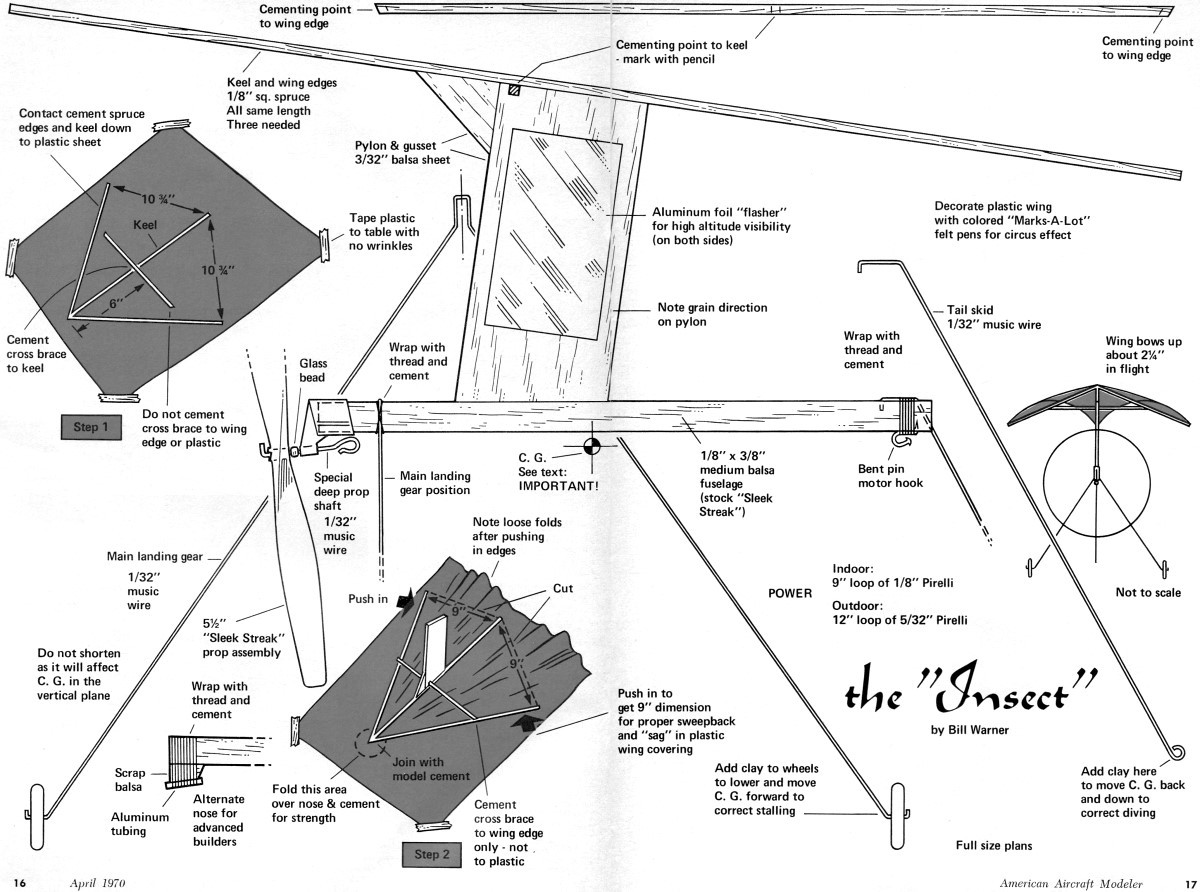
Building the Insect is super-simple. The flexible wing is begun by taping one
layer of thin dry-cleaner bag to a table top. Actually, you may save time by making
a pattern and placing it underneath, to guide you in contact-cementing the keel
and sides in the right places. Cut three 1/8" sq. spruce sticks and contact cement
them onto the plastic in the arrowhead shape shown in Fig. 1.
Cut the cross brace from the same material and cement with Ambroid or other quality
model cement to the keel (center stick.) Do not cement it to the plastic or to the
wing edges - just keep it at right angles to the keel while it dries. Cut the pylon
and gusset from soft sheet, keeping grain direction as per plan. Cement pylon assembly
to keel as in Fig. 2, then take it off the keel, and let cement dry. This pre-coat
is important for a strong butt-joint. Glue it on again; make sure it does not lean
to the side while drying (a baby-food jar block on each side works fine for this).
In about a half hour, finish wing by untaping plastic and moving wing-edges into
the 9" dimension shown in Fig. 2 and cementing cross-brace to edges (but not to
plastic.) Trim excess plastic, leaving a bit at the nose to fold over for extra
strength. Remember, contact cement sticks plastic on, but Ambroid doesn't.
You can build your own fuselage or use one from a North Pacific "Sleek Streek"
cheapie flyer. The prop assembly from this plane works O.K., but bending a deeper
prop shaft and putting in a glass bead will keep rubber from climbing off the motor
hook and will cut friction and wear to a minimum. If you use the stock front end,
be sure and oil the shaft, use shorter motors, and keep rubber lube away from the
hook. A bent pin hook works better than the staple you get with the Sleek Streek
for keeping the rear of the motor in place.
Bend 1/32" diameter music wire landing gear and thread-wrap, rubbing cement generously
into the wrapped area. Wheels are also from the Sleek-Streek. Now give your cannibalized
Sleek-Streek kit to the neigh-bor kid who will make an unsuccessful glider out of
the parts that are left. All that remains is to mount the pylon on the fuselage,
taking care to "double-glue" it for strength as before.
Decoration of your Insect is up to you. Felt permanent marking pens do a nice
job on the plastic for a colorful, transparent color scheme. Chrome mylar tape was
used on the pylon sides and propeller tips for visibility when the insect is over
500' up. You'll need them on those good thermal days.
Test fly your Insect on about a 9" loop of 1/8" Pirelli rubber lubed with glycerin.
Wound from the rear with a bent nail in a hand drill, about 100 turns should do
to start with. You can build up gradually each flight if the Insect flies well.
Should the Insect stall or loop over the top, add a .little clay to each front wheel.
If it dives sharply or refuses to climb, add a little to the tailskid.
A tendency to dive in to the left under power may be corrected by bending a little
right-thrust into the nose-piece which will pull in the opposite direction from
the dive side. Also check that the pylon is on straight. If the pylon is twisted,
it may be necessary to steam it and twist it in the opposite direction. If the Insect
persists in diving after all your efforts have failed, bend the keel slightly up
ahead of the pylon (it may have warped downward).
In general, a launch with the nose slightly up is desirable, but under high power,
the nose pointing straight up works best.
A high-performance Insect can be made by reducing weight wherever possible by
using lighter materials - 5/32" Pirelli will give a real climb! If the Insect does
aero-batics under high power, try a longer mo-tor, less-powerful motor, adding clay
to the wheels, giving the wing edges more sweep-back angle for more stability (at
the cost of lift). Adding clay judiciously to one wheel or the other works wonders.
Be sure and put your phone number on your Insect if you want it back! If you
want to try designing your own Rogallo-wing and don't like guessing, John Worth
has worked it all out for you in the 1964-5 Zaic Yearbook available from: Model
Aeronautic Publications, Box No. 135, Northridge, Calif. 91324.

<click for larger version>
Notice:
The AMA Plans Service offers a
full-size version of many of the plans show here at a very reasonable cost. They
will scale the plans any size for you. It is always best to buy printed plans because
my scanner versions often have distortions that can cause parts to fit poorly. Purchasing
plans also help to support the operation of the
Academy of Model Aeronautics - the #1
advocate for model aviation throughout the world. If the AMA no longer has this
plan on file, I will be glad to send you my higher resolution version.
Try my Scale Calculator for
Model Airplane Plans.
Posted May 3, 2023
(updated from original post
on 6/11/2011)
|