|
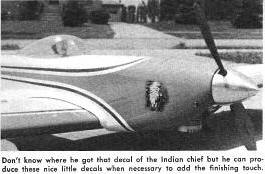
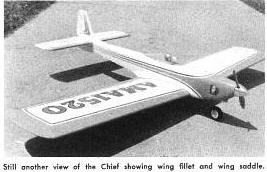
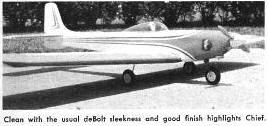
This article of the famous Harold
deBolt Chief appeared in the February 1967 edition of Model Airplane News. All copyrights
(if any) are hereby acknowledged. You might be able to buy full-size plans from the
MAN plans service.
deBolt Chief
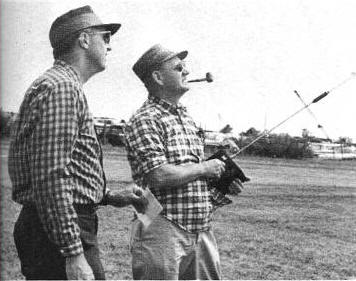
By Harold deBolt
Another outstanding multi contest plane from the very productive and accomplished
drawing board of modeling's top designers. It's good reading as Pappy is not a bit reluctant
to admit that he can make errors like any of us.
I wonder if many of you, like me, have had a frustrating airplane that just does not
come out the way that you had it dreamed up. With me it usually is one in which I have
put more effort, time and sometimes money; it almost seems as though you try too hard!
To some extent the Chief was just that sort of airplane and yet this time the plague
did not hold true, at least not until the end. It is true that I missed the design goal
by a big margin and pulled a classic boo-boo during the construction but it is the result
of these miscues and the lesson learned that makes an interesting story!
 Actually, the Chief
is the combined effort of Ed Keck and myself. Last winter, we got into model talk and
decided that we needed a good-looking contest-type stunt airplane competitive in any
contest. However, it had to have one more feature and this was to be paramount in its
design: it must be of the "quick build" type, somehow we had to take the work out without
spoiling the looks or performance. Having just come off a commercial project which had
as its feature "quick assembly," all sorts of ideas were still floating around in my
mind. Hence the idea of the Chief was most acceptable to me. Now that several of these
models have been built and proven successful, it does seem like a right smart idea, so
if you are a lazy type and still want a good contest machine, the Chief may just fill
the bill. Actually, the Chief
is the combined effort of Ed Keck and myself. Last winter, we got into model talk and
decided that we needed a good-looking contest-type stunt airplane competitive in any
contest. However, it had to have one more feature and this was to be paramount in its
design: it must be of the "quick build" type, somehow we had to take the work out without
spoiling the looks or performance. Having just come off a commercial project which had
as its feature "quick assembly," all sorts of ideas were still floating around in my
mind. Hence the idea of the Chief was most acceptable to me. Now that several of these
models have been built and proven successful, it does seem like a right smart idea, so
if you are a lazy type and still want a good contest machine, the Chief may just fill
the bill.
Try out my Scale Calculator
for Model Airplane Plans.
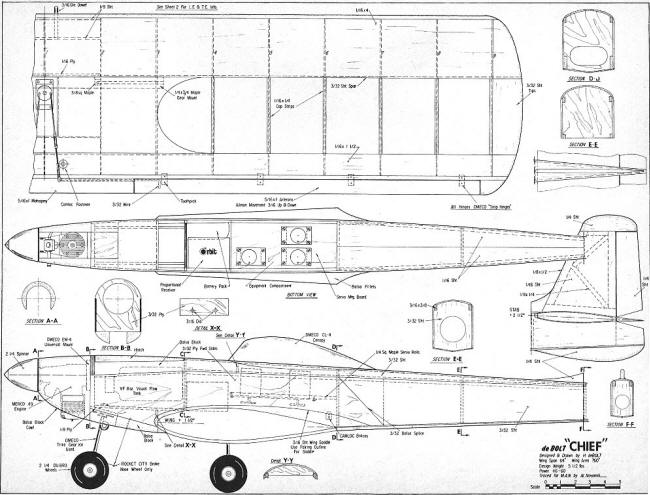
<click for larger version>
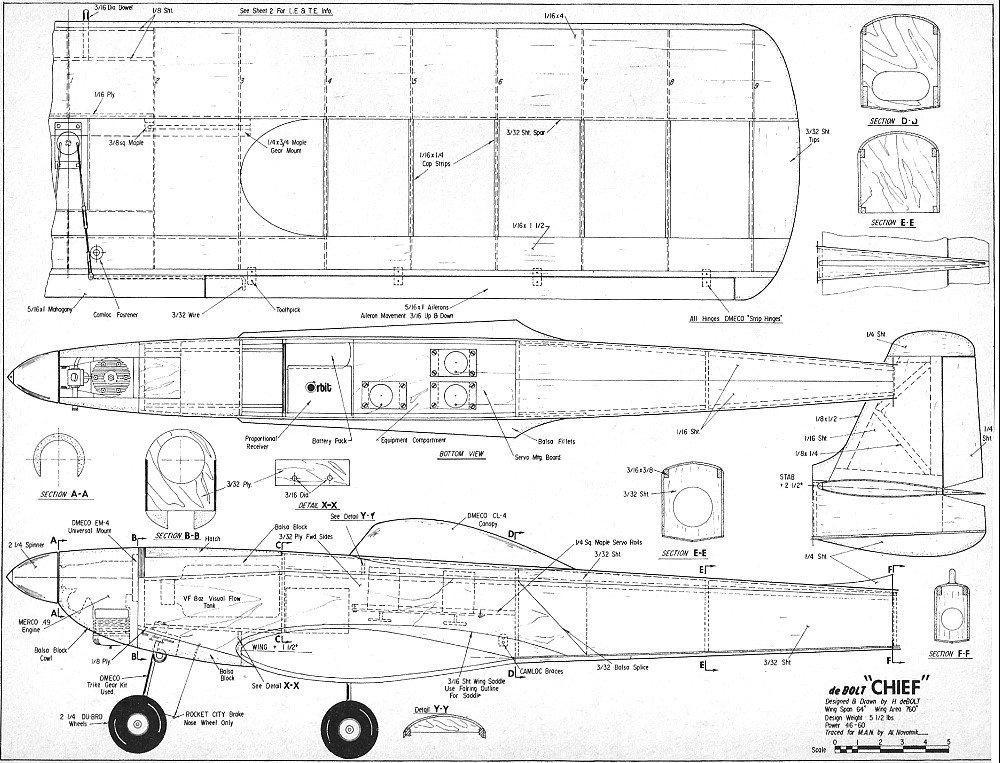
 The most interesting part of the
design, in addition to its performance, is the construction used. Let's go over the methods
and see if you get the message. In building a model the most time consuming is the making
of the various parts which must be sub-assembled. By comparison the final assembly is
much shorter. With this in mind the number of parts in the Chief is reduced to a minimum
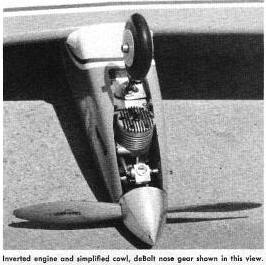
and all sorts of "cute" tricks are used to accomplish this. Just one example: the design
has a neatly cow led engine, in most models a cowl of this sort is composed of many pieces
all cut and fitted so as to get the final result. In the Chief, this cowl is but ONE
piece and NO cutting or fitting is required to get it ready to carve to shape! Carry
this theme throughout the model and you carve big chunks out of the building time. The
fuselage is well streamlined and yet no more work than one of a boxy nature. This is
accomplished by using plywood for the forward fuselage sides and radially mounting the
engine. The plywood removes all need for doublers and reinforcements while at the same
time acting as the The most interesting part of the
design, in addition to its performance, is the construction used. Let's go over the methods
and see if you get the message. In building a model the most time consuming is the making
of the various parts which must be sub-assembled. By comparison the final assembly is
much shorter. With this in mind the number of parts in the Chief is reduced to a minimum
and all sorts of "cute" tricks are used to accomplish this. Just one example: the design
has a neatly cow led engine, in most models a cowl of this sort is composed of many pieces
all cut and fitted so as to get the final result. In the Chief, this cowl is but ONE
piece and NO cutting or fitting is required to get it ready to carve to shape! Carry
this theme throughout the model and you carve big chunks out of the building time. The
fuselage is well streamlined and yet no more work than one of a boxy nature. This is
accomplished by using plywood for the forward fuselage sides and radially mounting the
engine. The plywood removes all need for doublers and reinforcements while at the same
time acting as the
 engine and servo mounts. There are
few bulkheads and the nicely curved top is simple sheet balsa bent into place, DO tedious
block carving to do! The secret of the cowl is that it starts as a solid block into which
you band saw a "key hole." The round portion of this hole is a good fit for the round
radial mounting plate and the slot portion is sized to the engine's cylinder. To align
the cowl to the fuselage, simply bolt the engine mounting plate to the firewall and use
this and the key hole in the block to align things when cementing the block to the firewall.
Imagine, no cutting or fitting required! engine and servo mounts. There are
few bulkheads and the nicely curved top is simple sheet balsa bent into place, DO tedious
block carving to do! The secret of the cowl is that it starts as a solid block into which
you band saw a "key hole." The round portion of this hole is a good fit for the round
radial mounting plate and the slot portion is sized to the engine's cylinder. To align
the cowl to the fuselage, simply bolt the engine mounting plate to the firewall and use
this and the key hole in the block to align things when cementing the block to the firewall.
Imagine, no cutting or fitting required!
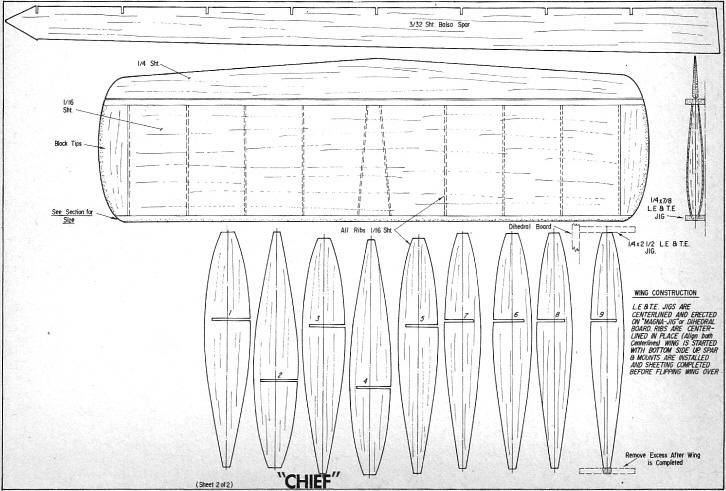
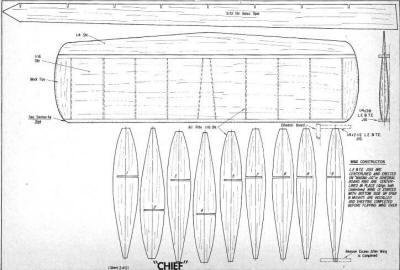
 The wing construction is a further
development of ideas aimed at producing a really fine wing with a minimum of parts and
jigging. I don't think that the internal structure could be more simple, you have a leading
and trailing edge which also acts as a jig, a single sheet balsa spar and the ribs. Do
you agree that this is just about the bare minimum? You might call it an "egg crate"
construction inasmuch as the ribs are notched to take the spar and in turn the spar is
notched to receive and align the ribs. No fancy jig is required to assemble this symmetrical
wing as the leading and trailing edges act as a jig. A dihedral board or Magna-Jig is
helpful but a good flat bench top will do. Using a dihedral board, it is set up at the
required angle so that the
 wing can be built with the bottom
side up, in one piece so to speak. Note that the leading and trailing edges are both
the same width and oversize so that they are wider than the thickest portion of the wing. wing can be built with the bottom
side up, in one piece so to speak. Note that the leading and trailing edges are both
the same width and oversize so that they are wider than the thickest portion of the wing.
It is a simple matter to draw a center line on them and then mark rib locations, then
they are erected on the dihedral board so as to match the planform of the wing. Center
lines are also drawn on the ribs and these can be cemented in their place between the
edges. With the basic wing started and aligned, it becomes a simple matter to add the
spar and various mounts. After adding bottom sheeting, the wing is flipped over and the
top sheeted one half at a time using the leading and trailing edges once more to ascertain
the alignment. Not only is a wing like this simple to build but it will also amaze you
with its lightness and strength.
The tail is handled in much the same way as the wing, except without the various mounts,
etc. it is only a simple hour's job to assemble. So, you might say, if the model is really
a "quick build" type, what about the aerodynamics and performance? I could say that I
started out with some wonderful new ideas and incorporated them all into this one design
and as a result, the performance is amazing! Unfortunately I cannot, what really happened
was that with so much effort being put into construction speed, I had little time to
think of aerodynamics and simply laid it out in a straight forward and normal way. Unfortunately,
I suppose, but to the benefit of my information or fund of knowledge, I made two mistakes
between the drafting table and the flying field and this is where the story can be interesting.
First,
the design was laid out with data accumulated from the use of an analog radio and its
servos. I did not have a digital system and did not realize that digital servos are much
heavier than the analog type. As a matter of fact, I never gave it a thought until the
first time I set the finished model on the floor and watched the tail drop so hard that
it could have damaged it. Simply put, with digital servos mounted in the normal analog
position, it was so darned tail-heavy that it was pitiful!
What to do now? I am rushing to get ready for a big meet and all my blood, sweat and
midnight oil have done nothing but produce what appears to be a tail-heavy pig. Perhaps
you have been at a similar point yourself, completely frustrated by something you know
just will not work and at the same till1e as mad as a hornet at your stupidity! My decision
was far from academic, I built this stupid thing and by golly I would fly it, tail-heavy
and all! Being the real cute type I figured that I would outsmart it so I screwed in
some down trim in the elevator for neutral, adjusted the transmitter so lots more was
available if needed, found the heaviest spinner that I could and installed it. Thinking
that when this heavy-tailed bird got into the air, it would act just as terrible as I
expected it to but at least 1 would be ready for it!
At the flying field I began to wonder just what sort of nut I was turning out to be;
here I am with much bard labor and all my hopes for contest flying tied up in a bird
which my past experience tells me is going to be a wild one at best. Most of my thoughts
told me to go home and fix it you darned fool, you know it's no good as is. However,
my "cute trick" ego overcame my good sense and I decided it was worth one good try at
least.
In short, I got the engine fired up and things checked out and nothing left to do
but bust it. We have a field with at least a 300 ft. runway and a normal multi takes
about half this to get off. In this case, I was prepared for much less. Letting the Chief
go at full bore I watched it reach the half-way point without the slightest indication
of a lift off so naturally, started adding up elevator to do the trick. Can you imagine
how dumb founded I was when it charged right off the end of the runway with full up and
all and proceeded to thrash around in the weeds? My first thought was that Dunham's stupid
radio was not working but a thorough check showed I could not blame it onto him. What
to do now, I am full of mixed emotions; happy that it did not take off like a tail-heavy
pig should and yet full of wonder as to why it did not!
Like any other darn fool there is nothing else to do but try again. This time we removed
some of the down trim, almost bring the elevator to neutral. Another mad dash down the
runway and this time full up breaks it off and into the air, only thing is that on relaxing
the up it plops right back down again and off into those weeds! The Gods must have been
with us for in spite of how hard we tried it was still in one piece. We seem to have
found one secret at least, it doesn't like down trim .... So neutralized the elevator
and had another go at it. This time full up gets us into the air and into a decent climb
angle, wow may be we got it now ... Only problem is that when up is released, it wants
to do an outside loop and there just is no room for that! Man, if you have not had the
experience and want your heart to have a good test try flying one of these hot birds
around on full up elevator for neutral, the only thing it wants to do is go down and
you just know that if you chop the engine to land it that up is not going to be enough!
Like everything else the moment of truth has to come at some time and so it was here,
the bushel basket was made ready and the model flown into the approach pattern. However,
when the engine was throttled instead of the nose pointing to hell like a home sick sinner
it came up into a gentle glide approach and we did a beautiful job of completely overshooting
the runway!
This thing just does nothing according to the book!
About 3 corn-cobs-full later, I get up enough nerve to have another crack at it and
this time the heavy spinner comes off and a little up trim is screwed in. Another dash
down the runway and this time the blooming thing acts completely normal, a touch of up
breaks it off and neutral is a sweet climb out. Who could ask for more?
A couple of laps around the field and this bird actually feels real good, no tendency
at all to change from whatever attitude you put it in. A few maneuvers are tried and
10 and behold those loops track as if it was on rails. One roll goes well and 3 are on
a string, next thought is, let's get this foolish thing down before my mind gets so confused
that I forget how! Again when the engine is throttled, the nose comes up to level flight
and it is or seems to be floating like a free flight so let's set up a landing approach
for something which is going to come in slow and easy like. Except that when it makes
the runway you find that the glide is not only flat as you thought but it is also fast
and penetrating into the wind; result is a wave off and another try. Same thing all over
so the Question now is how the devil to get it down in one piece so that we can take
a good look at what we got and just maybe find some answers. As it turned out I guess
we were lucky for the engine quit too far out and we really had to stretch it in, with
the squeezing for distance we got to dragging it in and the nose high attitude produced
the drag needed and this proved to be the speed reducer required for a neat landing.
At this point we did what we should have done an hour before, put the stupid thing
in the car and headed for home to give it a complete check out. Only thing being that
we rode home knowing that we had something much different from normal and with a performance
that anyone could not help but like!
The check out of the C.G. and wing and tail angles was shocking to say the least and
very different from anything I had seen before. It was hard to believe but after several
double checks and much thinking about what was done while building it we had to believe
it. Then, too when you put all the figures into your old com cob, the resulting smoke
explained a lot of things and the reason. for it all became clear and most interesting.
Here are the figures and the reason for the wrong tail angle: The balance point and
C.G. were at 45% which is a good 1½" back of the design point. Caused, of course, by
the heavier servos. The wing was at the correct angle of 1½ degrees, cheers for that!
However the stabilizer was another story. I recalled that I cut in the stabilizer saddle
using the rib template called for on the drawings but when I built the stabilizer I cheated
and used some other ribs which had already been cut out. Now when the stab was checked
against the saddle it did not fit but some minor changes had dropped it into place. Only
catch was that the resulting angle had not been checked! So, previous experience and
the drawings called for a stabilizer angle of 2 degrees which always works well with
the wing at 1½ degrees, however the after flight check out showed the angle to be 3 degrees
instead, one degree more than normally needed! How much bigger boo-boo can a guy make!
Somehow I had pulled two unforgivable goofs and lucked out like a Mexican bandit! More
important I learned how great inventions are made. most scientifically of course ...
Some might say that I am getting careless in my old age and this arrangement would
indicate that it is true, however some say that from every mistake a lesson is learned.
Frankly, this airplane, after serious test flights, proved to be the finest maneuvering
machine I have ever owned, it seemed down right automatic when it came to precision acrobatics,
just pull the stick and watch them groove. Not only did it tracked by itself but did
it so effortlessly that you would hardly believe it. In other words, no matter how you
cut the mustard it was a better performing machine than many others. Now that I have
seen the same airplane fly with more normal force setups. I have to say that the so-called
"goofed one" was considerably better! The nose up tendency on low engine appeared to
be a problem at first as described, however as more time was logged, it soon became apparent
that it was only a matter of breaking old habits and learning a new landing method. There
was no problem, once the landings were practiced with the anticipation of a flat penetrating
glide, they came very easily in fact.
Ed Keek's version came out tail-heavy same, as mine only he was smart enough to set
his stabilizer on at the correct design angle. As you might guess, his plane flew just
as any other tail-heavy bird and scared the pants off of him by darn near looping on
his first take-off! It now handles very well after moving the R/C gear as far forward
as possible and adding ballast to the nose.
I finished mine off very neatly on my first flight attempt at Dayton, last year, somehow
I managed to completely confuse myself and wound up in a split "S" which terminated half
way to China I guess. Sure was an unfortunate end to a brand new and exciting aircraft.
(People tell me Pappy had a perfect score at the time he dinged it-Ed.)
To get ready for the Nats, I built a similar type but did not have the guts to use
the same force setup again. This one had the normal arrangement mentioned and by juggling
equipment around, the C.G. was at 35% per design. Now, this is a mighty fine design and
will perform with the best of them. pilot willing of course, but somehow the "goofed
job" had that little bit more that makes a real exciting competition machine.
If you are the type who enjoys something different and are looking for a quicker built
competition type, give the Chief a try. I feel sure that you will be as surprised as
I was! See you at the next contest!
 (click for larger version)
Notice:
The AMA Plans Service offers a
full-size version of many of the plans show here at a very reasonable cost. They
will scale the plans any size for you. It is always best to buy printed plans because
my scanner versions often have distortions that can cause parts to fit poorly. Purchasing
plans also help to support the operation of the
Academy of Model Aeronautics - the #1
advocate for model aviation throughout the world. If the AMA no longer has this
plan on file, I will be glad to send you my higher resolution version.
Try my Scale Calculator for
Model Airplane Plans.
|