One of the advantages of publishing a website like AirplanesAndRockets.com is
that occasionally I get contacted by modelers of exceptional skill and, sometimes,
renown within the modeling universe. Such was the case recently when Mr. Steven Krick (a USAF jet engine mechanic many moons ago) wrote to ask a question about my method for applying Silkspan on an open frame
area on a vintage Berkeley
Privateer seaplane model. After receiving my response, he mentioned his other
model airplane building aspect - that of highly detailed plastic scale kits like
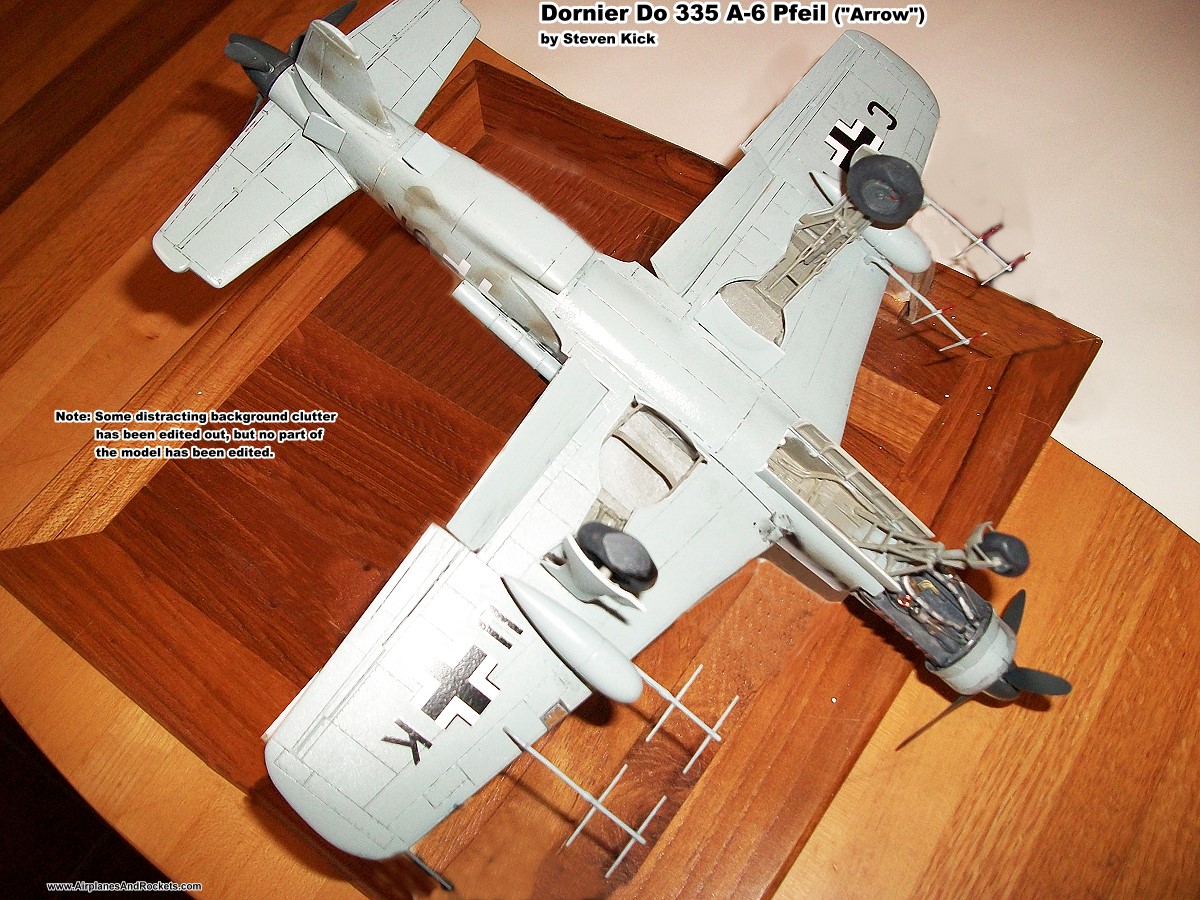
this Dornier Do-335 A-6, a World War II era twin engine craft in
a pusher-tractor configuration. According to the Wikipedia entry on the
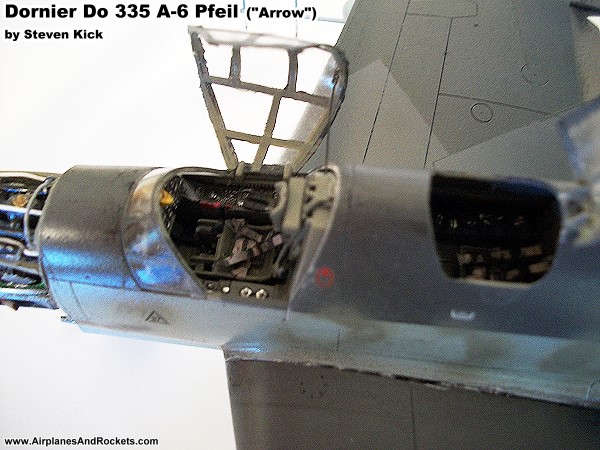
Do-335, the "A-6" version was a "two-seat night fighter aircraft,
with completely separate second cockpit located above and behind the original."
A few years back at the Erie International Airport, there was an extensive display
of more than 100 plastic models - all built by the same guy - with a high level
of scale detail. It included planes from many nations, both military and civil,
from all eras of aviation. To my critical but unqualified (as a judge) eyes, Steve's
work easily equals or exceeds those museum quality models. He is an unapologetic
"kit basher" who modifies the original models to conform to specific versions of
the real aircraft. One of the most obvious examples here are the multi-element
antennas installed on the wings. These were part of a special configuration
used, per Steve's story (below) to train RIO (radio intelligence operations) personnel.
Here is the text Steve included along with his photos:
After some delay, and a 35 year hiatus, the Do 335 A-6 (V-10) is ready for
it's debut. This has been quite an adventure, and my sincere thanks to all who made
it possible.
A Word About the A-6
Since we professional modelers continually strive for perfection, a bit of A-6
history is in order. What we know for certain is that at the end of the war, the
A-6 was found at the Heinkel factory in Vienna-Swechat, in Austria.
The Werke No. was 230010, the Primary Identification (Stammkennzeichen) was CP+UK,
the Versuch (Experimental) is V-10, and, in mid 1944, the V nummer [German "number"]
became the Muster (model) nummer (favored by the Austrians), or M-10. The aircraft
never was airborne, as it was waiting for the radars to be installed. You will note
on my ship the tail code 010, and the number 10 on the ventral vertical stabilizer.
Where did that come from? Ha!
Now things really get confusing. According to Monogram Monarch #2, the Do 335
(by three authors), the V-6 was a two-seater, but the RIO spot was enclosed by a
low drag canopy. According the William Green, in "Warplanes of the Third Reich,"
the V-6 was a two-seater, but with the distinctive "hump back" of the V-11 and V-12
trainers. The guy who sent we this info knows who you are. My guess is that Monogram
used the detail drawing in Green's book for their model of the A-6 (V-10).
Therefore, since the aircraft never flew, and since there is some dispute as
to what this actually looked like, I have taken some liberties with the model. I
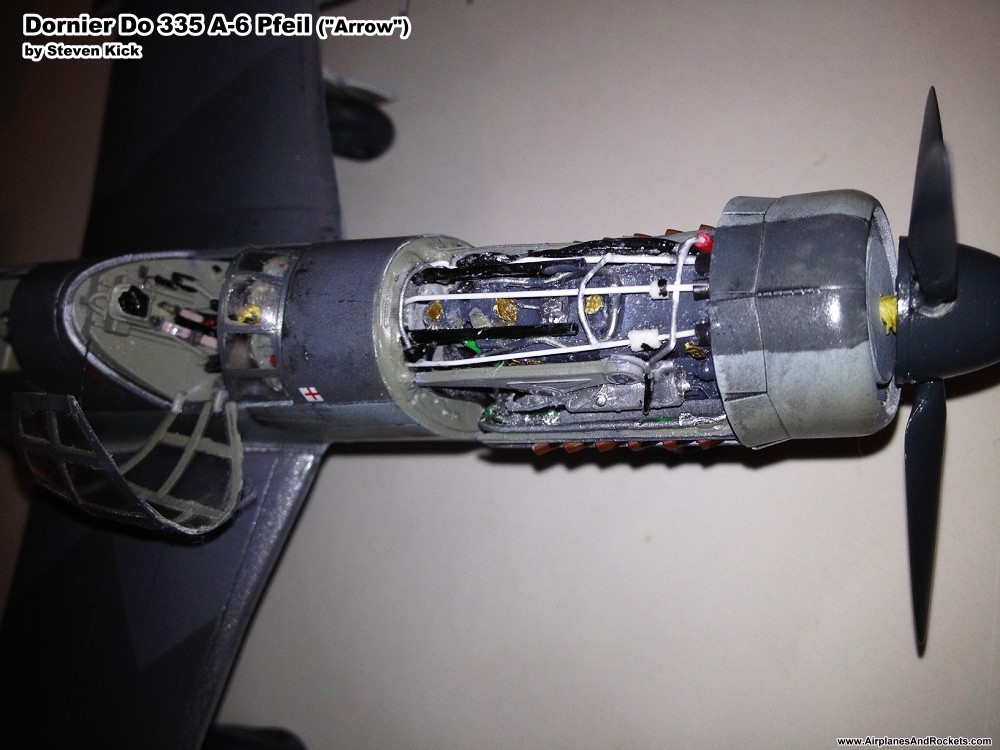
removed the two MG 151 20 mm canons from the nose, to save weight, as the "toasting
fork" antenna reduced the top speed by 34 knots. My ship was used to train the RIO,
and if the pilot, on a night intercept mission, got a shot at a Lancaster, Halifax,
or Sterling, he used the MK 103 30mm canon, firing thru the propeller hub. That
is, if a Mosquito Night fighter didn't get him first!
Things I Learned
The most gratifying thing was the vast amount
of support and advice I received from fellow modelers across the web. I realize
the introduction of better kits, photo-etched (PE) parts, resin accessories, and
better decals, all contribute to better models. But the help granted by the web
is the most powerful.
Next is the reliability of my $5 air brush (E-Bay from Hong Kong, $5 shipping
charges)
Next is the 3 HP pancake air compressor. Fill it to 100 psi, and I can air
brush at 25 psi all day, and
My Badger paint mixer. As it is important to stir, not shake, paint before painting,
this little item is well worth the $6 cost ($5 shipping).
Harsh Lessons Learned
First of all was the two canopies. I
tried to hand paint, with Tamiya tape, the outer and inner frames. Bad choice! Also,
the paint thinner I used to clean up the over paint crazed the clear areas. Rats!
I read not to use CA glue on canopies, as it will craze the plastic. All too true!
Decals. Unfortunately, the Monogram decals shattered when I tried to use most
of them. I used Testors decal set, and that worked OK with the Tamiya decals I eventually
used. Also, decal placement was an issue, by trying to "eyeball" correct placement.
I have to devise a system of using thin card to isolate the correct insignia position
on the aircraft.
Glue and body putty. This almost ended my effort. The Testors tube glue, and
Testors white putty, dried our much too quickly using the toothpick method. I now
have some
Green Stuff, and
Faller's Expert, and
TENAX 7R liquid glue, which works much better,
and is easier to control. Still have my doubts about the CA glue, though.
The Future (not the floor wax, which worked out OK)
My build schedule has all
Tamiya Do 335's, which are jewel-like in their perfection.
I pained my ship in the vertical, by attaching tape to the rear propeller shaft,
and securing it with a push pin. After painting the lower sections, I returned the
next day to find that the tape had detached from the shaft, the ship fell about
three feet, and the front propeller shaft was broken. No harm done, a simple glue
repair job. When it was time to spray the upper surfaces, I made sure to securely
attach the tape to the rear prop shaft, used to push pin, and painted. The next
day, I found that the push pin had pulled thru the tape, and the ship again fell
three feet, this time knocking of the front cowl, the front prop shaft, and de-gluing
the cowl machine guns section. Simple glue to repair, again. Monogram my not be
accurate, but their kits sure are tuff!
Therefore, at IPMS PHX, I will enter my ship in the 1/48 and larger, military,
that have flown at least 6 feet! I am sure of winning the Gold Medallion of
Excellence, even as Bruce Beemish is the key judge, as I will be the only entry
in the class!
So thanks to all for your help, patience, advice, and understanding in this effort.
- Steven Krick
Posted June 8, 2019
About Airplanes & Rockets
Kirt Blattenberger
Carpe Diem! (Seize the Day!)
Even during the busiest times of my life I have endeavored to maintain some form
of model building activity. This site has been created to help me chronicle my journey
through a lifelong involvement in model aviation, which
all began in Mayo, MD
...
Copyright 1996 - 2026 All trademarks, copyrights, patents, and other rights of ownership to images
and text used on the Airplanes and Rockets website are hereby acknowledged.