|
Rat racing has been
around for a long time. At some point the
AMA
contest rules changed to require only a profile type fuselage, and the maximum engine
displacement 0.1525 cubic inches. There is also Slow Rat Racing which allows engines
up to 0.2599 cubic inches. A 1/2A class is also specified for engines up to 0.0504 cubic
inches, also with a profile fuselage. So, that means the Desert Rat evidently would not
qualify for today's competitions since not only does it have a built-up fuselage, but
it uses a 0.35 cubic inch engine. Maybe some day there will be a "classic" event for
these early rat racer designs like there is for control line stunt.
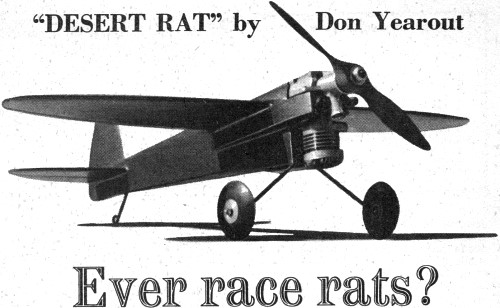
Desert Rat
Ever race rats?
 By Don Yearout By Don Yearout
The tremendous upswing in popularity of rat racing has all but exterminated team racing
here in the southwest (where Desert Rat gets its name). Nearly every control line meet
includes rat racing, very few have team racing on the docket.
The object of the rat racing event is to complete a specified number of laps in the
shortest time...all else being equal, the fastest plane wins. The basis for our design
is high top speed potential plus durability and simple construction. As in speed plane
practice, frontal area has been kept to a minimum and the engine faired smoothly into
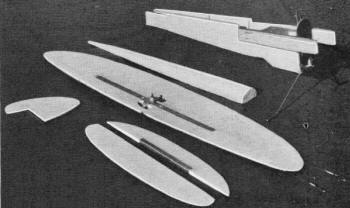
the fuselage. Sheet balsa fuselage, solid wing and tail surfaces make the finished Rat
light yet sturdy. Its speed will probably amaze you...well over 100 mph. Since it is
easy to fly what else could you want?
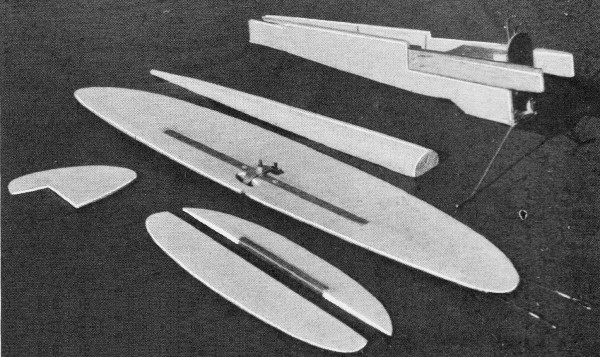
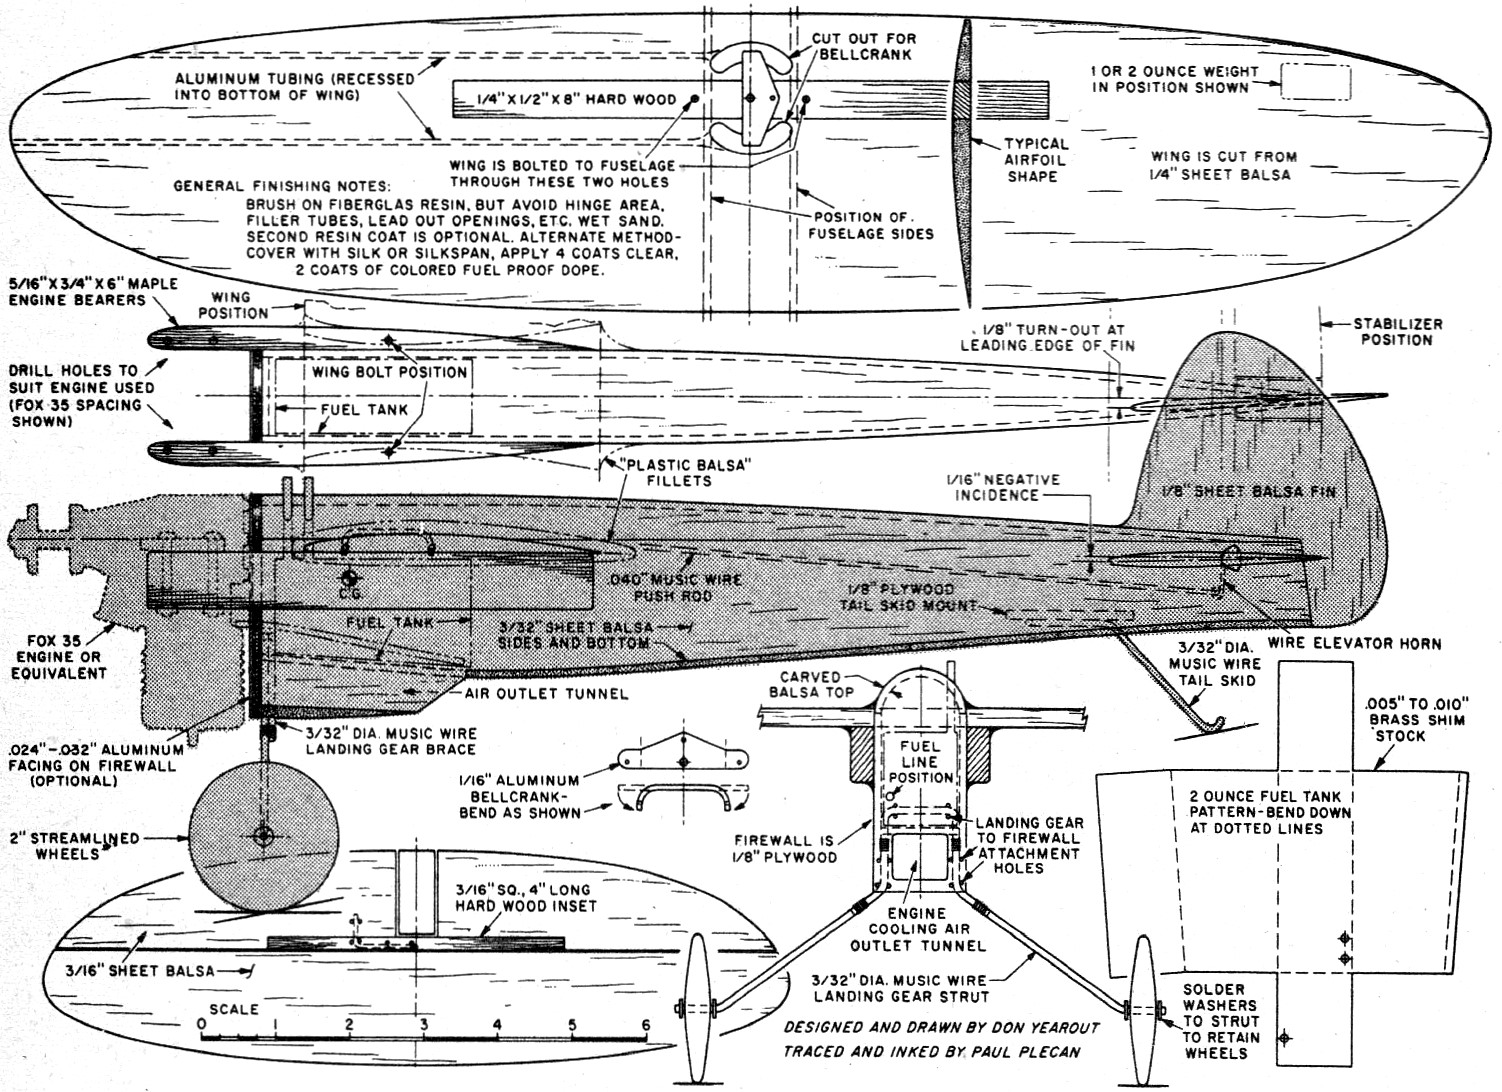
Construction: Cut two pieces of maple, oak or similar hardwood to 5/16" x 3/4" x 6",
taper one side toward back as shown. Drill mounting holes for 4-40 bolts to take your
particular engine. Bolt powerplant to mounts - observe 1 1/4" spacing between mounts.
If
your engine is wider than that, notch inside of mounts against motor. Make firewall-landing
gear assembly. Cut firewall from 1/8" plywood. A thin (about .032") aluminum facing can
be fastened to this plywood with fiberglass resin or cement and a couple of bolts. While
not absolutely necessary it offers additional durability for the area that really takes
a beating in rat racing.
Bend landing gear from 3/32" music wire with 3/32" reinforcement pieces. Bind to firewall
with copper wire and cement thoroughly, or (better) cover bound areas with fiberglass
resin. Position firewall-landing gear assembly between mounts. Shape two fuselage sides
from 3/32" sheet balsa; thoroughly cement together the three assemblies - engine mount,
firewall-gear and fuselage sides. When dry, draw fuselage ends together and cement. Make
fuel tank.
Here in the southwest we decree the 2 fluid ounce maximum shown. You can alter the
tank to any capacity by making it longer. Use .005" to .010" thick brass shim stock that
can be purchased in most hardware and automotive stores.
Here is handy information for the design of any fuel tank: there are 1.805 cubic inches
and 29.6 cubic centimeters in one fluid ounce.
Cement fuel tank in place with its top no higher than top of engine mounts.
 Full size working drawings for Desert Rat
U-control racer are part of Group Plan #462 available from Hobby Helpers (1543 Stillwell
Ave., New York 61, N.Y.) |
A pressurized tank was used on my original plane to guarantee a consistent engine run
throughout each flight. Hot starting is somewhat improved by this system. Make a pressure
take-off from the engine crankcase. This is done easily on front rotary engines by drilling
a hole through the main bearing at a spot directly in line with the intake tube and positioned
so that it opens to the crankcase just as the intake port closes. Thus, the crankcase
is pressurized when the piston comes down. Tap a 2-56 or 4-40 thread in the hole. Cut
off a brass machine screw of matching size to about 1/2" in length and carefully drill
a small (about .020" to .030") diameter hole lengthwise through the center of the cut
off piece. Thread it into the hole and lock it in place with a nut. A small fiber washer
can be used under the nut to prevent leaks. A length of small diameter plastic tubing
from the engine to the fuel tank completes the job. After filling the tank, the filler
and vent lines must be plugged. A short length of tubing run from one to the other is
one handy way of stopping them.
Now the wing. Make it from 1/4" thick balsa (not soft). Cut to shape, carve and sand
to airfoil section. Make trailing edge thin and sharp. Cement 1/4" x 1/2" x 8" hardwood
piece in the center. Cement two lengths of 1/16" diameter aluminum tubing into grooves
in bottom of inside wing for lead-out wires to go through. Cover tubes with Plastic Balsa
and sand smooth. Make bell crank and attach to wing after lead-out wires (preferably
cable) are installed. Notch fuselage sides down to motor mounts if not already done and
cement wing in place. Bolt wing to motor mounts with two 4-40 bolts through hardwood
insert. Recess bolt heads and nuts.
Make stabilizer from 3/16" hard balsa, carve and sand to shape and section. Cut elevator
loose from stabilizer and install hardwood insert. Attach control horn - made from .040"
music wire - by wrapping with copper wire and cement thoroughly. Hinge elevator to stab
and install in fuselage with 1 degree negative incidence. Hook up .040" music wire push
rod so a little more "up" control than "down" is available. About 20 degree up, and 10
degrees down is plenty.
Bend tail skid from 3/32" music wire, bind it to 1/8" plywood mount with copper wire,
install in fuselage. The 3/32" balsa fuselage bottom is put on. Note wood grain runs
crossways. Roughly carve fuselage top from balsa, cement in place. When dry, finish carving,
sand smooth. The 1/8" balsa rudder is installed with 5 degree turn-out. Fillet areas
around wing, fuselage, and engine mount junctures with Plastic Balsa. Sand entire plane
thoroughly using progressively finer paper until all rough spots have been removed.
Just about everyone has his own pet method of finishing a model but here is one I
recommend trying. It is ideal for a model of this type. Mix fiberglass resin with its
hardener and brush it directly onto the balsa wood surface, covering entire plane. One
word of caution. Don't let it get into hinges, fuel filler tubes, lead out tubes, etc.,
for obvious reasons. Coloring material may be added to the resin or the natural wood
finish can be allowed to show through. The resin which will soak into the balsa surface
a bit will double the strength of your model plus fuel proofing it. After the first coats
has cured, wet sand it to remove rough spots. A second coat can then be added if desired.
Add about 25% to 50% Cabocel (a thickening filler material) by Volume to help keep the
coat smooth and uniform. Cabocel can also be added to the first coat if desired. It would
be wise to experiment with fiberglass resin a bit on some balsa scraps to familiarize
yourself with its characteristics before applying it to your model. Fiberglass resin
and Cabocel can be purchased at many boating or sporting goods stores.
When you fly your Desert Rat for the first time be a little cautious about the take-off.
Make sure your launcher has the plane pointed well away from you as he releases it. It
accelerates from a standing start as if it were shot from a gun...so watch it. Also,
when flying in a race with other planes, be sure to watch ahead since it can overtake
many planes. Otherwise no particular difficulty should be encountered while flying. We
hope that you will be as pleased with the speed and durability of the Desert Rat as others
have been.
 Desert Rat Plans
Notice:
The AMA Plans Service offers a
full-size version of many of the plans show here at a very reasonable cost. They
will scale the plans any size for you. It is always best to buy printed plans because
my scanner versions often have distortions that can cause parts to fit poorly. Purchasing
plans also help to support the operation of the
Academy of Model Aeronautics - the #1
advocate for model aviation throughout the world. If the AMA no longer has this
plan on file, I will be glad to send you my higher resolution version.
Try my Scale Calculator for
Model Airplane Plans.
Posted October 26, 2013
|