|
AirplanesAndRockets.com website visitor
Ken E. wrote asking that I scan and post the article and plans for Cal Smith's Pee Wee
"Bomb." Says, Ken, "I built one back in the 60's and would like to try an other (feeling nostalgic)."
Having recently re-acquired a few Cox .049 engines for some A control line models, I can definitely
attest to the nostalgic feeling you get when hearing those babies (get it? Babe Bees) scream.
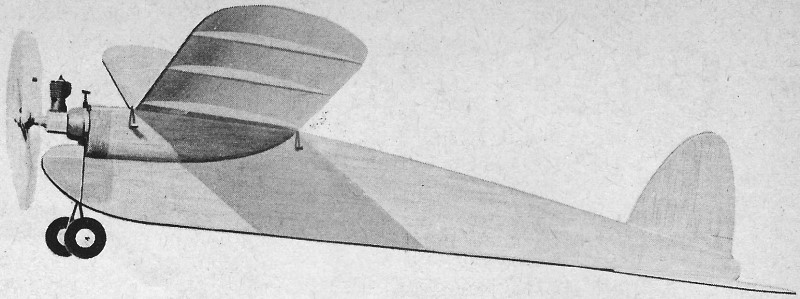
The Pee Wee "Bomb" is all sheet balsa construction with ribs under the wing to form an airfoil.
Wingspan is around 22 inches.
Pee-Wee "Bomb"
By Cal Smith
 To this modeler's way of thinking, the new Cox Pee-Wee
.020 engine is the best thing that has happened to free-flight since the advent of the glow-plug.
This tiny power plant really has performance plus. To this modeler's way of thinking, the new Cox Pee-Wee
.020 engine is the best thing that has happened to free-flight since the advent of the glow-plug.
This tiny power plant really has performance plus.
As soon as the Pee-Wee hit the local hobby store we purchased one and rushed home to build.
The result is the model you see here. It flew right off the board; in fact it flew away on
its third flight!
Design is like a miniature R/C model; the high thrust line results in a very stable ship
that only flies one way - up! The two wheel gear allows the ship to R.O.G. fine. Be sure to
time the engine run before flying because the tank holds enough fuel for about 1 3/4 to 2.
minutes running. It will fly out of sight in less than a minute easily. We found Pee-Wee has
ample power to fly any typical .049 ship, not with contest winning performance perhaps, but
excellent flights will result nevertheless.
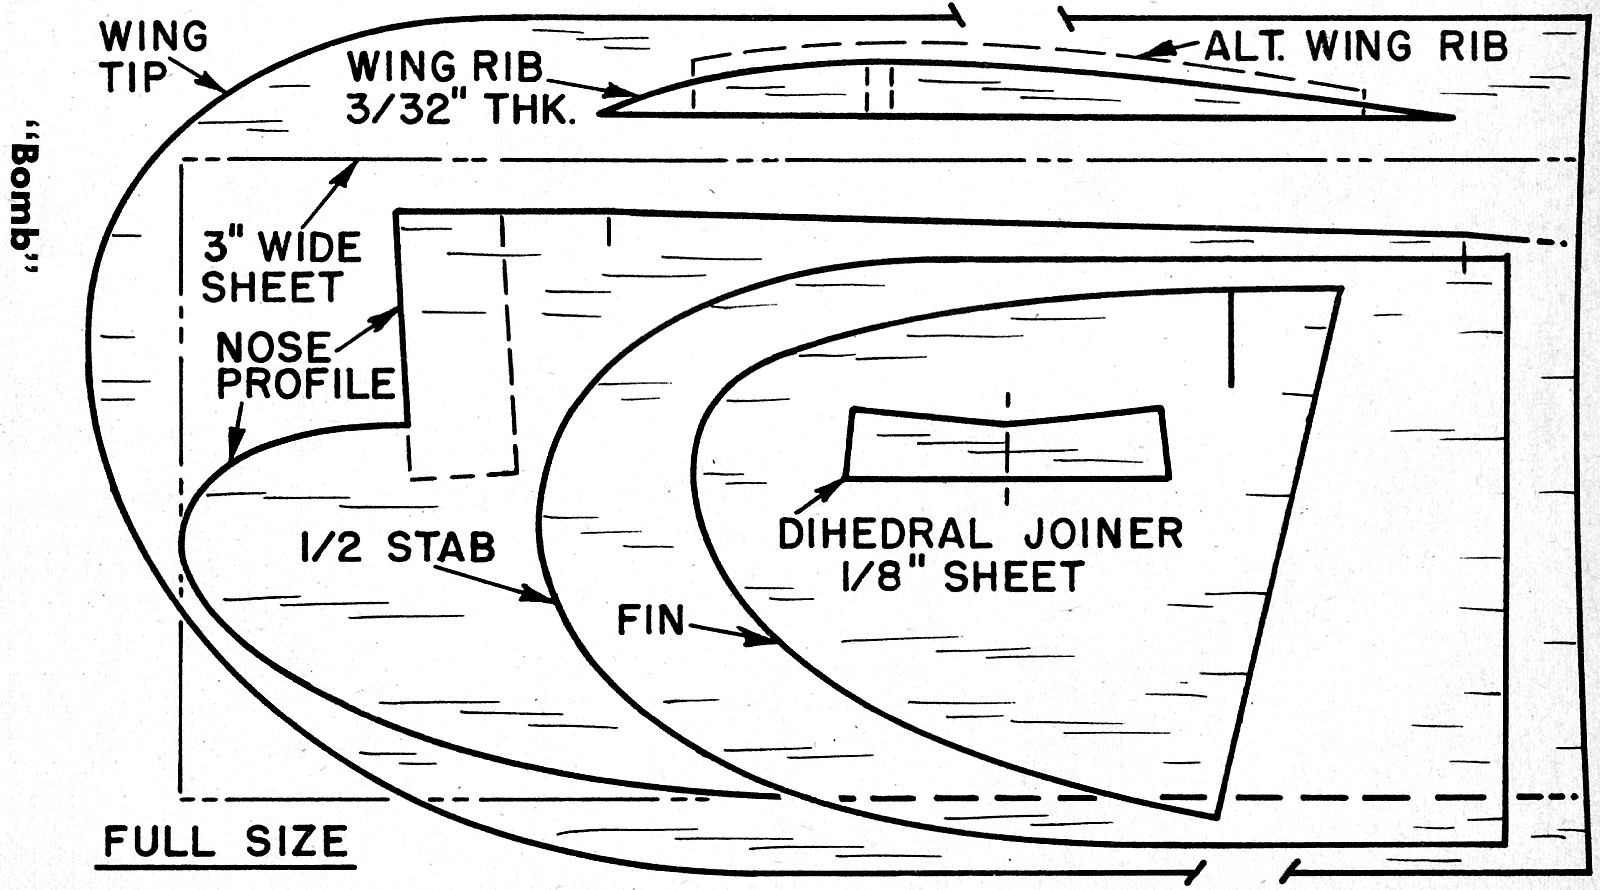
Our model, all-balsa, can be built in an evening. Plans show alternate wing construction
which will save a little weight for real contest performance. We used fairly hard heavy balsa
on the original model for extra strength; this additional weight is easily hauled by the Pee-Wee.
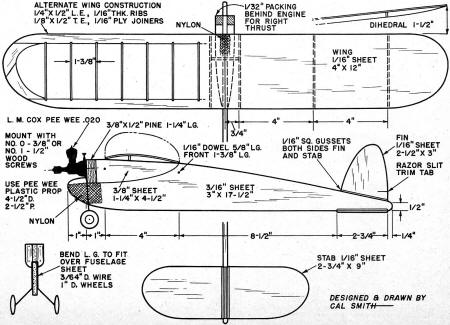
All you need is one sheet of 4" wide, 1/16" thick balsa and a half sheet of 3/16". The
other wood can be picked out of the scrap box.
Begin by cutting wing stab and fin from 1/16" sheet. Use full size patterns provided. Sand
smooth on both sides; round off all leading and trailing edges.
Cut required number of wing ribs from scrap 3/32" sheet. Cement first 1/2" of each rib
in place on underside of wing leading edge; set aside to dry. Omit ribs at center joint -
these are added after wing panels are joined.
Next cut fuselage from 3/16" sheet. Use patterns for nose sections; be accurate since down
thrust and incidence angles are built in. Cut gentle curve from wing trailing edge to tail.
No pattern is given for this part since the dimensions on plan serve as guide.
Cut two 1 1/4" lengths of 3/8" x 1/2" pine or other hardwood for engine mount. Curve bottom
end as shown in front view. Double cement these pieces to fuselage sides flush with top and
front edge. You can add a 1/16" plywood firewall over front face if desired, but this is not
absolutely necessary. Cut two mount fairing pieces 1.0 shape from 3/8" sheet. Rough carve
bottom edge 1/4 round; double cement to fuselage sides behind engine mount hardwood pieces.
Flush fairing pieces level along top edge to form wing platform.
Next cement stab and fin on fuselage. Align carefully; add 1/16" square gussets along edges
where tails touch fuselage. Landing gear can be from that cracked-up Firebaby or made from
scratch. Bend to fit over fuselage and cement in place ahead of engine mount. Cover wire and
fuselage sides with nylon or fabric patch for reinforcement. Coat liberally with cement. One-wheel
gear may be substituted if desired.
Dampen top surface of wing sheets and draw down to meet top of wing ribs and cement. Pin
through top surface to ribs to hold while cement dries. Bevel and curve wing panel ends to
meet snugly at center section. Cement dihedral joiner to panel; be sure L.E. and T.E. are
aligned while center section joint is drying. Note that dihedral joiner is flat on bottom
- this serves to level wings when placed on top of fuselage and fairing blocks. Cut center
ribs into two pieces and add in front and back of dihedral joiners under wing. Add 3/4" wide
strip of nylon over top of joint and onto bottom for about 1/2" at L.E. and T.E. Coat liberally
with cement.
Give entire model two coats of clear butyrate dope. Additional coats may be added on nose
and wing center section for complete fuel proofing around engine.
Mount Pee-Wee engine to front of hardwood strips with No. 0-3/8" wood screws. No. 1 size
may be used if desired. Behind left side of engine add 1/32" thick aluminum strip or washers
to give some right thrust. This should be adequate but test hops will indicate any additional
adjustment. When proper amount of right thrust is obtained hardwood strips can be carved to
this angle to substitute for packing.
Dowel wing hold-down pegs are not mounted until after glide tests are made. Put pins in
position indicated for wing hold-down rubber bands.
Hand glide model and shift wing forward if glide is nose-heavy, rearward if glide is tail-heavy.
When glide is set, mark exact wing position on fuselage. Dowel hold-down pegs then are added
so this position is maintained.
Check engine run time on ground before flying. Let engine run off fuel until desired engine
run is reached, then launch. Start with 10 second run then increase to 10 or 20 seconds. Better
be ready to chase.
Some provision can be made for limiting fuel capacity. Place hardwood blocks inside tank
to reduce volume. A separate eye dropper tank can be rigged by drilling the engine tank side
and connecting eye dropper tank directly to carburetor.
A slit cut in fin T.E. can serve as turn trim tab; bend sheet as required. Make power-on
turn adjustments via engine thrust off-set rather than rudder trim. Glide trim is controlled
by tab. Unlike pylon models high thrust line models such as this tend to turn to left under
power, so right-thrust and right-rudder is the usual adjustment - then model turns left in
climb and turns right in glide. Whatever adjustments are made will depend on your particular
plane, since slight warps may produce a natural turn tendency either way in glide. But start
with right thrust anyway to counteract torque.
Let us know how your model performs.
"A.M." pays $10 for pix used.
Pee Wee "Bomb" Plans

Pee Wee "Bomb" Wing Plans
Notice:
The AMA Plans Service offers a
full-size version of many of the plans show here at a very reasonable cost. They
will scale the plans any size for you. It is always best to buy printed plans because
my scanner versions often have distortions that can cause parts to fit poorly. Purchasing
plans also help to support the operation of the
Academy of Model Aeronautics - the #1
advocate for model aviation throughout the world. If the AMA no longer has this
plan on file, I will be glad to send you my higher resolution version.
Try my Scale Calculator for
Model Airplane Plans.
Posted September 2, 2017
|