|
'Giant scale' is a relative term - relative to when it is used,
that is. In the 1960s, a giant scale radio controlled model was
like this Sopwith Pup, by Cal Smith, with a wingspan of 53 inches.
In the 2010s, giant scale usually implies at least 1/4 the size
of the full-size craft, and more often means at least 1/3 size.
A mere .19 size engine was used to haul around its 5½ pounds
with 1,000 square inches of wing area, wing struts, flying wires,
and a fat cowl producing copious amounts of drag. A single-channel,
rudder-only radio control system was used. In a day when radio systems
are so reliable that nearly all crashes and mishaps are attributable
to pilot error, it is hard to imagine a time when so much manual
labor was put into building a model and then it was launched skyward
with electronics that often used vacuum tubes and a lead-acid battery.
Cal Smith's Giant Radio Controlled World War One Flyer Sopwith
Pup
... for which we've been waiting five years!
|
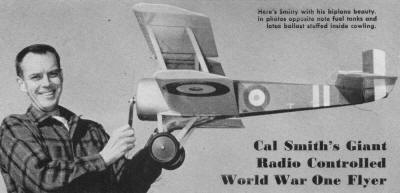
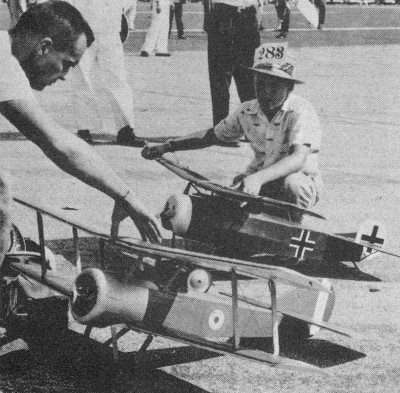
Here's Smitty with his biplane beauty.
Note fuel tanks and lotsa ballast stuffed inside cowling.
|
PUP SPECIFICATIONS; Span, 26-ft. 6-in; Length,
19-ft, 5"in; Height, 9-ft, 5-in; Chord, 5 ft, 1 1/2-in; Gap, 4-ft,
5-in; Stagger, 1-ft, 6-in; Dihedral, 3°; Wing Area, 254- sq-ft;
Loaded Weight, (80 hp), 1225-lbs.
By 1915 the war in the air over the Western Front was beginning
to develop the terrible things which were to come. No longer did
the airmen on both sides merely wave to or take pistol pot-shots
as they passed each other on their observation flights. Thanks to
Anthony Fokker's successful development of the fixed forward-firing
synchronized machine gun, the Germans were able to gain mastery
of the skies over the battlefronts. The. Fokker monoplanes were
shooting down Allied aircraft with alarming regularity.
To offset this German advantage, the French, late in 1915, equipped
their Nieuport 11 Scouts with guns mounted above the top wing's
center section and firing over the prop arc. Thus they were able
to meet the German Fokkers on somewhat more equal terms.
During the spring of 1916, a new type airplane, the Sopwith Pup
went into action on the English Sector of the Western Front. It
quickly proved to be equal to or better than the Fokker monoplanes
and Albatros scouts. The Pup was the first Allied aircraft designed
specifically to carry a fixed synchronized machine gun. Its design
was simple and sound, and it was considered safe and easy to fly.
The Pup was fully aerobatic due to its excellent balance and very
low wing loading of 5-lbs/sq-ft (glider class). It had a good rate
of climb, 650 ft/min, and could maneuver well at altitude.
First Pups powered with the 80-hp. LeRhone rotary engine had
a top speed of 106-mph. Landing speed was 40-mph or less, giving
it good small-field performance. Later models were fitted with the
100-hp Gnome Monosoupape rotary, which upped performance a bit.
Overall the Pup bore a strong resemblance to the earlier Sopwith
1 1/2 Strutter and Tabloid Scout and seemed to have inherited the
good features of both of these excellent aircraft.
Pups saw service with R.N.A.S (Royal Naval Air Service) No.3,
4, 8, 9 and 13 Squadrons and R.F.C. (Royal Flying Corps) Squadrons
46, 54 and 66 along the Western Front accounting for a goodly share
of enemy aircraft from the spring of 1916 until the end of 1917.
By then the little fighter, outclassed by heavier, more powerful,
newer German aircraft, was assigned to less vulnerable duties. Since
the Pup was originally ordered for R.N.A.S. service it pioneered
many experiments in air-sea flying. It became the first type to
fly from and land on a ship at sea. Waterborne flying with landplanes
was in its infancy in 1916 and 1917 and as a result some unusual
operations were run off.
Pups and Camels were put onto flattop barges and towed toward
the action at sea. Take-off from the barge was the start of a one-way
trip, since the barge was too small to land on. After the mission
was flown, the airplane ditched near a friendly ship. Inflatable
air bags fitted to the fuselage were blown up just before ditching.
If the plane floated - and often they did not - the ship hoisted
the plane out of the water. When dried out it was flown again. Pilots
had to be good swimmers, too.
|
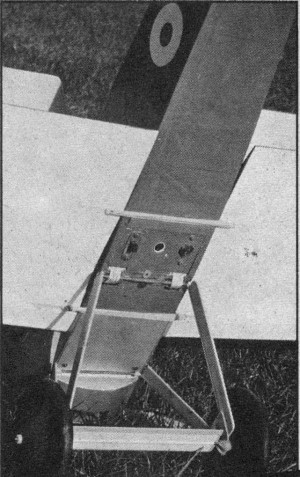
Sopwith Pup's undercarriage.
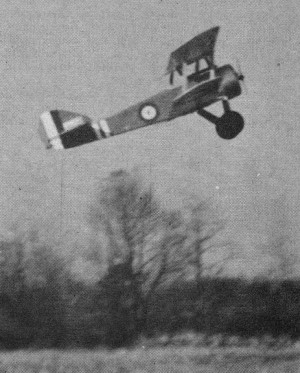
Sopwith Pup climbing out for another dawn patrol.
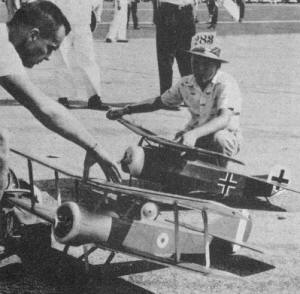
Cal and son Skeeter way back at 1957 Nats. Sopwith was
re-worked afterwards for better performance.
|
Later the cruiser H.M.S. Furious was fitted with a tiny forward
flight deck from which Pups took off. Some planes were fitted with
skids instead of wheels to reduce landing roll distance. On a landing
approach the pilot had to fly around the ship's superstructure,
make his turn above the deck and get down right now. The deck crew
literally manhandled the aircraft down onto the deck by grabbing
it out of the air. Hooks on the skids and ropes on the decks aided
the action. [From these experiments reliable arresting gear was
developed and utilized on the first Royal Navy carriers.]
In addition ·to flying at the Western Front and in the hair-raising
naval program, Pups were used successfully by Home Defense Squadron
No. 61 against the Gotha bombers and Zeppelins that raided England.
Pup production continued until the war's end and the little ship
spent its final active service as a well-liked advanced trainer.
Total production reached about 1,300.
But the story of the valiant Pup did not end with WW-I's end.
In 1919 Sopwith produced a modified two-place version for the civilian
market. This airplane was called the Dove and eighteen were built.
One of these somehow survived the rigors of the years, including
another World War (2) in England. Just after V J Day this plane
was completely restored and converted into a replica of the original
1916 Pup. Today, a part of the famous Shuttleworth Collection of
vintage aircraft, it is in full flying condition.
In the U.S.A. an accurate reproduction Pup has been scratch-built
and flown by Californian Joe Pfiefer. Several other Pups are under
construction by experimental aircraft home-builders.
The Pup Model: Simple construction and its many straight lines
make the design most appealing for a model builder. She has enough
scale dihedral for good inherent stability. Both wings are equal
chord, thus we need only a single basic wing rib pattern. The model
is scaled at 2-in to the foot. Every effort was made to simulate
the construction of the full size airplane ... you will find fabric
cover and planked surfaces in their proper places.
We do not claim the model to be a 100% Smithsonian-type non-flying
scale version since some departures were made as noted for simpler
building and better flying. For those interested here are the changes;
Wing rib spacing is uniform which differs slightly from scale; however,
there is the correct number of ribs. Leading edge is planked rather
than having a false rib between each full length rib. Wing spars
are in scale position; wing ribs, which scale thickness, are flat-bottomed
rather than undercambered. Certain rigging omitted includes the
flying and landing wires between wing struts and fuselage. Dihedral
is increased to 40 - but the scale 30 should be adequate. Horizontal
and vertical tail areas are increased and stab has thick symmetrical
airfoil rather than thinner scale section.
Span is 53 inches. Length is 39 3/4 inches. Wing area is 999-sq-in,
stab area is 200-sq-in (20% of wing area), fin area is 50-sq-in
(5%). While weight may appear high at 5-lbs, 8-oz, we still end
up with a relatively light wing loading. Nearly one pound is in
nose ballast, a necessity for a model with such a short nose moment
arm. This is the one unfortunate feature of most WW-I scale planes.
Their snort noses pose a knotty design problem - how to get proper
longitudinal trim? Answer: via ballast or a lifting tail surface.
We prefer ballast to gain a normal C.G. position, since the lifting
tail tends to make a model tuck-under in a high speed dive.
Full size drawings for Cal's Pup are part of Group Plan #1262
available from Hobby Helpers.
Our Pup is not a roar-and-zoom crowd-scattering type. Since the
lower wings plug-in and are rubber band retained, excessive speed
might set them adrift ... we haven't attempted to find out. The
Pup is a fine pattern maneuver model - with throttle control circuits
and bumps would be a delight. The biplane makes R.O.G. take-offs
as though on rails and in most realistic fashion. The tail slowly
comes up to near level attitude before the model breaks ground.
Those big wheels roll over rough ground easily. The landing gear
has rubber band shock absorbers at the axle similar to the prototype.
Entire gear which can pivot backward at the fuselage about rear
leg crosspiece is held at front with bands passing upward into fuselage.
Our model operated with rudder-only control, but there is ample
space in the fuselage for more R/C equipment. With more controls
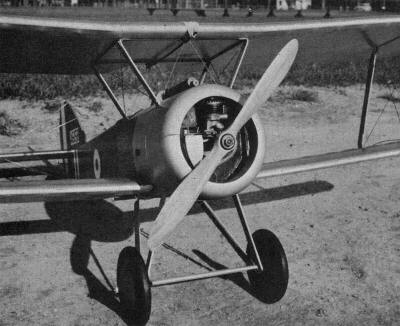
and a throttled .29 size engine, performance would be very lively!
A .19 engine as illustrated is adequate for rudder-only control.
Due to that short nose things do get a bit crowded up front ...
the cowling is filled with engine, fuel tanks and ballast. The cross-feed
fuel pick-up from two tanks works well. A single small tank can
be used for short test flights.
The Pup flies fine. About the only problem to concern yourself
with is a tail-heavy tendency so keep that tail structure light!
An attempt was made to fly the Pup free-flight when it was first
built. We had fitted wagon wheels because of their scale-like appearance,
With a 1/4"-dia steel axle and those steel wheels nearly a pound
hung below the airframe. As a turn developed in flight, centrifugal
force on this low slung weight seemed to increase turn and every
flight ended up in steep bank into the ground. The Pup successfully
resisted a half dozen nifty cartwheels with only minor damage. When
the lightweight wheels shown were fitted this turn tendency dropped
off considerable. Now with only rudder control, turns are tight
but stable and recovery to straight flight is good. A quick blip
of opposite rudder is helpful to turn recovery. Numerous flights
have unveiled no bad trim characteristics.
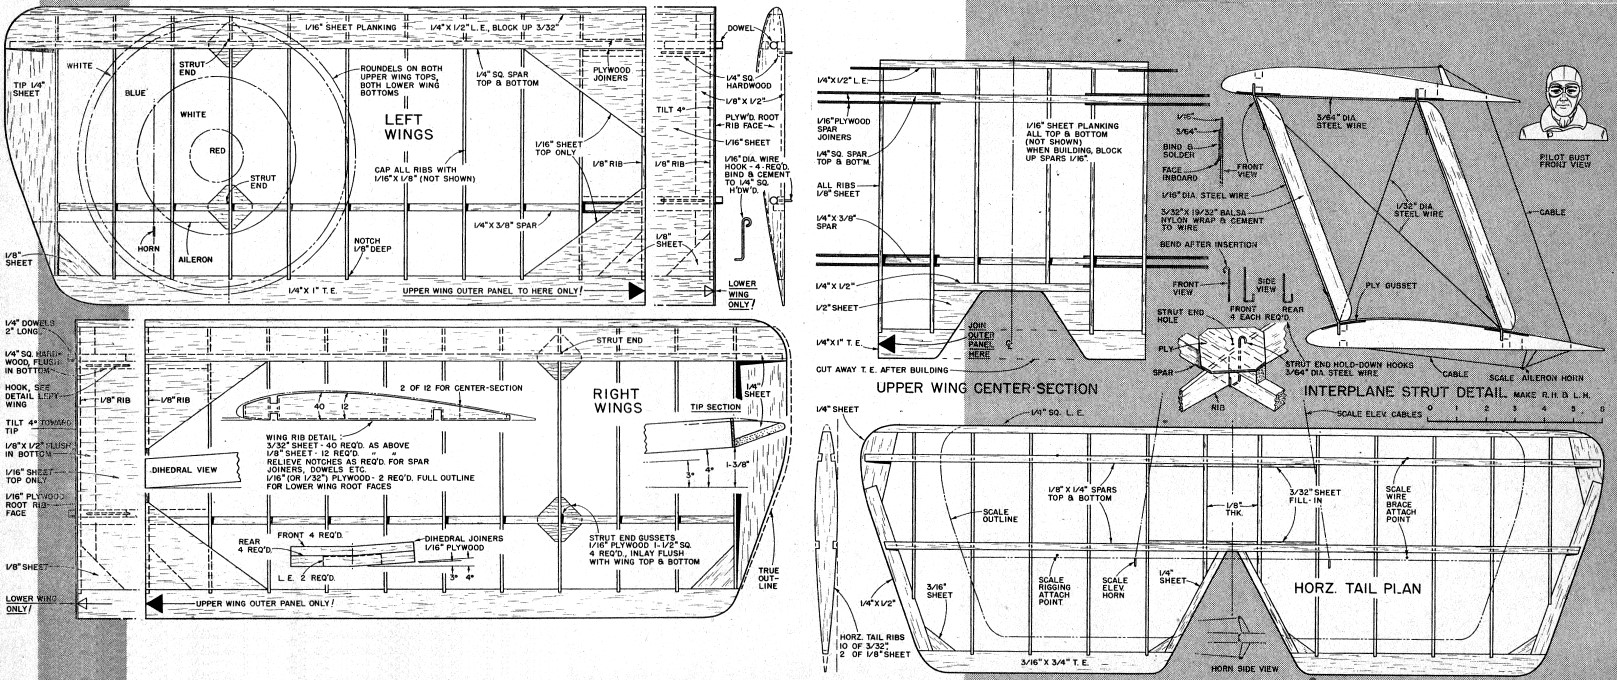
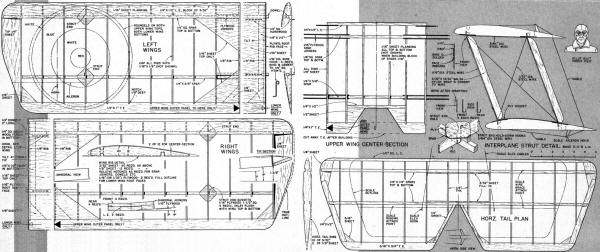
Building The Pup: Construction starts with the wings - since
there are so many of them! One-piece upper wing is built in three
sections: two outer panels and a center-section which are joined
to complete assembly. Plans show only one right and one left panel
because these are used to make both upper wings and lower wings.
Note that lower wings, though of similar construction, are a few
inches longer than upper wing outer panels.
Sopwith Pup Bill of Materials
Balsa, unless noted otherwise
Eleven pieces of 1/16" x 1/8" x 36" for wing rib, fuselage, cap
strips; (six) 1/16" x 1/4" x 36" for fuselage cap strips; (ten)
1/8" x 1/4" x 36" for stringers, diagonals, tail spars; (one) 3/16"
x 3/4" x 36" for T.E. stock; (fifteen) 1/4" x 1/4" x 36" for longerons,
spars, tail L.E.; (four) 1/4" x 3/8" x 36" for wing spars; (four)
1/4" x 1/2" x 36" for L.E. fin spars; (four) 1/4" x 1" x 36" for
T.E. stock; (four) 1/16" x 3" x 36" for wing, fuselage, planking;
(six) 3/32" x 3" x 36" for wing, stab ribs, fairing; (three) 1/8"
x 3" x 36" for wing, stab ribs, formers; (two) 1/4" x 3" x 36" for
wing tips, formers, tail edges; (one) 1/2" x 3" x 36" for cowling.
Also, three pieces 1/16" x 6" x 12" plywood for doublers, ribs,
joiners; (two) 1/8" x 6" x 12" plywood for firewall, bulkheads;
(one) 1/4" x 1/4" x 24" hardwood for corner braces, wing hook mounts;
(one) 1/4" x 1/2" x 24" hardwood for bulkhead braces.
Also, three pieces 1/32"-dia x 36" steel wire for strut bracing;
(one) 3/64"-dia x 36" steel wire for strut bracing, hooks, rigging;
(two) 1/16"-dia x 36" steel wire for hooks, interplane struts; (two)
3/32"-dia x 36" steel wire for cabane struts, wing platform; (two)
1/8"-dia x 36" steel wire for landing gear and axle.
Also, tinned iron or copper wire for strut binding and rigging.
Scrap steel for axle plates. Eight J-bolts for cabane strut mounting.
Three 4-40 blind nuts for engine mounting. Wedge fuel tanks. One
pound lead ballast. Nylon control horn. Du-Bro Kwik-link control
yoke. R/C batteries, receiver, escapement or servo, switch, plug,
etc., as required. Cement, glue, clear dope, colored dope, nylon.
Let's tackle the lower wing first. Cut required number of balsa
ribs and two plywood ribs for root faces. Cut notches in trailing
edge stock. Pin down leading edge, bottom front spar, rear spar
and trailing edge over plan. Cement ribs in then add top front spar
and corner braces at trailing edge tip and root. Cut tip outline
from 1/4" sheet, bevel and cement to tip rib. Add brace to tip plate
at front spar and 1/16" sheet to leading edge. Also plank top of
space between root and next rib outboard. Cement 1/16" x 1/8" cap
strips to all other rib tops from front spar to trailing edge. Set
diamond-shaped plywood gussets for strut ends in place on top surface
. These are inlaid flush with surface. Add scrap 1/4" sheet to top
of rear spar to help support plywood. Bend strut end hold-down wire
hooks to shape, drill plywood and cement hooks in place over spars
... double cement these. Prepare wing mounting wire hooks by binding
and cementing to 4 1/2" lengths of 1/4"-sq hardwood, Notch inboard
ribs and cement these strips to front and rear spars. Add 1/8" x
1/2" stiffeners along root rib bottom.
Carefully drill plywood root face ribs for 1/4" dowel alignment
pegs. Cement plywood rib to balsa root rib, then drill balsa and
cement dowels in place ... they should project 1/4" from root face.
Thread-wrap dowels to spars if desired and cement liberally. To
complete wing, carve leading edge to shape and sand all surfaces
smooth. Wing can be covered now or later as you wish. Apply two
coats of clear dope to all balsa that will touch any covering. Sand
smooth then cover with nylon.
Build upper wing outer panels over plan following same procedure
as described for lower wings ... with these following exceptions:
Omit inboard rib until outer panels are joined to center-section.
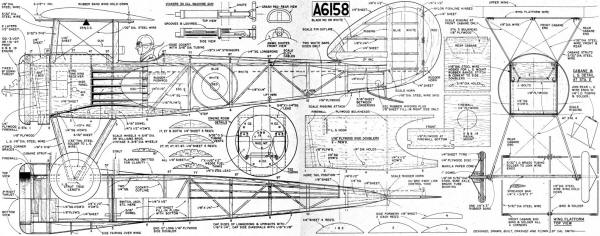
Sopwith Pup Fuselage Plans
Sopwith Pup Wing Plans
Notice:
The AMA Plans Service offers a
full-size version of many of the plans show here at a very reasonable cost. They
will scale the plans any size for you. It is always best to buy printed plans because
my scanner versions often have distortions that can cause parts to fit poorly. Purchasing
plans also help to support the operation of the
Academy of Model Aeronautics - the #1
advocate for model aviation throughout the world. If the AMA no longer has this
plan on file, I will be glad to send you my higher resolution version.
Try my Scale Calculator for
Model Airplane Plans.
Posted May 10, 2014
|