|
Mr. Jon Lowe, the son of well-known columnist
Don Lowe, wrote to request
that I post this article on the Whiplash, which was originally published in the November 1974 edition
of American Aircraft Modeler. His father wrote a monthly column for AAM at the time, including in that
very edition. The Whiplash is a 20-size aerobatic plane designed for fast building and for pattern practice
when you don't want to drag out your full-size ship. Whiplash
Dick SarpolusIf you were in it while it was flying, you'd understand how this plane
got its name.
 If weather conditions
in different parts of the country have an effect on aircraft designs, then the Whiplash is a result
of our northeastern (New Jersey) winter climate. I am primarily a pattern competition flier, and after
the last contest in October, I hang the current hot ship on the workshop wall until spring. I just don't
enjoy serious practicing in cold, wet, windy winter weather - I'd rather not risk a good pattern aircraft
in casual fun flying. If weather conditions
in different parts of the country have an effect on aircraft designs, then the Whiplash is a result
of our northeastern (New Jersey) winter climate. I am primarily a pattern competition flier, and after
the last contest in October, I hang the current hot ship on the workshop wall until spring. I just don't
enjoy serious practicing in cold, wet, windy winter weather - I'd rather not risk a good pattern aircraft
in casual fun flying. Our club field does see a lot of winter activity and, without the contest
season pressure, it is a lot of fun. Because of the weather, our winter flying is done a little differently
- we don't plan on a whole day at the field. Much of the time is spent with hot coffee in a handy car.
For this type of flying, a small, easily assembled plane (especially one that will fit in the
car assembled) is a real advantage. We observed some fliers who flew powered gliders exclusively and,
while this was not what we wanted (can't practice Class C maneuvers with a glider), the simplicity of
hand launching appealed to us. Elimination of landing gear would further simplify the plane and enable
better performance with a small engine. One characteristic we had to have to allow pattern practice
was full aerobatic capability. To be competitive in Pattern, you must fly a lot. To do all the flying
with the same aircraft would, of course, be ideal. However, that is not a necessity. The important thing
is to fly something that will perform all the maneuvers.
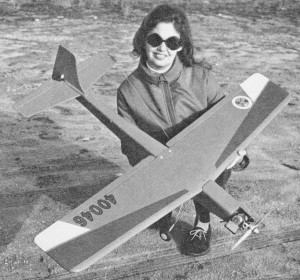
 The angular lines of the Whiplash allow many variations in personalizing
the finish. Wayne Marcy did the eye-catching MonoKote job at the left.
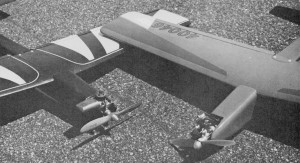 The sidemounted engine (right) ensures that the center of the
tank falls in line with the needle valve. 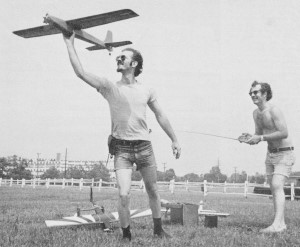
Dick uses transmitter
antenna to prod Arni Pederson into one of his statuesque launches.
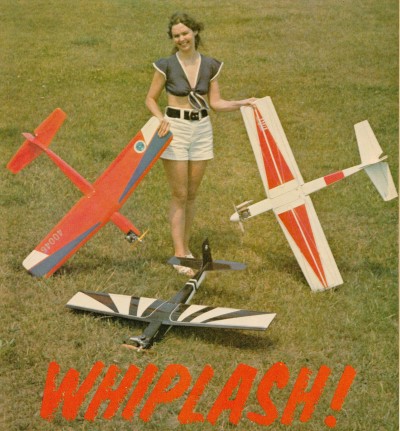
 Lynn Sarpotus gives some feel for the size of the model - large
enough for smooth aerobatics, yet small enough to dump in the trunk or back seat between flights.

A minimum number of pieces makes the Whiplash not only simple,
but inexpensive to build. 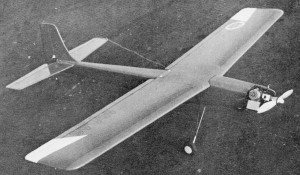
A Whiplash with legs.
The landing gear might be essential in some areas (after all. it doesn't snow everywhere). Try skis
in place of wheels for an ROS (Rise Off Snow).
Don' think hat these desired characteristics result in a hot, "experts only" airplane. The Whiplash
is not a basic trainer, but it did turn out to be a good intermediate ship. Anyone who can fly basic
ships like the Falcon 56, J-Craft, etc., can fly our Whiplash. And the expert flier can have plenty
of fun without worrying about his top contest ship. We set led on 19 power to keep the size
down and still achieve acceptable performance. We would be using four channels, so the equipment weight
would be considerable. There are some good 19 engines on the market, and we felt this was as small an
engine size as possible. The wing would need to have a fully symmetrical airfoil for full pattern capability;
we wanted this plane to "feel" like a typical 60 competition ship. Wing planform would be tapered, of
course, with strip ailerons for ease of construction. Foam wing cores were de-sirable for a quick, easy,
rugged model. The wing would be top mounted, so we could hand launch and belly land. Competition
ships are exclusively low- or mid-wing now, but a top wing on a reasonable fuselage design doesn't change
performance noticeably. The fuselage was held to a minimum cross-section for the least possible drag
and weight. One area that could significantly help in weight was the radio equipment; we used a 600
mah battery pack and KPS-10 size servos. The newer mini-servos and lighter battery packs would make
a difference. Throughout the plan sketching, we stressed simplicity - we wanted to fly, not build.
Specs came out like this: 50" span, 390 sq. inches of wing area, 41" overall length. So many of
our local club members liked the concept that, with the help of the local hobby shop, we made several
dozen "semi-kits" which were sold at a nominal charge. One alteration of the original concept
was the addition of landing gear. I like the plane better without it, but after our club put down a
blacktop strip 250 x 40', we did want to use it on occasion. I added the gear to my completed plane,
made it removable, and really haven't used it very much. That covers the design. Although the
major design influence was our local weather conditions, we feel the result may appeal to many fliers.
CONSTRUCTION I would suggest cutting out all the parts first, making your own kit, rather
than the cut-as-you-go approach. It will save time. Wings first - most clubs now have foam cutting ability
and it sure makes for an easy wing. Foam wing construction has been covered many times, so I'll
emphasize only a few points. To insure a smooth job, join the 1/16" balsa skins, truing the edges first,
taping the seams, then gluing and sanding before cementing the skins to the core. The best contact cement
I have found is Southern's Sorghum or Mini-Flite's Maxi-Tac. I skin the cores first, true the leading
and trailing edges with a long sanding block, then glue on and finally shape the leading and trailing
edge wood. Tips come next; center section is joined and reinforced with fiberglass cloth and epoxy.
Aileron horns are installed, then the 1/16" plywood reinforcement for the nylon hold-down bolts.
Tail surfaces are simply 3/16" sheet balsa. Try to select light wood throughout and sand everything
well. The fuselage is a basic box, with triangular balsa in the corners to permit a well
rounded shape. The 1/32" plywood doublers add a lot of strength. The sides are parallel from the firewall
to the wing trailing edge, which makes it easy to align. I build almost the entire fuselage with five-minute
epoxy. The engine could, of course, be faired in more with balsa blocks shaped to match a spinner but,
again for simplicity I used side cowl pieces only. Glue the hardwood wing mount blocks securely
and drill and tap for the nylon wing bolts. There is not a lot of room for the radio equipment, so the
installation must be neat. The three servos in the fuselage should be installed as low as possible,
and the aileron servo should be installed as deeply as possible in the wing. The gas tank can be inserted
through the wing opening and held in place with foam rubber. We have used the Kraft nylon engine
mount and the Tatone aluminum mount. The models built so far have balanced pretty well without any added
weight; they do tend to be nose heavy, so try to use a light muffler and keep the radio equipment as
far back as possible, etc. We put the servos at the rear of the compartment, receiver in the middle,
batteries by the leading edge. If you use an engine larger than a 19, it might be well to shorten the
nose by 1/2" or so. A 19 seems to be the ideal size. I have flown four different Whiplash models, each
with different engines (a Veco 19, Supertigre 19, OS 19 and a Webra 20), and all performed about equally.
It is a good idea to put a skid of some sort under the nose section, or to even cover the bottom
with fiberglass or celastic. We adjust the carburetor to stop the engine on command and, if the prop
is set horizontal at compression, it will stop at that position. MonoKote or a similar material
is of course best from a weight and finishing time standpoint. Flying the model should present
no problems; if inexperienced, let a pro set it up for you. The rudder is only needed for certain maneuvers
and, if lack of a throttle doesn't bother you, I see no reason why it couldn't be flown two channel
(ailerons and elevator). With the fully symmetrical airfoil, it isn't going to float like a sailplane,
but it is pretty gentle. We sure don't need more pylon racing classes, but a 19 class with a design
like a Whiplash would be a lot of fun. If you can't get foam wing cores locally, contact me
at 32 Alameda Ct., Shrewsbury, N.J. 07701. Every project leads to another idea; after flying
the Whiplash and reading about the progress in electric power for RC aircraft, I feel an electric-powered
Whiplash would really be the thing for fun flying. Perhaps our next project will be an electric-powered
pattern-ability fun ship. The state-of-the-art moves ever onward!

Whiplash Plans
<click for larger version>
Notice:
The AMA Plans Service offers a
full-size version of many of the plans show here at a very reasonable cost. They
will scale the plans any size for you. It is always best to buy printed plans because
my scanner versions often have distortions that can cause parts to fit poorly. Purchasing
plans also help to support the operation of the
Academy of Model Aeronautics - the #1
advocate for model aviation throughout the world. If the AMA no longer has this
plan on file, I will be glad to send you my higher resolution version.
Try my Scale Calculator for
Model Airplane Plans.
Posted April 30, 2012
|