|
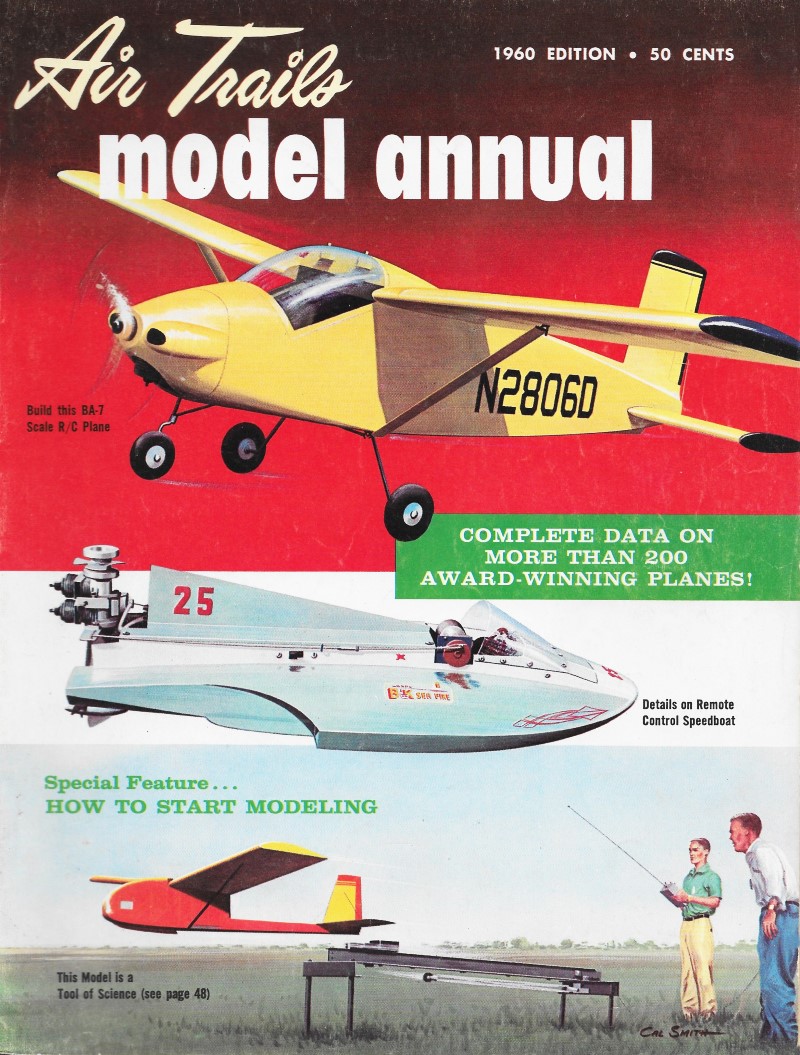
While credit is not explicitly given to a particular author for
this "Starting Free Flight" article in the 1960 Annual issue of
Air Trails magazine, Cal Smith's name is on the
drawing, so it might be him. It was an era when many modelers
were transitioning from gasoline-fueled ignition engines to the
newer glow fuel type. Smaller and lighter engines and
proportionally smaller and lighter models quickly became popular
both because smaller fields could be used and the costs were
lower, thereby providing greater affordability to no more
people. The same change was true for other forms of modeling -
control line and radio control airplanes, boats, and cars. An
evolution in configurations of engine, fuselage, wing, and
empennage was occurring as well based on decades of
experimentation by the hobby's pioneers.
Starting Free Flight
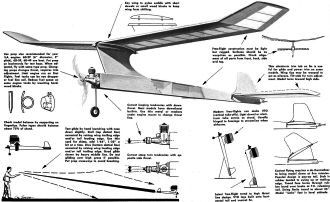
Key wing to pylon saddle with short dowels or small wood
blocks to keep wing from shifting.
Use prop size recommended for your 1/2A engine: 6D-2P (6"
diameter, 2" pitch), 6D-3P, 6D-4P are best.
Put prop on backwards for test hops. When adjusted, fly
with same type prop. Changing props changes thrust, requires trim
adjustment.
Limit engine run on first flights. Fuel tanks can be eye
dropper or fuel line coil. Reduce fuel space on some engine tanks by
inserting hardwood blocks.
Correct looping tendencies with down thrust. Most models
have down thrust built-in. Use thin metal or washers under engine mount to
change thrust line.
Check model balance by supporting on fingertips. Pylon
types should balance about 75% of chord.
Test glide by hand launching with nose down slightly.
Stall (top dotted line) corrected by raising wing trailing edge and/or tail
leading edge. Use thin card for shims, add 1/64", 1/32" a bit at a time.
Dive (bottom dotted line) corrected by raising wing leading edge and/or tail
trailing edge. Good glide shown by heavy middle line. Do test gliding over
high grass if possible.
Put prop crossways to avoid breaking.
Correct steep turn tendencies with opposite side thrust.
Free-flight construction must be light but rugged. Surfaces should
be as warp-free as possible. Check alignment of all parts from front,
back, side and top.
Thin aluminum trim tab on fin is useful for glide and power trim
on some models. Wing tips may be warped to act as ailerons. Tilt
stab for turn adjustment. Model turns toward high side.
Modern free-flights can make VTO (vertical take-offs). Light
dowel or aluminum tube serves as stand. Usually hinged to fuselage
to streamline when airborne.
Contest flying requires a de-thermalizer to bring model down
at five minutes. Popular design is pop-up tail. Stab is rubber loaded
to swing up at trailing edge. Timed fuse burns through rubber band
over hooks at T.E. releasing tail. String limits travel to about
35°. Model "sinks" fast in level attitude.
A Half-A (or 1/2A) free-flight model probably offers the beginner
more flying thrills for the smallest investment than any other phase
of model building. (Half-A class means a model powered by an engine
not over .05 cubic inch displacement - which is smaller than the
"A" class.)
Today's free-flight models are a far cry from the six foot giants
of the early 1930's. Gas engine powered free flight really got its
start about this time when Maxwell Bassett of Philadelphia installed
Bill Brown's first .60 cu. in. "Brown Jr." in his big semi-scale
"Fleetwing" and sent the model aloft for two hours 35 minutes to
set a national record. Fuel load permitted then was measured in
ounces and an engine run limited to a few seconds was unheard of.
Through the years since then the gas engine has undergone constant
improvement. Power has increased, smaller size engines have been
developed. Ignition systems using heavy batteries, coil and condenser
have given way to the now familiar glow plug. Gasoline and motor
oil fuel mixtures have been replaced by the potent glow fuels. As
power plants were improved free-flight model design changed to keep
pace. Early free-flight models were practically all high wing cabin
jobs copied after real planes. Flights were slow and sedate by today's
standards. Then in 1939 Carl Goldberg designed the "Zipper," the
first pylon type which set the style for years to come. Here was
a design that could handle a lot of power when properly adjusted.
It climbed like crazy and would soar like an eagle. Generally, "pylon"
type means the wing sets atop a thin, flat mount high above a boomstick
like fuselage.
Model flying performance improved so that it became necessary
to shorten engine runs to prevent fly-aways. Present rules limit
engine runs to 20 seconds for R.O.G. (rise-off-ground) and 15 seconds
for hand launch. Even limited to this extent today's free-flight
model can climb hundreds of feet in this relatively short time.
Since the object of free-flight is to climb the highest and glide
the longest, a free-flight model combines the best features of a
powered plane and a sailplane. It must be capable of flying in a
high speed climb under power and then soaring well after power ceases.
This has led to a highly specialized model design combining ruggedness
and light weight. To control the red-hot power of the modern engine
and still attain a good glide requires a compromise of adjustments.
Free-flight adjustment is about as controversial a subject as you
will find in all of modeling. We cannot hope to cover it all here.
We will, however, try to touch on the basic rules of adjustment
a little later on.
Latest free-flight trend to high thrust line design. VTO legs
built onto horizontal tail and ventral fin.
A good place for the beginner to start in free-flight is with
the 1/2A model. Kits and engines are inexpensive. Models do not
have very complicated structures, are quickly and easily built and
are a convenient size to transport and store. Flying performance
leaves nothing to be desired. Many kits are for contest types, but
there are also numerous scale kits available. Pick the simpler type
to begin with. A contest ship can also be flown for sport. Since
free-flight structures are relatively light care must be taken when
building to have good alignment and warp-free parts. Every wiggle
will affect the flying performance - so build 'em straight and true.
In order to maintain light weight it is not necessary to cover the
model with 29 coats of dope. This will only add extra weight. Five
or six coats of dope is ample.
When your model is completed check it over carefully for good
alignment. View it from front, side and top. Wings and tails should
sit square on the fuselage. Any warps that have developed should
be twisted out by holding that part over steam from kettle spout.
Sometimes warps cannot be taken completely out of a structure and
if they balance each other or are about the same on both sides they
can be left alone. The next item to check is balance, Support the
model on fingertips under each wing near fuselage. Pylon types generally
balance from 50% of chord (distance from wing's leading edge to
its trailing edge) to trailing edge. Cabin types about 1/3 chord
point (one-third back from L.E.). Kit and magazine plans will show
where model should be balanced. This should be considered a starting
point since each model will vary a bit. Flying and gliding are final
proof of correct balance.
When viewed from the side there should be a slight difference
in angular setting of the wing and tail. The most desirable set-up
should have wing at a few degrees higher angle than the tail. This
arrangement determines proper glide. If this angular difference
(decalage) is too great (5° to 10°) the model will climb too steeply
and stall. If the angular difference is negative (tail L.E. at higher
angle than wing L.E.) dive tendencies will increase as speed increases.
When balance, alignment and decalage have been checked it's time
to test glide the model. Do this on a calm day and preferably over
high grass. Launch model slightly nose down. If it dives into the
ground nose heaviness is indicated; it is corrected by raising the
leading edge of the wing or trailing edge of stab, a slight amount.
A fraction of a degree will make a difference. Try not to change
settings radically from required decalage arrangement. Use match
book covers and 1/32" thick wood for shims. If model still dives
after changing wing and tail angles it may be necessary to add a
bit of clay or lead shot to tail to get proper trim.
If model climbs and stalls when hand glided the angular difference
between wing and tail should be reduced slightly or weight added
to nose. These trim tricks will only take care of gliding - power
flight will require further adjustment. The basic rule to follow
is: Make glide trim changes with flying surfaces and make power
trim changes with engine offset thrust. Obviously a model trimmed
for good glide will tend to climb steeply when speeded up with power
on. Steep climb and looping tendencies can be corrected by angling
the engine down a few degrees. This is called down-thrust.
Most models have the firewall set at an angle so that down-thrust
is built in, but minor corrections may be needed for a particular
model. On radially mounted engines a bit of 1/32" thick metal or
washers put behind top of engine mount will change angle. Strong
turn tendencies are corrected by offsetting engine to side opposite
to turn.
Pylon models generally tend to turn steeply to right so that
side thrust to left is used. Cabin models tend to turn left so engine
is angled to right slightly. Offset thrust adjustments are made
after observing flight pattern during test hops. This is the critical
point, if you can bring the model through the test hop stage intact
you can refine the adjustments later for peak performance.
Make first test hops with prop on backwards to reduce power.
Engine can be run rich to further reduce rpm. Shorten engine run
to 5 to 10 seconds so that if erratic flight develops chances of
crash will be reduced. Watch what happens during hop and make corrections
immediately. Little by little as corrections are made flight pattern
will become safe and maximum power can be used. Further adjustments
will be needed to take care of added power.
Since pylon models tend to turn to right they are usually adjusted
to climb in wide right spiral. Glide can be either way but natural
tendency of model should be used rather than forcing turn in opposite
direction. Glide trim can be adjusted with wing and tail settings
as already mentioned and turn in glide can also be adjusted by tilting
stab. Model will turn toward high side. Rudder trim tab will adjust
glide turn but will also affect power turn. Glide turn should be
flat and fairly tight so that model will circle and not drift straightaway
downwind.
Always launch free-flight models into wind (unlike control-line
which are launched downwind). Recent trends in free-flight design
have been to high thrust line models. This design tends to turn
left like cabin design under power.
Good straightaway climb can be attained with the high thrust
design so spiral climb is less desirable. R.O.G. launching has given
way to VTO (vertical take-off) with model climbing from a tail stand.
This is pretty spectacular stuff when compared to lumbering ground
runs of the "early birds."
Today's high climbing contest free-flight should be finished
with some high visibility decoration so the timer will have no trouble
keeping it in sight. Many modelers paint wing tips and tails with
day-glo paint or put aluminum foil patches on fuselage sides to
reflect sunlight.
Your field kit for free-flight should include: extra rubber bands
for wing and tail hold-downs, extra props, fast drying cement for
patching punctures and the usual fuel, boosters and extra glow plugs.
Your hobby shop will be glad to suggest a 1/2A kit.
Recommended free-flight kits might include.: California-Spacer,
Midwest-Sniffer, Goldberg-1/2A Blazer, Berkeley-Mini-Hogan, DeBolt-Clipper,
Guillow-Kiwi, etc.
So get down to the hobby shop and join the free-flight fans.
You'll find plenty of model building fun and you'll get plenty of
fresh air and exercise chasing that bird cross-country. Tree climbing
practice will come in handy.
Posted January 22, 2022
|