|
  We needed some nice, strong, low profile wooden
transition molding strips to install between very dense carpet (w/padding) and thick vinyl
floor tiles. An area inside our front door, and also the two bathroom doorways needed
the molding. Commercially available transition strips made of
solid wood are very expensive ($50 for a 78" piece), and even the el cheapo
variety made of "wood products" with a
faux grain layer on top is expensive ($35 for a 78" piece). None that I could
find would have done a good job, anyway, because the dimensions were not right. We needed some nice, strong, low profile wooden
transition molding strips to install between very dense carpet (w/padding) and thick vinyl
floor tiles. An area inside our front door, and also the two bathroom doorways needed
the molding. Commercially available transition strips made of
solid wood are very expensive ($50 for a 78" piece), and even the el cheapo
variety made of "wood products" with a
faux grain layer on top is expensive ($35 for a 78" piece). None that I could
find would have done a good job, anyway, because the dimensions were not right.

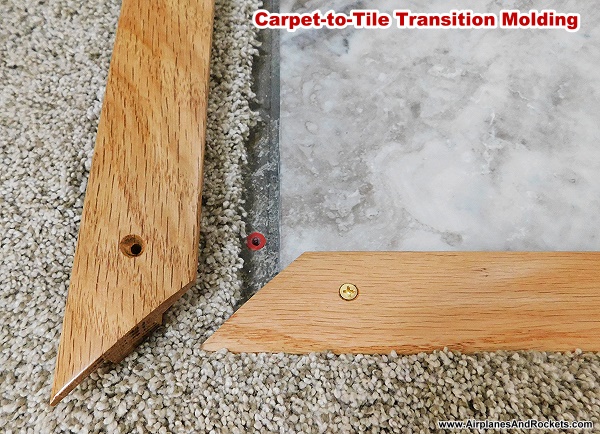
Carpet-to-tile transition molding mitered corners, plastic anchors
in concrete subfloor for attachment.

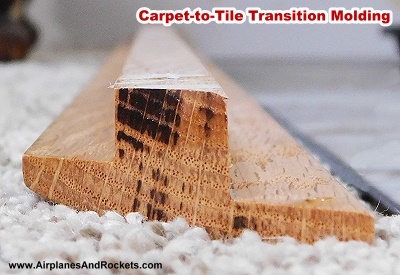
Carpet-to-tile transition molding end view.
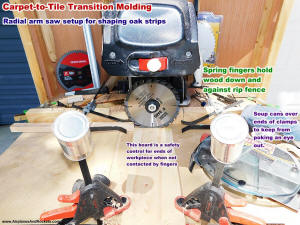
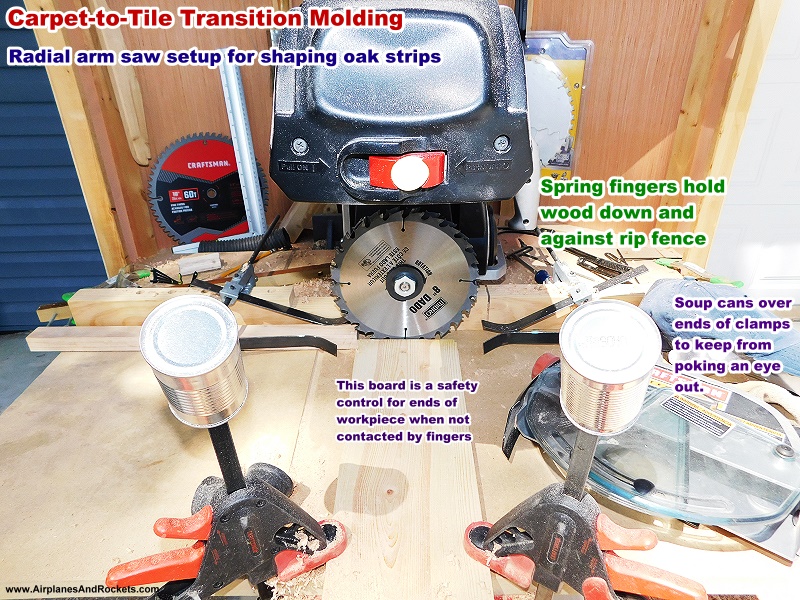
Radial arm saw setup for cutting rabbets in edges of carpet-to-tile
transition molding.
Dado saw blade setup.
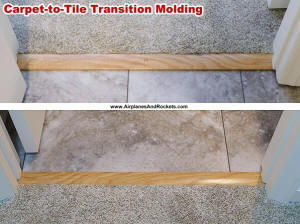
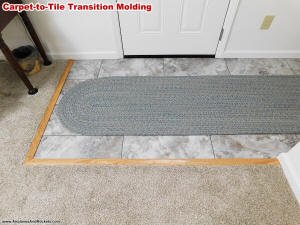
Carpet-to-tile transition molding installed in bathroom doorways.
I wanted the molding to make intimate contact with the underlayment while allowing
the floating vinyl floor tiles to have freedom to expand and contract, with minimal thickness on top
to minimize tripping hazards. The carpet
side needed to compress the piles enough to hold the edge securely on the tack strip
while not distorting the piling excessively. I have the tools required to do a
custom molding,
but really didn't want to put in the effort unless absolutely necessary. Ultimately, doing it myself
was the best choice, and I'm glad of it now that it's done.
My daughter and son-in-law had some nice red oak and white oak trees cut down
and sawn into fence board size (approximately 1" x 8" x 10 feet) a year ago
and had it stacked to dry. I selected a few premium pieces of each for running through the
Craftsman planer, figuring I might as well do a few extra to build up my project
stock inventory. Prices for sanded oak boards have doubled since the COVID scam
began.
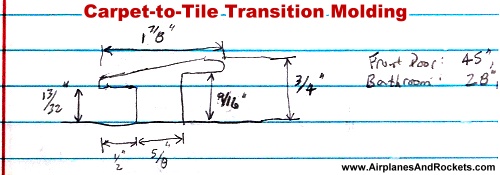
After making careful measurements, I came up with the shape shown in the drawing
at the top of the page.
One of the red oak boards was planned down to thickness, and then cut into strips
a bit wider than the intended finished size (to allow for sanding). Dimensions are
not critical, but it is good practice for shoot for perfection all the time, even
if not required. About 13 feet total was required.
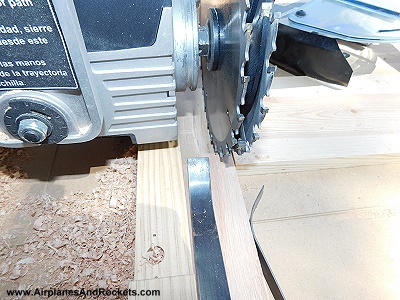
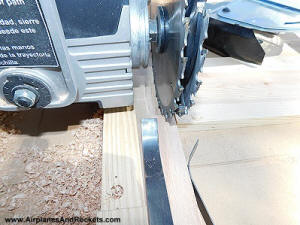
A dado blade was used to cut the rabbet grooves along the edges. As the photos
show, spring fingers were set up to hold the stock securely against the rip fence
and the Craftsman radial arm saw table surface. I also installed a piece of wood in front of the saw blade
where there is no support by the fingers, to make sure the stock couldn't shift
while first entering and then exiting the blade area. Enough of a gap was provided
to ensure binding would not occur.
Next, the strips were clamped in a vise and the top surface was beveled using
a block plane and belt sander, and the edges were rounded over. The carpet-to-tile
transition molding strips were then cut to length and miters were cut for the front
door area.
Since we have light traffic in those areas, I figured using plastic anchors in
the concrete floor would do a good enough job of holding everything in place. Holes
for the flathead brass screws were drilled and countersunk. A trial installation
showed everything was good, so a final sanding was done, and three coats of clear
polyurethane were applied, sanding between coats.
After allowing the polyurethane to dry for a week, the carpet-to-tile transition
molding was permanently installed. That was all about six months ago, ad thus far
it had held up very well, with no indication of coming loose or wear on the finish.
On tot he next project...
Posted August 5, 2023
Other Woodworking Tips & Projects:
|