|
Models of Frank
Smith's Miniplane have been built and flown by scores of modelers over the decades. Homebuilt
planes are popular scale projects partially because the level of detail necessary to
faithfully reproduce the full-size airplane is less that with a production plane. Sig
Manufacturing introduced a radio controlled kit model of the
Smith Miniplane back in the
1970 that is still available for purchase on their website today. This article from a
1961 issue of American Modeler includes plans for a .29-powered control line version
of the Smith Miniplane having a 34" wingspan, along with some history on its development.
Frank Smith and His Lightplane Legacy
Story, model and plans by Tom Henebry
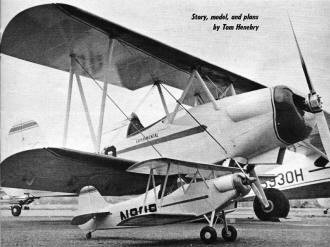
Smith Miniplane
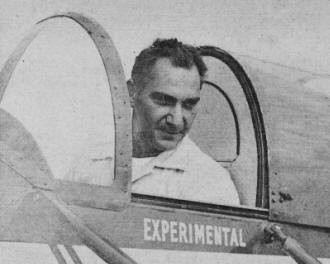
Frank Smith in his Playboy; a machinist by trade, Frank learned to
weld so he could build the ship.
All model builders do not end up manufacturing airplanes, but most of aviation's creative
minds first found an outlet for their aeronautical ideas by hacking away on a chunk of
balsa wood. Take Frank W. Smith for instance, he followed the same path as many successful
aviation enthusiasts. His name is as well known to amateur aircraft builders as the bearded
Smiths, "Trade" and "Mark," are to the buyers of cough drops.
Starting back in the roaring "20's" with the old solid scale models (replaced now
with today's "plastics") he progressed to gliders then to rubber models in the classic
pattern of the day. Models in the 20's were far from roaring, no tender-eared citizens
complained to the local constabulary about the gliders and rubber jobs making too much
noise. Then Frank got a taste of flying in a Curtiss Junior; the models just had to wait.
Flying from a barnstormer's strip in Missouri the Junior convinced Frank that this activity
was for him. Unfortunately 1929 was a bad year for almost everything so Frank took Greeley's
advice and headed West.
Smith spent the next decade outside of aviation physically but not mentally. While
he was working in a machine shop, or later when he was starting his own shop, there was
usually a flying or model magazine within reach. During the war years, although working
long hours, Frank's interest in models was reborn. Gasoline engines fascinated him so
he began making control line speed models. Engines were hard to get and most of the ones
available were pretty sad, so he promptly made his own engines.
The power of Frank's mills was proven when an airplane-engine combination built by
Frank and flown by Rolf McPherson walked away with a big contest in the Los Angeles Coliseum
during 1943. The model weighed a whopping 8 lbs., was powered by his homemade engine
of .59-.60 displacement. To prove it was no fluke the same 8 lb. monster was flown at
105.75 mph for a new record that held up for several years. Along with his very successful
models and engines the energetic Mr. Smith developed the first wet cell battery for ignition
engines and one of the first storage battery powered starters seen on the West Coast.

Mrs. Dorothy Smith and her son Don admires Henebry's model Miniplane.
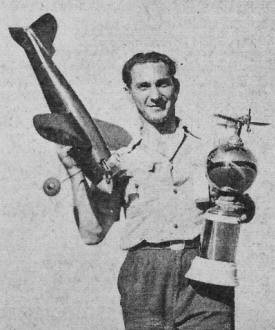
Frank Smith taking home some hardware from a model contest in 1943.
He had designed and built both the plane and the power plant.
Models were fine but the old flying bug bit again and in 1949 Frank got his pilot's
license. The ink was hardly dry on this precious document when he bought the remains
of a Travel Aire 12 W. This was a real basket case that he rebuilt from the tail wheel
up. Powered with a 145 Warner the slicked-up red and silver ship helped Frank pile up
some hours in his log book, but it was too big and bulky to suit him.
With Ray Stits and a few more interested people he helped form E.A.A. Chapter #1 in
Riverside, Calif. Ray was building the prototype "Playboy" and Frank followed the progress
closely. Delighted with the original Stits Frank built the first Playboy from Ray's plans.
This was a true sport plane and Smith logged many hours in it. He still had a preference
for biplanes; when one voice in a group of hangar flyers suggested he build another deck
on the Stits, he countered with a sketch drawn on the hangar floor. "That's what it should
look like," he said, "and I'm going to build it." Eight months after he made the sketch
on the hangar floor, the first Smith Miniplane was rolling down the runway on its maiden
flight. This is a fantastically short period of time to build an airplane even from a
set of plans, and to start from scratch on a new design, it must be some sort of a record.
The Miniplane was all Frank wanted in an airplane; stressed for 9 G's it could do
any maneuver in the book. With a husky 100 HP Lycoming roaring in its nose, it made the
proverbial home sick angel look like she was dragging her feet. The perky little bipe
was a crowd stopper on the ground as well as in the air. Anytime it was on the field
it attracted crowds of admirers and it wasn't long before Smith started getting requests
for plans. Lee Wainscott took on the job of drawing up the plans while Frank started
building another Miniplane very much like the first but with a few minor changes. The
second ship was about seventy percent complete when tragedy struck. Without warning Frank
Smith died of a heart attack. His family and friends were stunned and grief stricken.
For a long time the second Miniplane stood in mute silence under a mantle of dust.
With the help of friends and her son Don, Dorothy Smith, Frank's widow, decided to
see Frank's work carried on. Lee Wainscott and Howard Terrill finished the second Miniplane
and the plans were made available to builders everywhere. Tom Messick flies the Miniplane
to fly-ins and Don follows in the family Piper Vagabond. Don, who holds a student ticket,
has piled up many hours in the Vagabond. He far exceeded the cross-country requirements
for his private license with a tremendous 4,200 mile round trip flight to the 1960 EAA
Fly-In at Rockford, Illinois. Don's itching to get his hands on the Miniplane but the
FAA requires a private ticket to fly an experimental aircraft and until he's 18 Don will
have to be content to remain as a student pilot on the Vagabond.
Present at every regional or national Fly-In, Dorothy Smith is interested in all homebuilts
but especially Miniplanes. She intends to keep low-cost plans available to anyone who
wants to build the plane. To date there are 7 Miniplanes flying, over 30 in various stages
of construction and more than 100 sets of plans in circulation. There will be more Mirriplanes
and certainly for many, many years they will serve as a flying tribute to Frank Smith:
Control Line DSA Miniplane

Big and little Miniplanes, below.
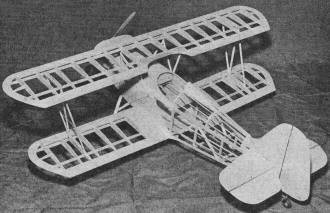
Full size drawings for the Miniplane are a part of Group Plan #161
from Hobby Helpers, 1543 Stillwell Ave., New York 61, N. Y. (85c).
One of the best of the newer homebuilt biplanes is the late Frank Smith's "Miniplane."
Called the DSA (Darn Small Airplane) it is by no means a midget in performance. Stressed
for 9-1/2 G's the stubby 17 footer will outclimb and out stunt most contemporary designs.
The 2" to the foot scale model described in this article inherits all the get-up and
go of the prototype. With the symmetrical airfoil and a hot .29 the DSA will stunt as
good as many models designed for aerobatics alone. For the scale builder who wants to
load up on detail the flat bottom scale airfoil and reference to Jim Triggs scale drawings
in the March 1960 American Modeler should produce a contest winner.
The model was built from plans for the real airplane and differs only slightly from
the original Miniplane (N90P). Since all the airplanes of this type are homebuilt, each
one reflects changes desired by the individual "manufacturers." Because each one is different
the only real yardstick of scale can be the original designer's drawings. Plans for the
full sized airplane or further info on the Miniplane can be obtained from Mrs. Frank
Smith, 1938 Jacaranda Place, Fullerton, Calif.
Construction begins with the upper wing. Your best hard balsa should be used for spars
and all ribs. Except for two shorter center ribs, cement all in place. Place 1/8" x 1/4"
in back of each spar in center section as a spacer and cement another piece of 1/8" x
1/4" from the last full-sized rib on one side of the center section to the last full-sized
rib on the other side. The two center section ribs may be traced from the plan in the
fuselage side view. These two ribs are cemented in place and top spar, wing tips and
leading edge covering added while wing is still flat on plan. Mark position of 1/4" x
1/8" strut sockets but do not add them at this time. Remove wing from plan, add 1/8 "
sheet gussets at wing tips and smooth up complete structure with sandpaper wrapped around
a block of wood. Both bottom wing panels are made in same manner but let. the 1/4" x
1/8" spars extend past root rib about 2 1/2". Strut socket centerlines should be marked
on lower wings while wings are still on plan.
The fuselage is started by stripping off two 3/8" wide strips from 3/16" sheet and
pinning them in position over top longeron. Fit large piece of 3/16" sheet that extends
from nose to cockpit area and cement to top longerons. Build up rest of side structure
from 3/16" sq. With both sides positioned accurately one above the other, drill 1/8"
dowel hole thru both sides and slot both sides for 1" wide piece of 1/8" plywood that
will hold bellcrank. If you intend to rig airplane with flying and landing wires drill
two 1/16" dia. holes at lower forward part of fuselage that call for 1/16" O.D. aluminum
tube. Make sure front of fuselage is square with top longeron before separating sides.
Cut formers F-1 and F-2 from 1/8" plywood, position them as shown. When they are aligned
drill engine mount holes and fuel line hole. F-2 cements in position as first step in
building fuselage. Use temporary cross pieces of 3/16" sq. in bottom forward part of
fuselage and build up basic fuselage box structure. Split 3" length of 1/2" sq. diagonally
and cement it in both comers of fuselage and F-1 as a gusset. Pin firewall, gussets and
side together with dowel about 1/2" from top and bottom of both sides. This will give
added strength to the joint to absorb engine vibrations and impact loads.
Slip 1/8" dowel cross piece and 1" x 1/8" plywood bellcrank platform thru their respective
slots, cement and cut off flush with outside surface of 3/16" sheet. Bend landing gear
parts from 3/32 wire and install in place. Bind rear strut to piece of 1/8" dowel and
coat with cement. Cement 1/8" plywood pieces shown in fuselage side view securely in
place around gear. The top of main landing gear strut should be flush with top longeron
and at right angles to sides. Bend 1/16" wire cabane struts, place front cabane strut
directly over front landing gear strut. Wrap the two wires together with soft copper
wire and solder. Cement 1/16" x 1/8" x 6" at top of both cabane struts; when dry place
them in slots in wing center section. Check wing for zero incidence; it must be at right
angles to fuselage. Make any adjustments by slight bending of cabane wires. Add notched
piece of 3/16" sq. across fuselage under rear cabane struts, wrap with strong thread
and cement. With wing pinned in position, bend and install diagonal cabane struts. The
fuselage is now a box with landing gear and cabane struts firmly attached.
Bend and drill engine mount; drill tin can stock slightly larger than flat part of
engine mount to match mounting holes. Solder four #6-32 nuts in position on tin and attach
firmly to back of former F-1. Assemble engine mount and former F-1 and screw in position
with #6-32 screws; when all is in alignment remove screws, coat former F-2 with cement
and reassemble. Using "Perfect" #10 or similar tank solder extensions of 1/8" brass tube
on all outlets, place tank in position. Shim tank with scrap balsa until it is level,
cement in position.
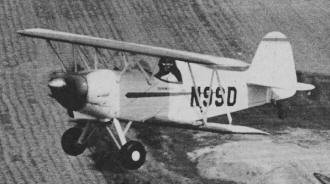
Flight shot by Howard Levy during E.A.A. "Fly-In" at Rockford last
summer.
Cut and form tail surfaces from smooth warp-free 1/8" sheet. The elevators are joined
by a "V" shaped piece of 1/16" wire forced into the" elevators; a "Perfect" #258 hinge
is wrapped around this wire and pressed into center of stab. Install other two sets of
hinges, check for free movement. Bend push rod; position tail assembly so it is level
with bellcrank in position shown. When stab is cemented in position formers F-5 through
F-8 and 1/16 x 1/8 turtleback stringers are added. The vertical fin extends down to top
of elevator; it is braced on both sides by soft balsa blocks shaped to fair in with turtleback.
The same type hinges are used in rudder to carry out the scale effect but are soldered
stiff.
After attaching lead-out wires and making sure that everything inside fuselage is
in order, cover front section with 3/32" sheet. Cut nose pieces of cowl from 1/2" sheet,
cement it in position by mounting it on temporary blocks attached to firewall. Carve
and install cowl cheek pieces. Put strip of masking tape around fuselage at cowl line,
fill in area between nose piece and F-1 and area from F-1 to cowl line with scrap balsa.
Shape and sand cowl so it is a straight line from nose piece to thickness of the masking
tape at cowl line. You will note that F-1 acts as template to keep surface aligned. Split
cowl from former F-1, carve out inside. Small blocks of balsa cemented to firewall will
position cowl while simple hooks and rubber bands run thru the cheek piece will hold
it snug. The engine is started inside closed cowl by attaching short lengths of wire
to glow plug and ground and running them out cowl cheek piece on right side. Alligator
clips on battery leads will speed starting procedure.
Position lower wings by slotting fuselage bottom in proper location to take two 1/8"
x 1/4" spars; locate bottom wings at zero incidence and with 1" dihedral at tips. Cut
two interplane strut assemblies from cardboard, fit in position by marks made on wing
spars. On the upper wings lay 1/8" x 1/4" balsa on each side of strut; cock them to correct
angle so they lay flat against top of strut. The bottom strut sockets are installed the
same way but use 3/32" sheet wing ribs that are cut oversized and chopped off at the
front spar. Check alignment from every angle; remove interplane struts to sand tops of
lower wing flush with rest of wing. Unless your work is exceedingly accurate there will
be a slight difference in the cardboard struts and the ones shown on the drawing. Use
cardboard strut as templates and cut each strut from one piece of 1/16" plywood. Cover
each side with 1/4" strips of 1/32" sheet, sand to airfoil shape. Lay struts aside, do
not install until after wings are covered and doped.
The original model was covered with Silkspan which was given two coats of clear butyrate
and four coats of pigmented butyrate. The colors of the Smith aircraft are '56 Ford Yellow,
Stearman Red trim and gloss black lettering.
After the first two coats of dope, lower wings may be cemented in position and finished
along with fuselage. The top wing is completely finished, then slot cut in covering for
interplane struts and cabane structure. Lower wing covering is slotted for interplane
struts and they are cemented in place. Lay top wing in position and rig airplane with
1/2A control line wire. If you installed 1/16" O.D. aluminum tubes in fuselage you can
run flying wires from top of one strut thru fuselage to top of other. With all rigging
in place top wing may be removed, slots filled with cement and reassembled.
Weighing in at 3.5-lbs model is a little on the hot side with a good .29 swinging
a 10"-6" prop. The bipe could be covered with silk and more detail added and still perform
well on a .29 but for the wild ones a .35 powered version with a symmetrical airfoil
and a heavier finish should be quite a handful. One word of caution, if the lifting wing
is used, don't forget they are lifting wings - be prepared for a sharp climb from take
off. If you are expecting the climb-out everything is fine but if it comes as a surprise
the results could be disastrous. Once in the air, the model is sensitive but not tricky;
it will groove if you hold just a little nose-down to counteract the lifting section.
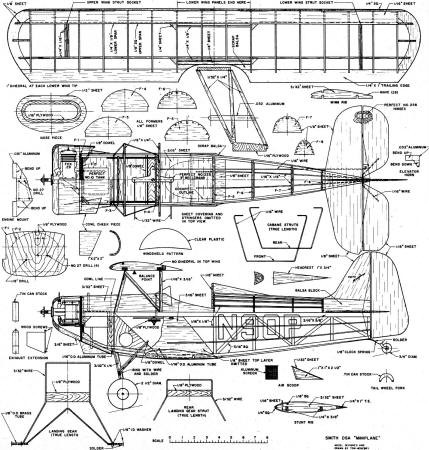
Control Line Smith Miniplane Plans
Notice:
The AMA Plans Service offers a
full-size version of many of the plans show here at a very reasonable cost. They
will scale the plans any size for you. It is always best to buy printed plans because
my scanner versions often have distortions that can cause parts to fit poorly. Purchasing
plans also help to support the operation of the
Academy of Model Aeronautics - the #1
advocate for model aviation throughout the world. If the AMA no longer has this
plan on file, I will be glad to send you my higher resolution version.
Try my Scale Calculator for
Model Airplane Plans.
Posted April 8, 2017
|