Those of us fortunate
(or unfortunate, depending on your point of view) to have been in the model airplane
realm back in the 1960s and 1970s (and earlier) are very familiar with
Maxey Hester and
his award-winning models. Mr. Hester designed many of the fine scale models sold
(some still) by Sig Manufacturing of Montezuma, Iowa. In fact, if you don't know,
Maxey later married
Hazel Sigafoose
after her first husband and company co-founder (Glen) died (during an aerobatic
performance). This P-63 Kingcobra was designed for "multi" radio (what we refer
today as 4 or 5 channels) and a K&B .45
engine. The wingspan is about 64".Maxey's Marvelous P-63
 Author
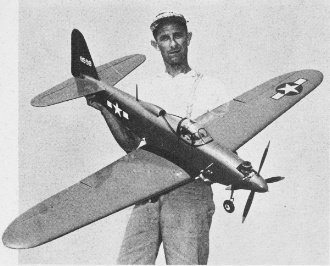
Maxey Hester of Des Moines, Iowa, with his radio controlled near-scale Bell P-63
Kingcobra "multi" job. Author
Maxey Hester of Des Moines, Iowa, with his radio controlled near-scale Bell P-63
Kingcobra "multi" job.
At the 1960 Dallas Nationals, while waiting in the ready line at the hotly contested
(in more ways than one!) multi R/C event, I was struck by the similarity of most
entries. While there was a small variety of configurations, the majority were pretty
much the same in shape, ranging from plain to downright ugly. At that moment the
concentration required in competitive flying didn't allow further speculation, but
after the meet on the long drive home, I got to thinking about what to build for
the following season. Seemed to me that a good "pattern airplane" could be designed
that would be realistic in appearance without sacrificing stunting performance.
Since the trend at Dallas indicated trike gear was the only way to get top points
for take-off and landing, I began looking up full scale designs so equipped. It
didn't take very long to narrow the field, because my preference was for a military
aircraft and there just weren't many in the pre-jet age that had tricycle gear.
Of the few I was able to turn up, only the Bell Airacobra P-39 seemed a likely candidate.
Later I was to discover that Harold deBolt and others had arrived at the same conclusion.
Shortly after the Nats I was visiting fellow clubman Claude McCullough, having
taken on the test piloting of his Martin Mauler R/C job. He's a scale fiend from
way back with a large collection of magazines, books and 3-views. We got to digging
around for material on the P-39 and turned up plans and photos of it as well as
a later development, the P-63 "Kingcobra." Its lines were more appealing and I was
not long deciding that here was the configuration I was seeking - the ideal layout
for a fully stuntable multi that could be near scale in outline.
I worked out specs that tied the lines of the P-63 to well-proven multi construction
practices; Claude (a big-time Iowa farmer also known as "Mac," "Flint" and/or "Flyaway")
drew up the plans. Turned out during one winter month, the plane was an instant
hit with everyone who saw it. As soon as the weather broke in the spring, out came
the Kingcobra and proving the point that airplanes which look right generally fly
right, performed perfectly on the first attempt, only minor trimming being required.
The model was an impressive stunter, fast yet extremely smooth. But there was
one large ant in the oatmeal. Wanting a fine finish to go along with the sharp appearance,
I applied what has come to be known in these parts as a "McCullough" finish. This
is measured not in coats, but in gallons. It turned out plastic-smooth (note photos)
but I found out that you never get something for nothing ... the finished product
weighed nearly 8 lbs., at least one more than planned.
This extra weight was carried fairly by the model, nevertheless there were a
couple of maneuvers where the "McCulloughnizing" had its effect. Since contests
are won or lost on such little matters as half a point, I concluded that my lighter,
modified Orion would have to be my main multi competition ship; the Cobra would
serve as my scale entry.
No scale contests were scheduled before the 1961 Nationals but the P-63 made
its mark as a demonstration airplane, flying at noon-hour contest breaks all over
the Midwest. For an experiment, at the Lincoln, Neb., meet the Cobra performed after
the regular events be-fore the same set of judges as my 1st place multi-winning
Orion. The P-63 was only two points less than the winning flight in spite of that
weight disadvantage. There's no doubt but that "K.C." consistently copped the prize
for interest throughout the season ... always it was the airplane everyone asked
to photograph and see fly. Cliff Bennett got good movie shots of it in action at
a big Chicago contest. He showed these during the Nationals (I didn't get to see
them).
At the Nationals scale event, it seemed the Cobra would really be in its element
as a thoroughly checked and proven model. But fate and Murphy's law (i.e. - If it
can happen, it will) ruled otherwise. Just after completing the straight flight
back from a procedure turn during the first round, transmitter failure transformed
the Cobra and my hopes into a heap of pieces ... luckily, at least, off the concrete
runway or there would have been radio and servo shards among the balsa shreds. Up
to this catastrophe I had collected 25.5 flight points, which added to my scale
judging score of 67.66 gave a fairly respectable for fourth place ... not too bad
for a nearly Kaput airplane.
Another Murphy (Joe) with 60.33 scale points plus 53.2 points for flying went
home to California with the trophy. His mantle might have been bit less loaded if
our Cobra had been in the air a couple of minutes longer before the transmitter
antenna lead let go!
After a busy contest schedule (over 10,000 miles of driving, some flying) when
the weather turned "sour" I got to looking at the pieces. England's Henry J. Nicholls
and Claude had helped me gather up most of them, though we missed a few of the smaller
ones embedded in the landing crater. World Engines' John Maloney later found the
nose hatch cover. Actually for such a spectacular plunge the remains were in fairly
good shape - most vertical full power bashes don't leave much repairable. So I began
hooking it back together. In recovering the whole ship and using a minimum rather
than a maximum amount of dope, I dropped a full pound of weight - this in spite
of the fact that jigsaw puzzle repair jobs invariably make the structure weigh more
than it did originally. It looks nearly as good as it did at first and flies even
better at the lower loading. I took it down to the last contest of our Midwest season
in Topeka on Nov. 11-12 and finished on a high note - first place in the scale event.

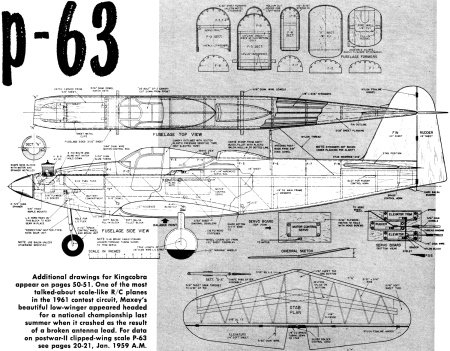
Maxey Hester's P-63 Kingcobra Fuselage Plans

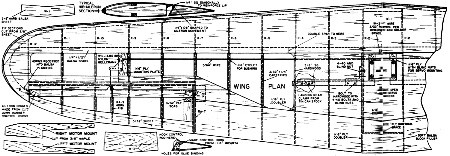
Maxey Hester's P-63 Kingcobra Wing Rib Plans

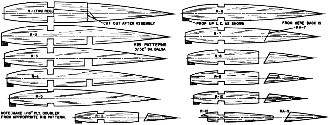
Maxey Hester's P-63 Kingcobra Wing Rib Templates
The construction, along proven lines, should not require much explanation to
a builder with R/C experience. And certainly you should have some experience, preferably
with low-wing, aileron-controlled planes before tackling a project like this P-63.
Take time selecting your wood before beginning. About the only place for hard
balsa is in the elevator and wing spars. Longerons and stringers are medium. Use
harder balsa for ribs near the center, graduate to light balsa at the tips. Planking
and fin and rudder are Sig Contest (very light) balsa; all blocks are soft.
The fuselage is a combination of square longeron built up and sheet side construction.
Assemble 1/4" side frames and install formers before covering sides with 3/32" sheet-doubled
in areas indicated.
One of the most talked-about scale - like R/C planes in the 1961 contest circuit,
Maxey's beautiful low-winger appeared headed for a national championship last summer
when it crashed as the result of a broken antenna lead. For data on postwar-II clipped-wing
scale P-63 see pages 20-21, January 1959 American Modeler.
Take particular care around the mounts and nose blocks to get everything solidly
fastened. I used Ambroid on the entire job, pre-gluing all joints for greater strength.
Leave nose squared off until construction is completed then carve to shape with
spinner and motor installed (but not running).
Note fuselage has slight curvature between F-1 and F-2. Reproduce this by allowing
stringers to protrude slightly, sanding them to conform to this contour.
The nose wheel gear designed by Dale Nutter, used because of its scale appearance,
works effectively. (Available from Perfection Model Co., 827 22nd St., Santa Monica,
California, $7.50, ready-made, chrome plated.) I had homemade wheel hubs and drums
but Space Control brakes and wheels, now available, are quite similar.
The control rod for the L.G. is not shown on the plan since its positioning is
dependent on type and placement of your R/C equipment and batteries. Some over-and-under
bends are required to clear things. Near the gear bend a "V" into the wire to allow
adjustments (by spreading or narrowing); this serves as a shock device to take some
of the landing strain off of the servo, Very little wheel movement is required for
making taxi turns - most fliers use too much ending up with overly-sensitive response.
While the usual keepers are used to attach the control rods to the servos, the
motor control rod has none so the servo board may be removed from the airplane.
It is so close to the guide that the wire stiffness holds it in place without a
keeper. A vision hole is cut in the fuselage planking just above the servo horn
hole so that you can see to guide the wire back into position when replacing the
servo board. Use flat head screws to mount the motor control servo so that they
will not hit the bottoms of the 3 other servos on the other side.
I use dowels for elevator and rudder control rods considering them more trustworthy
than balsa. A Bonner nylon control horn is on the rudder. It is a good idea to make
a removable hatch on the bottom of the fuselage just below the elevator horn so
that changes in movement may be made easily.
The elevator trim deal, a very workable setup suggested to me by Ed Kazmirski,
couldn't be much simpler. I've used it on all of my airplanes. To change the degree
of trim just insert a larger or smaller spacer as required. To be noted particularly
- the nylon block should be solid and non-flexible. I made mine from 1/4" thick
nylon 3/8" sq. The spring is not necessary once amount of trim is established, since
the block could then be solidly fastened, but it makes it handy to move the unit
to another airplane and have it always ready for adjustment.
The canopy is the deBolt CF-2 World War II job which must be cut down, mainly
from the front, to get the shape peculiar to the Cobra. The framing is outlined
with Scotch Plastic Tape; This is not the familiar electric tape; very resistant
to being soaked loose by oil it must be applied to a clean surface and can even
be doped over for a better seal. (It is not advisable to dope the entire canopy,
it may. distort or warp.) The tape is obtainable from hardware stores from a rack
of colors and widths.
The wing and stab of conventional construction should give no difficulty. Care
should be taken to get the wing assembled perfectly true ... these fast flying ships
aren't happy with sloppy alignment. I have a construction jig and the number of
wings which have gone through it make the extra effort well worth while. Similarly,
double check the angles of incidence of the wing and stab. A flat section of fuselage
is provided as a stab mount; wing angle may be measured from the 1/4" sq. main longeron.
The scale finish of the Cobra was matt (non-glossy), but this does not mean crude.
I can't emphasize too strongly that your final finish depends mainly on its base.
Fill all those little cracks and nicks that collect during construction with Plastic
Balsa and fillet where necessary - as on the scoop and fin - with the same material.
Then caress everything velvet smooth with fine sandpaper; it will take time and
patience, plus a lot of elbow grease.
Next, give the entire framework a coat of Sig Balsa Filler. Sand most of this
off, so that the remaining filler is mainly in the pores of the wood. Cover entire
airplane with silk, applied wet, sticking it on with dope on all balsa parts. After
drying, dope all of the exposed silk parts with one coat of clear butyrate, follow
with two more coats on the complete model. Sand lightly with 400 wet-or-dry paper.
Brush on one coat of Aero Gloss Filler Coat over the entire model. Sand thoroughly.
Spray on two coats of thin color dope, Olive Drab on top, Light Gray on the bottom.
One coat of clear is then brushed on (to avoid overspray traces) with a large fine-haired
brush, on top of the color. After several days drying, sand with 400. Try not to
sand through the clear into the color. Then one more coat of brushed clear. Rub
with very fine rubbing compound (I used the white variety) to dull the glitter of
the last coat of clear. Final step is waxing with Aero Gloss wax. This is not quite
as striking as my original gallon-and-a-half job, but it is fully presentable and
doesn't add surplus weight.
Originally the Air Force insignia was hand-painted. On the refinishing job, decals
from the Sterling Mustang kit were found to be just right. After attaching the decals
and removing all bubbles, I applied a thin coat of decal setting liquid to stick
them down. For scale accuracy, the red stripe should be removed by covering the
bar with a piece of white decal material cut to the same shape. Tail numbers were
cut from Sig decal material, I used my AMA number.
Since the Kingcobra wasn't used in combat by the U.S. you can't find any authentic
fancy paint jobs. All of the photos we have found show it in stock olive drab top,
light gray bottom, black wing walks with white or yellow tail numbers or unpainted
bare metal with black tail numbers. Many P-63's were supplied to the Russians with
a red star in a white circle, same size as the U.S. star and circle (including border)
but with no border or bar and on both wings, top and bottom. A number were used
as piloted target planes (now there was an assignment!), some painted orange-yellow
overall, with a bull's-eye on the cockpit sides and such names as "Pin-Ball Special"
on the nose. So if you want to be different, look up these off-beat color schemes.
You'll be better off not trying to cut corners on the equipment installation
- the higher quality items are the cheapest in the long run. I used Bonner Transmite
Servos and have flown the Cobra with C. G., Klinetronics and Min-X outfits.
A word on flying: First of all, it goes without saying (but I'll say it anyway)
that the first flights are not even attempted until everything - alignment, C.G.
position, operation of the motor and all radio gear - is 100%. Then, if you are
not a fully qualified multi low-wing flier with a log book showing hours of flying
time, "forego the thrill (?) of first flight and get an experienced R/C'er to do
the test flying. Until completely checked out, there is no substitute for a skilled
hand on the box. Once over the hurdle of initial flights, have your test pilot "take
off the ship and get up to altitude before giving you the box to get the feel of
the plane and standing by to take over should you develop a nervous twitch-a normal
reaction that even top fliers develop on occasion.
I've test flown a couple of dozen airplanes this past season, some of them really
wild, and only automatic reactions built up by hundreds of flights saved many of
them from piling in on the first time up. I recently worked up a linked transmitters
affair that allows the test pilot to take over control of the airplane at a drop
of the switch, to better handle a testing or training assignment. Having a club
test pilot is getting to be a common practice in many sections and a sensible one
considering the amount of work and money tied up in a multi R/C.
Adjust so even full-down trim will hold the plane level while in inverted flight.
Up-trim should be set for the best normal glide for landing. The P-63 should have
a rather fast glide, nose slightly down. If you try to slow the glide down too much,
there won't be good control reaction and she will stall out too easily and settle
too soon. It's better to come in fast, clean and steady than galloping around.
Every airplane has its own individual characteristics which must be learned,
but the Kingcobra is fairly free of idiosyncrasies. I do advise ailerons-only and
not using up-elevator during spiral dives, for she twists quite spectacularly what
with the large fin area. It is best not to chance stalling out the ailerons delaying
recovery.
The interest shown by both spectator and modelers in the P-63 has amply verified
my thought that a realistic appearing model was the ticket. It is a topnotch pattern
performer. With enthusiasm for R/C scale increasing she should make a good building
project.
Notice:
The AMA Plans Service offers a
full-size version of many of the plans show here at a very reasonable cost. They
will scale the plans any size for you. It is always best to buy printed plans because
my scanner versions often have distortions that can cause parts to fit poorly. Purchasing
plans also help to support the operation of the
Academy of Model Aeronautics - the #1
advocate for model aviation throughout the world. If the AMA no longer has this
plan on file, I will be glad to send you my higher resolution version.
Try my Scale Calculator for
Model Airplane Plans.
Posted August 25, 2023
(updated from original
post on 8/19/2013)
|