|
Danny M., a website visitor
from The Land Down Under, wrote to ask that I scan and post this article for what
today we would call a "smart" glow plug driver. There is also an accompanying article
in the same July 1974 edition of American Aircraft Modeler magazine titled "The AAM Glowdriver."
Danny said, "I built one in 1978, it is still working fine. When a friend saw
how it would light a plug under water and clear a flooded engine instantly he
begged me to build him one. Unfortunately the original article is long gone, so
I found your website and noticed that you list the magazine in question." Well,
thanks to our resourceful mate, now the plans and article are available again in
case you are experiencing a bit of nostalgia.
Fast Start Set Uses The AAM Glowdriver
The AAM Glowdriver is ultra-simple to construct, using readily
available radio supply stores.
Here's how to build an AAM Glowdriver, using a printed circuit board.
By Hobie Steele
Late last fall, I was the last guy left at the field. There was plenty of
daylight left, and I wanted to do more flying. I cranked away, with nary a pop
from my engine. I finally decided to check the glow plug. It was lukewarm, but
not hot enough to fire off my engine. Other plugs produced the same (non)
results, and not a buddy was in sight from whom to borrow a fresh battery. Has
it happened to you?
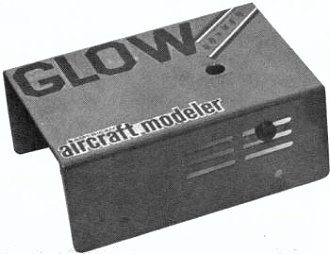
Chin up Ducky, here comes the AAM Glowdriver. It's a new and better way to light
that glow plug from your 12 volt starter battery. With flooded or dry plug, upright
or inverted engine, in hot or cold weather, with fully charged battery, or almost
flat, you'll go every time. The AAM .Glowdriver is a solid state, pulse width modulated
power supply, which senses a given glow plug's needs and keeps it cherry red. Let
me tell you how my Glowdriver came about, and show how easily and inexpensively
you can duplicate it for yourself.
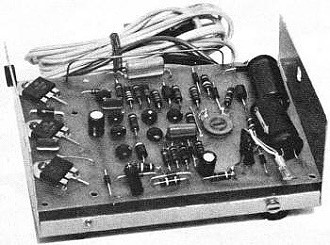
AAM Glowdriver chassis with components mounted.
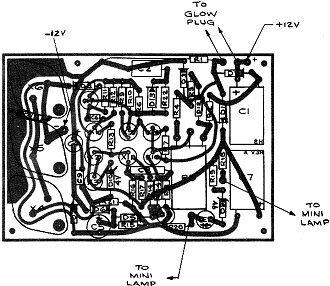
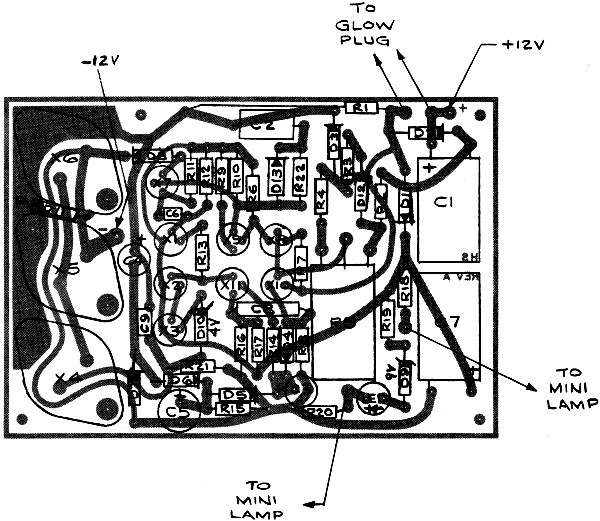
AAM Glowdriver PCB wired connections.
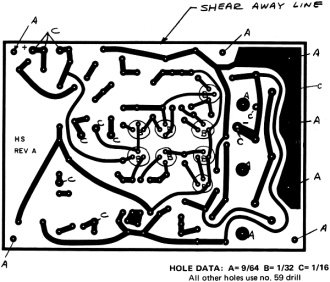
AAM Glowdriver PCB hole drilling data. Drill holes from
foil side, using care and a sharp bit. Use hole data for proper sizes.
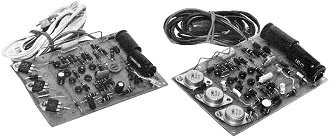
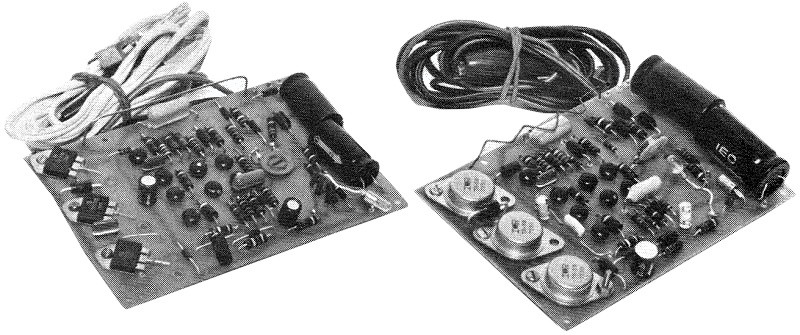
A handful of components on two versions of the Glowdriver printed
circuit boards. Two different types of power transistors show. Using cheaper power
transistors could lead to frustration.
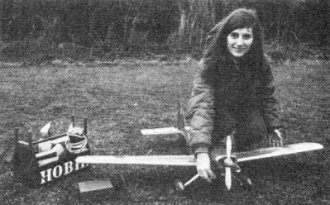
If you can manage to talk an assistant into joining you for some
cold weather flying, she will appreciate having an AAM Glowdriver (and so will you).

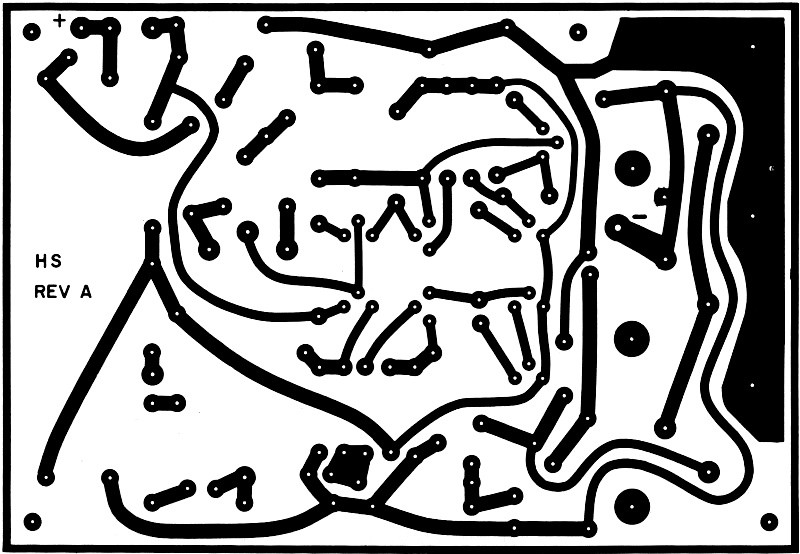
AAM Glowdriver Full-Size PC Board Negative
Use this negative on photosensitive PC material, or hand-paint a board, using
this as a stencil. (Circuit layout courtesy Fred Hock)
I was becoming a year 'round flier. As winter approached at my Maryland flying
grounds, it appeared to be about time to make the transition from prop-flipping
to a 12 volt starter. I bought a starter and a motorcycle battery. That fateful
afternoon, I realized that a dry battery was not going to be satisfactory for heating
glow plugs in cold weather.
A carbon-zinc battery's voltage drops significantly with lower temperatures.
Nickel-cadmium cells begin at .3 volts lower than most glow plugs like. A dropping
resistor could be used from one (2 volt) cell of the 12 volt motorcycle battery,
but lead-acid cells vary significantly in voltage from fully charged to partially
discharged. The voltage drops even more under the load of a starter, with the glow
plug voltage following suit. Besides, a dropping resistor wastes the power it absorbs,
dissipating it as heat.
Looking for the ultimate circuit, I called Ed Sweeney to find out what new ideas
might have crossed his desk. Before I knew it, I was designing a p.c. board layout
for McCutchen's schematic of the AAM Glowdriver.
The schematic was one thing, but when I saw a red hot glow plug stay red hot
when doused with raw fuel, I was amazed. When it remained cherry red, without burning
up, after drying itself out, I knew I had the answer to a starter's prayer.
The printed circuit layout is presented here. It can be photographed for photo-etching,
or you may use the magazine itself as a negative for exposing photo-sensitive printed
circuit material. The board could also be hand painted with resist solution for
etching, if desired, using the pattern here as a stencil.
Get all the goodies together and make sure the p.c. board fits the case. Install
the components on the board, as shown in Figure 1. Check off each part as you install
it, paying careful attention to the polarity of the electrolytic capacitors, diodes,
and the LED. Because of the board's layout, transistors cannot be installed incorrectly,
so just put their leads in the holes where they fit.
The AAM Glowdriver is ultra-simple to construct, using readily available radio
supply store items.
Check all diodes with an ohmmeter as you go, to eliminate the potential problems
of bad components. For example: on a high quality ohmmeter, the forward resistance
of the diodes should be under 50 ohms. In the reverse direction, they will typically
be two megohms or greater.
Solder each lead to the p.c., avoiding cold solder joints and solder bridges
(solder between adjacent leads). When soldering is complete, clean the copper side
of the board with thinner to remove rosin.
The pilot lamp, which lights if the glow plug is on, may be installed in its
rubber grommet through the louvers of the Radio Shack case, or in a hole drilled
in any non-perforated case you may use. Put a knot in the glow plug and battery
leads before fastening them to the proper terminals on the p.c. board, to keep from
accidentally pulling the leads out.
After checking all components to be sure that they are correctly installed, hook
up the battery leads to a 12 volt battery, and observe correct polarity (+ and -)!
Turn the potentiometer counter-clockwise, to its lowest setting, and short out
the glow plug leads. The pilot light should glow, showing that the circuit is on.
Next, hook up the GE 1133 light bulb as a "dummy" glow plug. If it glows too brightly,
quickly disconnect it and double check the wiring. If problems are evident, but
you're sure that all components and wiring are correct, use the troubleshooting
hints given in Charles McCutchen's Glowdriver article.
Top Right: P.c. Drill Guide. Drill holes from foil side, using care and a sharp
bit. Use hole data for proper sizes. Right: A handful of components on two Glowdriver
printed circuit boards. Two different types of power transistors shown. Using cheaper
power transistors could lead to frustration.
Full-Size PC Board Negative
Use this negative on photosensitive p.c. material, or hand paint a board, using
this as a stencil. (Circuit layout courtesy Fred Hock)
If you can manage to talk an assistant into joining you for some cold weather
flying, she will appreciate having an AAM Glowdriver (and so will you).
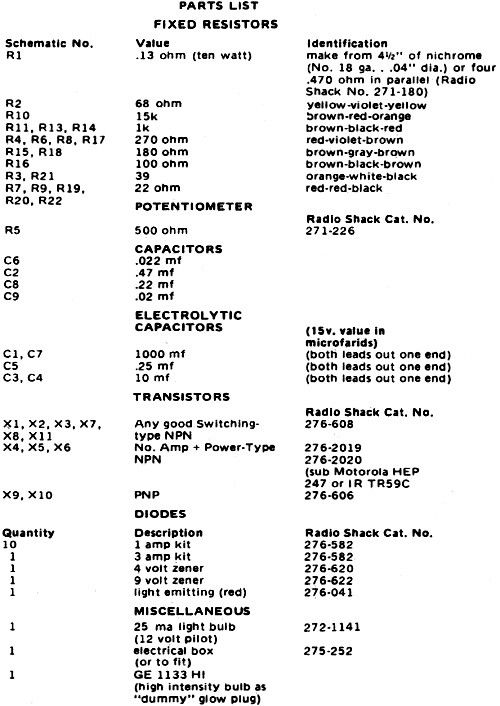
Parts List

Hopefully, all will be well, and the dummy glow plug (light bulb) will glow nicely,
but not overly bright. Listen to the little beauty pulsing away as it does its glowdriving
number! Turn the pot clockwise, and the light should increase in brightness. Turn
the pot back down and connect leads to a glow plug. Now, turn the pot clockwise
until the plug glows a nice cherry red (not too hot or you'll burn it out). Your
Glowdriver is now ready to operate with that particular glow plug. Changing glow
plugs will require readjusting the pot, and you should always begin with the pot
turned fully counter-clockwise.
Insulate the bottom of the p.c. board with tape, to prevent shorting, or install
the board in the box with clear medium fuel tubing spacers over the mounting screws.
Now you've got it. You are the first with the mostest on the flight line, and
your Glowdriver makes you a member of the fast start set!
Posted January 3, 2024
(updated from original
post on 6/28/2014)
|