|
It's an interesting concept, but one inevitably
doomed to failure simply due to the lack of structural integrity of the airframe.
You might argue that some of the Cox plastic control line models were not much more
robust than these converted static scale kits, but at least there was some flexure
inherent in the Cox models. Author Don Pratt approached the project from an engineer's
point of view, calculating wing and power loading, stall speed, and flight speed,
and beefing up the structure in key areas. Still, he found that while success can
be had on a limited basis, in the long run it just is not worth the effort (IMHO).
One of today's powerful, lightweight brushless motors and a LiPo battery might work
out better since at least the severe vibration of an internal combustion engine
running a 18,000 rpm will not be trying to shake the poor thing apart.
Adding Power to Plastic Scale Planes
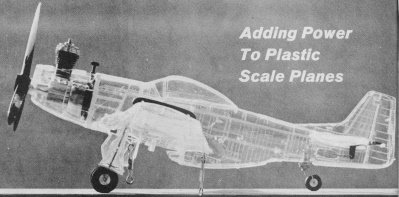
Monogram's transparent "Phantom Mustang" is powered by a Cox .049 motor.
"Aviation Archive" researcher Don Pratt jazzes up Kansas modeling with his glow
plug engine powered "non-flying" shell scale models!
When the small styrene plastic "shelf" scale exhibition kit airplanes appeared,
I figured that eventually some control-line scale nuts would be flying such "non-flying"
models on the ends of steel lines, but I didn't expect it to be me! Then one day
in my workshop while trying to decide what to build next, I half jokingly fitted
a Baby Spitfire .049 engine to the nose of a tiny plastic. It was not difficult
to see that there was an incompatible size differential and the whole thing, plane
and engine, felt like a lead brick in my hand. My scale plastic control-liner dreams
would have to wait until either the engines got smaller or the plastic models got
larger.
In another year some ready-to-fly plastic aircraft appeared. I must say that
my introduction to them was disappointing. They were about as scale as a child's
polyethylene push-toy. While single-camber wings gave tremendous lift to overweight
models that needed every bit of it, poor penetration made them all but uncontrollable
in our healthy Mid-western breezes. Coming into the upwind side of the circle they
ballooned upward as if going for an altitude record. Full down on the control handle
was all that terminated the climb in a mild wing-over. On the downwind side of the
circle I often found myself performing full power-on landings. I must admit that
in still air I had fun and they were practically indestructible.
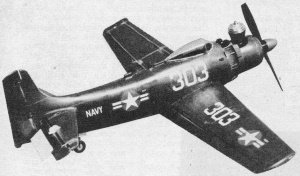
Added elevator area proved too sensitive.
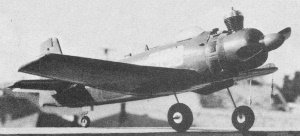
Here's how Revell's Douglas Skyraider looked after cowling and decals were added.
1 1/4" dia. wheels are for off-grass flights.
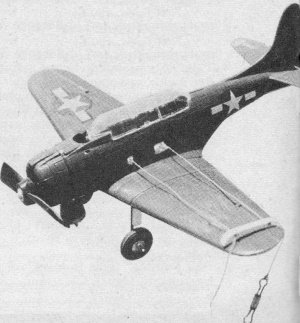
Monogram Douglas Dauntless flew with Cox .020 Pee Wee & clipped prop.
Something was missing. It wasn't that they could do no more than the simplest
maneuvers. I had flown many a super-scale job so heavily overloaded with scale detail
and fittings that they could only lumber around the circle in labored level flights.
The thing that was missing with the plastics was that I didn't build them.
Now more years had passed when the non-flying shelf scale plastic kit manufacturers
decided that the public wanted larger models. Engine makers decided there was a
need for smaller engines. I began to feel that the time was right to revive the
idea of adding power to the non-flyers.
I selected Revell's $2.98 Douglas AD-6 Skyraider kit, a Cox Thimble Drome Babe
Bee .049 engine on radial tank mount, 1/32 inch, and 1/16 inch steel wire, 3/4 inch
and 1 1/4 inch Perfect rubber tire wheels, 1/2 inch Perfect tail wheel, small Perfect
bell-crank, 1/16 inch Perfect spring wheel retainers, Perfect engine mounting bolts,
small Perfect control-line snaps.
The" Skyraider turned out to be quite detailed, with bombs, rockets, "and fuel
tanks hanging below the wings. All controls were operable, dive brakes extended,
gear retracted, all from levers in the cockpit. While all this made for a very fine
exhibition shelf model, it would require the power of a McCoy .60 to raise it off
the macadam. I decided to dispense with as much of this detail as possible to keep
the model light and simple.
Without engine cowling my converted Skyraider weighed in at 6-3/4 ounces with
its 3/4" Perfect wheels. Model has 15" wingspan, a mean chord of 2 1/2" and 27 square
inch wing area. Thus, wing loading was just under 2 1/2 pounds per square foot,
rather high for a model, but low for a real airplane. Only the ultra high performance
sailplanes have loading below three pounds while the average lightplane is loaded
at around 8 pounds. Using my lift tables for the nearest airfoil to that on the
Skyraider I figured the model's stalling speed at 19-mph. Again high for a model,
but very low for a full size airplane. I estimated power loading at close to four
pounds per horse power.
Because of the blunt nose of its airfoil section lift occurs on the scale Skyraider
rather far forward on the wing. In fact, the aerodynamic balance point is 1/4 back
from the leading edge.
My flight tests proved that my calculations were very close. With the engine
retarded I flew several laps at 22-mph. The model lifted off after a run of 16'
from a smooth macadam surface and circled at 42-mph with full throttle.
Over a period of two months I powered four AD-6's and cracked up three. I learned
a lot from the crack-ups. The converted AD-6 is hot. Elevator proved ultra sensitive
so I mounted restricting bars so full travel did not exceed 1/4"- 1/16" down, 3/16"
up. I lost two models in high speed stalls caused by too abrupt pull-ups, but found
them to be quite controllable under smooth control action. I have over 1,000 hours
in the air, flying all sizes and weights of real aircraft, and I had the impression
that the AD-6 model performed more like a real plane than any control line model
I ever flew. Non-pilot control-line fliers thought she acted very much like a speed
job.
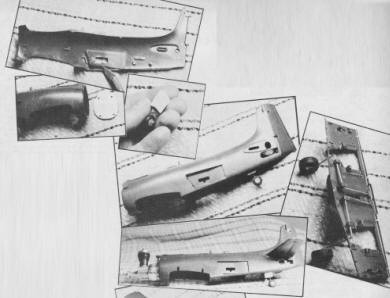 Steps in converting Revell's AD-6 shelf-scaler
to flying control-liner starts (top) when Pratt cuts scale control fitting mounts
off inside right fuselage. Larger firewall from sheet styrene is drilled for mounting
engine and tank. Special assembly is made for tail wheel. Assembled fuselage - note
inspection opening below stabilizer mounting hole and angle of stab slot. Landing
gear installed in center wing. Steps in converting Revell's AD-6 shelf-scaler
to flying control-liner starts (top) when Pratt cuts scale control fitting mounts
off inside right fuselage. Larger firewall from sheet styrene is drilled for mounting
engine and tank. Special assembly is made for tail wheel. Assembled fuselage - note
inspection opening below stabilizer mounting hole and angle of stab slot. Landing
gear installed in center wing.
Engine, horizontal fin and elevator mounted on Skyraider fuselage. Bellcrank,
wingtip line guides and control line lead-outs are in place. AD-6 as first test
flown without cowl and small size wheels (3/4" dia.) for takeoffs at paved field.
Final configuration of plane shown on opposite page. Wing airfoil was something
near to a neutral laminar flow... crude but air-worthy. As on the real plane, horizontal
fin had thrust line adjusted to compensate for considerable tail down-load. The
wing I would leave as is, the horizontal fin would have to be fudged.
Landings proved to be a one-chance proposition. When the engine stopped, the
model made for terra ferma. There was just time enough to get the elevator in full
up position before contact with the ground. Every landing was made in the three
point attitude. There was no tendency to skip or balloon back off after contact.
The model stayed down for a short landing roll-out.
After several test flights I decided to do some additional finishing work on
an AD-6. I removed prop needle valve, cylinder, and head from the engine in order
to slip the assembled engine cowling over it. I glued all cowling parts together
per the kit plan. After the glue had set about two hours, I cut holes in the cowling
assembly for the engine cylinder, needle valve, air and fuel filler vents. Then
I slipped the cowling into place and glued it. Through the openings in the cowling
I re-assembled the engine, and the model was again ready to fly.
 I discovered that neither the decals furnished
by Revell nor the decorative enamels normally used to paint this type of model are
hot fuel proof. I fuel proofed the decals-by spraying (not brushing) a fine thin
coat of clear butyrate dope over them 12 hours after their application to the model.
The enamel was something else! I solved the painting problem by first covering the
area I wished to paint with two coats of white decorative enamel, sanding lightly,
then painting with three coats of colored butyrate dope. This worked very well.
Butyrate lacquer cannot be applied directly to the plastic surface of the model
in any concentration... the solvent in the lacquer will soften and distort the styrene. I discovered that neither the decals furnished
by Revell nor the decorative enamels normally used to paint this type of model are
hot fuel proof. I fuel proofed the decals-by spraying (not brushing) a fine thin
coat of clear butyrate dope over them 12 hours after their application to the model.
The enamel was something else! I solved the painting problem by first covering the
area I wished to paint with two coats of white decorative enamel, sanding lightly,
then painting with three coats of colored butyrate dope. This worked very well.
Butyrate lacquer cannot be applied directly to the plastic surface of the model
in any concentration... the solvent in the lacquer will soften and distort the styrene.
On my third model I attached the rockets, bomb, and drop fuel tanks from the
kit, mounted the landing gear doors in down position. While the plane did fly in
this form, performance and handling were poor and I did not repeat this on model
number four. Model # 3 weighed 7-2/3 ounces.
After the AD-6 models I decided to see if I could use a smaller engine and model
kit with equal results. I mounted a Cox Pee Wee .020 engine in Monogram's $1.49
Douglas Dauntless Dive Bomber. This tiny ship spans just 10" and weighed 4 ounces
when converted to a control-line model. Its flying characteristics can be best described
as H-O-T. I flew it on 20 foot lines, got it up and down in one piece and never
chanced it again. Too tricky and sensitive.
Let's hope that some day we can drop in at the hobby store and pick up a plastic
kit of the AD-6 in 30" span for about $6.95 including all goodies except the paint
and power plant. By adding a McCoy .35 we would find that the all-up weight would
come out right at 28 ounces. The wing loading would be just over 2 pounds per square
foot, power loading would be 3-3/4 pounds per horse power. Once, many years farther
back than I would like to admit, I won a scale event flying a P-40 that weighed
just under three pounds, powered by an O&R .29 with ignition, and gasoline for
fuel. We had stiff competition in those days too. Now is the plastic idea starting
to look promising?
I am presently converting a twin engine kit to power. If I am successful, I will
prove that it can be done. Now it's up to the kit manufacturers to pick up the ball
and carry it from here.
Every "boy" from 6 to 60 who builds a scale plastic kit model this year is a
potential purchaser of a scale. plastic flying control-line model next year. It's
the next logical step for the person who lacks the necessary skill and experience
to make the big jump to balsa built-up scale planes. How many millions of builders
have stared longingly at the plane they had just completed as it sat there on the
shelf... and wished that it could fly?
ADDING POWER TO AD-6
Meantime, want to try your hand at powering Revell's Skyraider? Here's my construction
sequence along with changes made in the scale "shelf" kit: With X-acto knife cut
away all fittings from inside right fuselage half so nothing will obstruct free
operation of elevator control rod. Glue rudder halves together, cement rudder onto
right fuselage post off set 100 right, allow to dry.
Cement elevator halves together. On right horizontal fin halves with X-acto knife
and metal file, cut out elevator hinge guides for free up-and-down elevator movement.
Glue right horizontal fin together with right elevator in position in hinges. Repeat
for left horizontal fin and elevator.
To correct tail download, file slot where right horizontal fin fits into fuselage
until fin thrust line is altered 5° upward at leading edge from scale position shown
by Revell. Repeat on left fuselage half.
Axle joining elevator halves passes through fuselage and glues into styrene control
horn. This horn was sufficient for operating elevator on my control-line model.
Fuselage openings were large enough for axle to move freely. For access to control
horn and rod end after fuselage is assembled cut generous opening in left fuselage
half under left horizontal fin.
Glue right horizontal fin into right fuselage half slot, passing elevator half-axle
through hole in fuselage. Glue control horn onto half-axle inside fuselage. Glue
left horizontal fin into slot in left fuselage half. When these assemblies dry glue
left and right fuselage halves together. Carefully guide left half-axle of elevator
into slot in control horn already glued to right elevator half-axle. Check elevator
and horn for free up-and-down travel.
From a 1/8" thick white model-makers sheet styrene, purchased from a local plastics
house, I cut a firewall with a coping saw that is 1/16" larger all around than kit
one. Using metal file I hand fit it into fuselage just behind mounting lips moulded
into fuselage halves for holding kit firewall. After fitting I drill firewall holes
for radial tank mount of Cox engine .
Originally I mounted the Cox inverted, later to upright position after tearing
one up during a hard landing. I use the regular mounting bolts for the Cox .049,
offsetting it up and to the right with two washers at upper right hole viewed from
front and four washers at lower right hole. This results in a desirable thrust line
differential between engine and wing which offsets the rather high angle of at-tack
of Revell kit wing.
For tail wheel bend 1/32" steel wire as the axle and leg; bend upper leg end
into flat "S." Cut two 1/2" squares from 1/8" thick white styrene. File grooves
in these so "S" can be imbedded between the styrene pieces as they are glued together.
File styrene assembly to tear-drop shape, glue tail-wheel into well molded into
the kit fuselage.
Build wing center section lower half and landing gear as one assembly. Using
kit's scale landing gear as a guide bend 1/16" steel wire as shown. Carefully shape
so wire leads through cradles already fitted in lower wing center section for kit's
retractable landing gear. Use U-shaped styrene plastic kit parts for capping cradles
and securing gear.
Since I fly off a hard surface I mount 3/4" diameter Perfect wheels onto the
gear axles, secure them with 1/16" spring retainers.
Layout wing panel halves, ailerons, and flaps, and glue together. After these
dry sufficiently to set, quickly glue wing panels to lower half of wing center section,
and before that glue can set, glue wing center section upper half to lower half
of wing center section then adjust entire assembly for alignment. Fit ailerons and
glue securely in place, follow with wing flaps.
To mount bell-crank to wing center section, cut 1/8" thick styrene 1" x 3/4"
and drill for bell-crank mounting bolt. On upper wing center section is a rectangular
opening 3/4" x 1-1/2". Positioned bell-crank pivot mounting bolt in this 1" back
from leading edge and 1/4" in from left side. Bolt bell-crank to styrene platform
piece; glue platform to upper wing center section so bell-crank mounting bolt fits
specified location.
Form 1/16" steel wire elevator control rod so one end travels down through hole
in bell-crank arm and other end to the right through elevator control horn. Secure
rod to bell-crank with washer and 1/16" Perfect spring wheel retainer. Secure other
end to elevator control horn by making "L" bend to right of sufficient length so
rod snaps into horn and is held there by slight pressure of the rod rubbing against
inner wall of left fuselage. From "L" bend to "L" rod is exactly 6". At the moment
attach rod only to bell-crank.
Before joining wing and fuselage assemblies attach control line lead-outs to
bell-crank, cut notches in left fuselage for these to travel through, make wingtip
line guide from 1/8" styrene, drilled for lines to pass through, glue it on wing-tip.
With nylon lead-outs tied to bell-crank, drop fuselage onto wing center section
and glue securely in place. Tie small Perfect line snaps on line lead-outs just
outboard from wingtip line guide. Note that your model is beginning to take shape
and display some character.
Snap control rod into elevator control horn and check controls for free movement.
If you feel some drag, apply Vaseline to bell-crank and elevator horn.
When satisfied with control linkage, glue windshield, canopy, and fuselage dive
brake outer panels into position. To cover holes in wing underside where landing
gear came through glue gear doors on in "up" position. Bolt on 4-1/2 inch Cox Nylon
Prop, fill tank with Cox Thimble Drome fuel, and make test flights on 20' nylon
lines.
Posted December 3, 2011
|