|
Airplanes and Rockets visitor Wells S.
requested this article and plans of the Cardinal, from the February 1972 issue of AAM.
The Cardinal, per its designer Dan Santich, was created in order to have a competitive
pattern ship that could not only fly the entire FAI course, but do it gracefully and
effortlessly. A search did not reveal whether he ever went on to win an FAI contest with
his Cardinal.
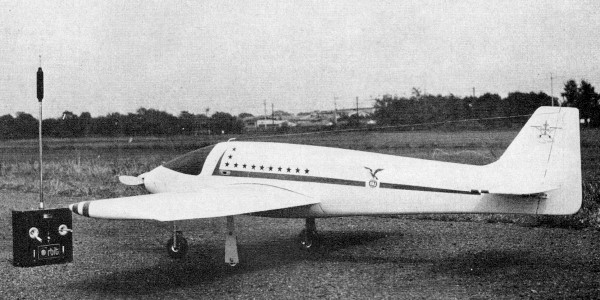
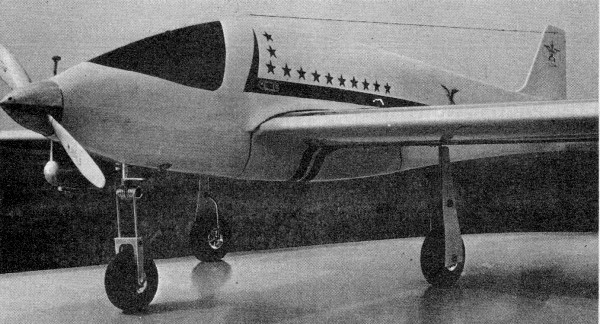
Cardinal
by Dan Santich
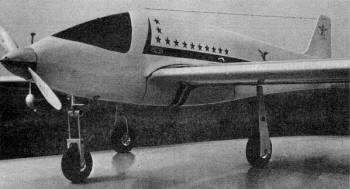
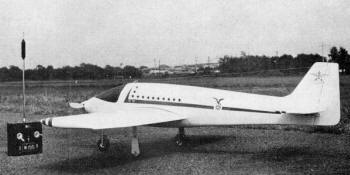 Distinctive-Looking American-Designed Plane
Created for the FAI Pattern Maneuvers
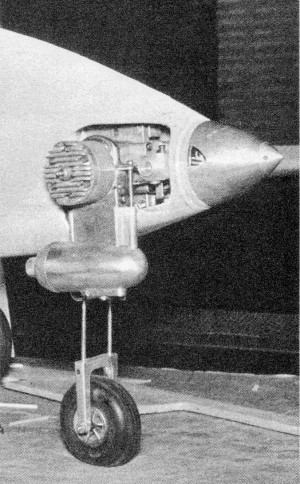
Tatone engine/nose gear mount
used and recommended for balance and heat sink effect.
 Other than gear and engine, the profile is
clean - offering low drag. Laminar wing allows speed and needs large maneuvers, but in
this case, also permits stable, slow flight.
|
Someone once said, "What this country needs is a good five-cent cigar." Well, there
is a new saying that goes, "What this country needs is a good FAI Pattern ship." Who
said it? Just about everyone after the FAI Championships two years ago when this model
was designed. We do not have a ship capable of the precision and grace required by the
FAI Pattern. Don't get me wrong, we have plenty of airplanes that will perform the FAI
Pattern, but there is quite a big difference between simply doing the maneuver and doing
it correctly. Let's use the takeoff as an example. Just about anyone can perform this
to one degree or another. You just aim it, pour on the coal and unglue it from earth
when it has flying speed. It's simple, right? WRONG!
A good precision takeoff is a difficult maneuver, but a beautiful one if done correctly.
It must track absolutely straight and lift smoothly from the ground in a fairly flat
attitude. It takes a good pilot to do this, but more importantly, a good airplane. If
a ship is not set up correctly one will have problems, even if he is the world's greatest
pilot. Let's take another one on the spin. Get some altitude, head into the wind and
cut the power. Bring the nose up, and as it stalls, hold up elevator and right or left
rudder and aileron. It is at this point that the airplane takes over. All the pilot can
do is watch as it rotates. It will either spiral or spin. If it does spin, how fast does
it rotate? I have seen some pattern ships that would spin so fast it was hard to even
count the turns.
Stopping it is something else. If the spin is rapid, the chances that you will stop
it right on heading are remote. So, it follows that the slower the ship spins, the easier
it is to stop it when you want to - not a half turn after you neutralize the sticks.
Again, it is the airplane dictating the maneuver, not the pilot.
The Cardinal is the result of countless hours of research and study, as well as trial
and error. Every aspect of the ship has a planned purpose. Each maneuver in both the
AMA and FAI pattern was analyzed and the ship designed accordingly. It will actually
climb while knife edging with full top rudder. It does not wiggle even the slightest
on the double stall turn and will tail slide better than any ship I have seen. Wind has
no adverse effects on it - in fact, it even helps you track straight in the loops and
eights. Takeoffs are absolutely beautiful; it is almost impossible to tell exactly when
the ship leaves the ground, it is that smooth. The spin rate is quite slow and it stops
immediately when the sticks are neutralized. To achieve a faster spin rate and to do
the loop with one and one-half snap, just move the clevis for more elevator throw. It
will slow-fly at near walking speed, which enables you to put it right smack in the center
of the circle every time.
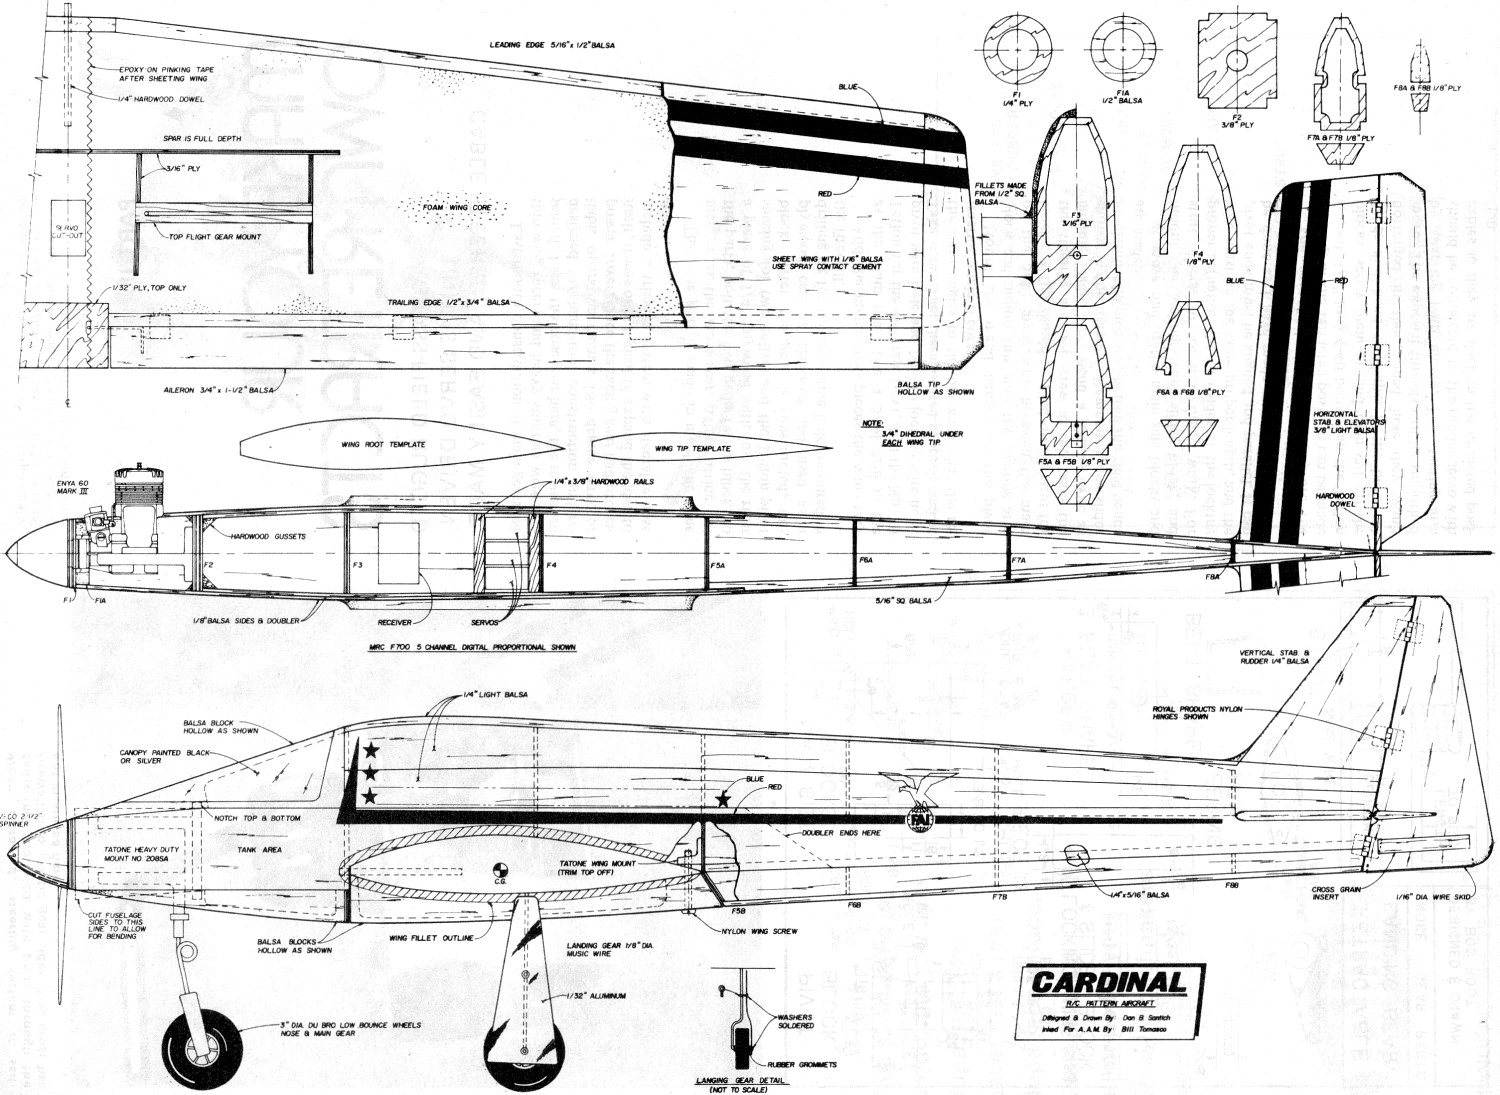
Construction
Cut out all fuselage parts and mark with a ball point pen. Epoxy doublers to fuselage
sides. Do not use white glue as it will warp the balsa. Glue stringers to rear half and,
when dry, epoxy bulkheads F3 and F5 in place. Drill F2 for Tatone side nose gear mount,
install blind nuts, and epoxy in place. Wet the nose section forward of F2 and use a
2-in. dia. bottle or can to form the rounded nose section by sticking the bottle between
the wetted sides and wrapping with rubber bands. When dry, add FIA and epoxy vertical
triangle braces to the front and rear of F2. Glue remaining bulkheads in place making
absolutely sure it is aligned properly - the fuselage must be true.
I built mine on a small card table in our apartment here in Japan, and I got it straight,
so you lucky fellows with fabulous workshops and building jigs should have no excuse.
Epoxy top nose block in place (after it has been hollowed out) and glue on upper and
lower portion of fuselage. Use a razor plane to shape after everything has dried. Add
F1 and lower nose block with epoxy after hole is drilled for nose gear to go through.
Sand to shape and make cutout for engine. Shape and glue vertical and horizontal stabs
in place, again being very careful of alignment.
Since
a foam wing is used, not much explanation is necessary. Select the lightest possible
foam and make sure you epoxy gauze tape on after the wing is sheeted. Add lower portion
of fuselage to bottom of wing. Fit wing to fuselage and add fillets. You will have to
form your own main gear due to its unusual shape and length. Make sure you use good hard
wire. The wheel fairings are made from aluminum stock, but 1/32 plywood could also be
used. Strip ailerons are used; however, perhaps the puritan would prefer the center-hinged,
barn-door type. Take your pick. I have found that the rolls are cleaner by using very
large strip-type ailerons, since very little throw is required. They also make the wing
easier to construct.
A word about the "funny airfoil." It is the NACA 64 A215 and although it is a laminar-flow,
low-drag airfoil, it has excellent slow flight characteristics. It has been used on such
successful ships as the Orion, Thunderstormer, and Twister. If you prefer, go ahead and
use a fully symmetrical one.
The "easy does it" method of finishing is my favorite and that is how this one is
done. It is light, quick, and very attractive. "What is the "easy does it" method?" you
ask. Send off to Hobbypoxy and they will send you all the poop on how it is done correctly.
Here is my "easy does it" method: I use Sig epoxy because it cures fast. Mix about three
oz. each of resin and hardener, thin to a vodka consistency and brush on the bare wood.
Let cure Repeat the same procedure only not so thin this time. The reason for the very
thin first coat is to let it soak into the wood to increase the strength of the balsa.
After the second coat has cured, sand down with coarse sandpaper and remove all bumps
and fuzz. Sand it once again using a finer grade paper this time. Fill all nicks, cracks,
and dents with Epoxolite and after it is cured, scrape it down using a double-edge razor
blade. Do not use stainless steel blades, as the edge goes off almost immediately. At
this point the grain should not show. If it does, add another coat of thinned glue and
scrape down again. Wet sand it and spray on a coat of gray Hobbypoxy (black and white
mixed). Wet sand any rough spots and spray on your color.
Since I have gone into so much detail, there is not much left to say, except try to
be selective in your choice of wood and keep the weight down. Do not try to "beef it
up." I learned a long time ago not to sacrifice weight for strength. Mine tips the scale
at just over 6 1/2 pounds.
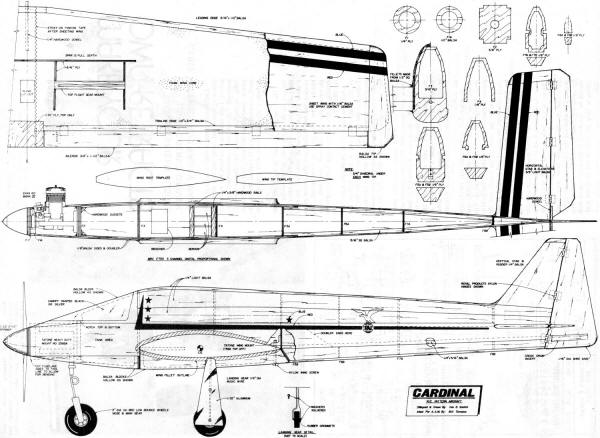 Cardinal Plans
Notice:
The AMA Plans Service offers a
full-size version of many of the plans show here at a very reasonable cost. They
will scale the plans any size for you. It is always best to buy printed plans because
my scanner versions often have distortions that can cause parts to fit poorly. Purchasing
plans also help to support the operation of the
Academy of Model Aeronautics - the #1
advocate for model aviation throughout the world. If the AMA no longer has this
plan on file, I will be glad to send you my higher resolution version.
Try my Scale Calculator for
Model Airplane Plans.
Posted May 20, 2013
|