|
These plans and article for the Curtiss
JN-4D Jenny biplane, by Dick Hansen, were scanned from my purchased copy of the September
1968 American Aircraft Modeler magazine (page 18). Plans for this fine model were drawn
by Dick Hansen. All copyrights (if any) are hereby acknowledged.
"The Curtiss JN-4 Jenny two-seat biplane was one of the most popular planes of all
time. Although the JN-4 series of aircraft was technologically unremarkable, it was significant
in that it was the first mass produced plane and was manufactured in larger numbers than
any other American plane up to that time. The Jenny never saw military action but met
the need for a dependable military trainer. From April 1917 when the United States entered
World War I, it was used to train some 95 per cent of all U.S. and Canadian pilots.
 A whole generation of Americans learned to fly
on Jennys, and in addition to U.S. and Canadian pilots, flying schools in Great Britain
and France used them as trainers. After the war, thousands were sold to civilians, and
the plane had a second career as a barnstorming plane, thrilling spectators at traveling
aerial pageants and shows throughout the United States. By the Armistice in 1918, more
than 6,000 JN-4s had been built, including some 2,700 JN-4Ds, the most widely produced
version. " -
Wikipedia A whole generation of Americans learned to fly
on Jennys, and in addition to U.S. and Canadian pilots, flying schools in Great Britain
and France used them as trainers. After the war, thousands were sold to civilians, and
the plane had a second career as a barnstorming plane, thrilling spectators at traveling
aerial pageants and shows throughout the United States. By the Armistice in 1918, more
than 6,000 JN-4s had been built, including some 2,700 JN-4Ds, the most widely produced
version. " -
Wikipedia
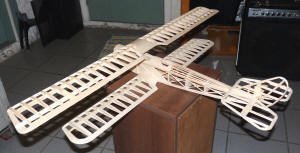
Airplanes and Rockets visitor Thierry L., of Belgium, wrote to ask for a larger version
of the plans image file so that he could scale it for building a 40" wingspan version
for electric power. He was kind enough to send a photograph of the framed-up Jenny. Doesn't
that look nice? It is always a shame to have to cover such fine handiwork, but the finished
model will undoubtedly look just as fine!
"I'll try to create a "mechanical sound generator" to produce a low rpm noise because
original engine turns very slow in comparison with electric motor," writes Thierry.
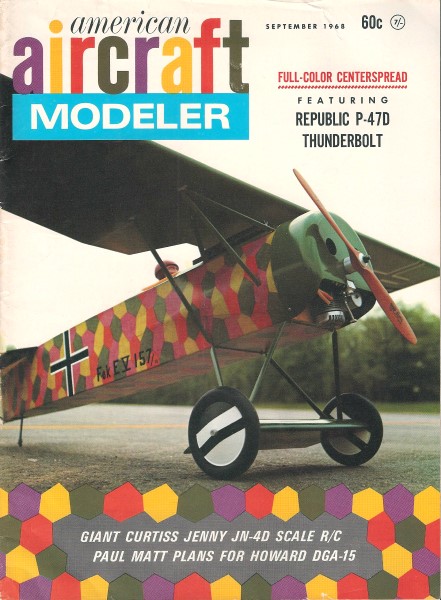
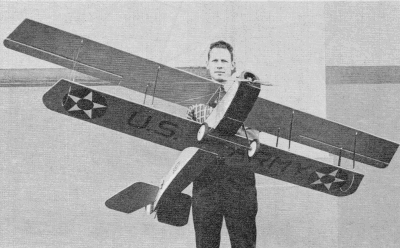
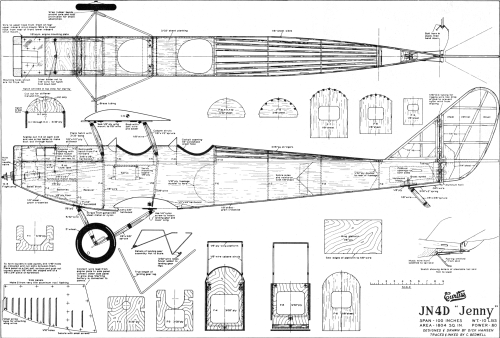
Curtiss JN-4D Jenny
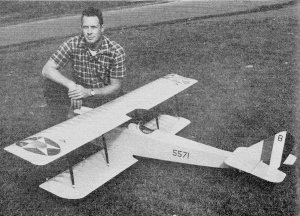
Although not a super-scaler, the Jenny has won a few scale contests because of its great
realism. In flight, it is as stable and stuntable as a real Bisso Jenny. |
Built by the thousands during WW I, this gawky, lumbering trainer became king of the
postwar barnstormers. The model captures the in-flight realism of by-gone days.Dick
Hansen
TO the fledgling birdmen of WW I, the Jenny was what the AT-6 became to thousands
of WW II pilots. Designed and built by Glenn Curtiss, it was originally intended as a
trainer for the Glenn Curtiss Flying Schools.
With the outbreak of WW I, the Jenny was ordered in large numbers by the U. S. Army
as well as Great Britain, France and Canada. Of the 7,000 JN-4's built, over 3,000 were
the "D" model. With a wingspan of 43' 7-3/8" and length of 27' 4" she was big and cumbersome.
Power was an OX-5, V-8 90-hp engine which yielded top speed of 80 mph. Stalling speed
was around 45 mph. Later versions were equipped with the 150-hp Hisso engine which upped
performance considerably.
So many were left after the war that the Jenny was greatly favored by the barnstorming
and stunt pilots. Cost was just a fraction of what the government had paid, and some
came new in the crate. They were still sold as surplus as late as 1927. Just about any
airshow that was worth seeing during the 1920's, and up into the late 1930's, had at
least one Jenny performing. The last time I saw a pure Jenny perform at an airshow was
1947. She was the star of the show, in my estimation.
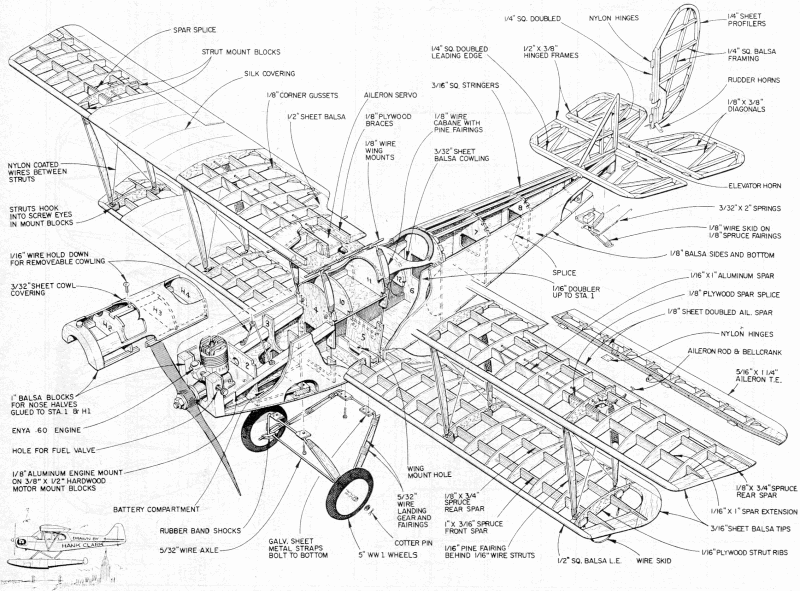
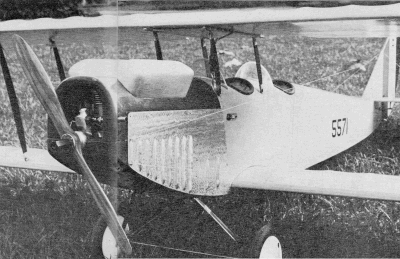 Forward fuselage side panels are made of soft,
thin aluminum, shaped and burnished by hand." They are screwed in place over the balsa
sides. Dummy engine heads servo as cooling outlets for the hard-working Enya 60 engine. |
Introduction: You will be surprised how much easier a large airplane is to fly and handle
on rough ground. The swing in our club is to the larger airplane as we find it more realistic
in the air and on the ground. Nothing gathers crowds at the local flying field like a
large aircraft, especially a scale job, with two wings - what will they think of next!
The Jenny is a fun airplane, not a super-detailed ship to win contests with. Although
she does have two trophies to date, it is not hard to build and, in fact, was one of
the easiest in a long list of craft including an 8-foot Aeronca Champion, 6-foot Kingcobra,
two Astro Hogs, etc. Flying characteristics were better than anticipated. Wind penetration
is good. She turns well on ailerons and flies a little faster than expected, probably
due to the thin leading edge. Having a simple flat bottom airfoil creates much lift at
slow airspeeds and much more lift at higher airspeeds. It should be flown with this in
mind.
One drawback of large aircraft is the assembly and disassembly time at the field.
This is why the wings are of one-piece construction and the only functional flying wires
are included.
Most early biplanes were noted for their short nose-moment arms. Not so the Jenny.
However, construction should be on the heavy side in the forward section as I had to
add a slight amount of dead weight in the nose to balance properly. Do not worry too
much about weight, except in the tail as this plane could weigh three pounds more and
still fly well. Do make sure there is ample cooling for the engine. It is easy to burn
one up, as I did in my Aeronca Champ for lack of adequate venting.
Changes made in the plans over the original model are: straight bottom hatch, aileron
horns on bottom of aileron, nylon screw for landing gear and lower wing hold-down, although
Dzus fastener or camlock can be used. Also the use of a round 8-oz. tank rather than
an oval one.
The model has been flying for over a year with only one mishap. That was an engine
backfire in the air that resulted in a lost prop nut and washer. She is powered by an
Enya 60 and guided by a Kraft KP-6 proportional rig. If you are worried about the metal-to-metal
connections causing interference in your receiver, you had best re-engineer these for
noiseless operation.
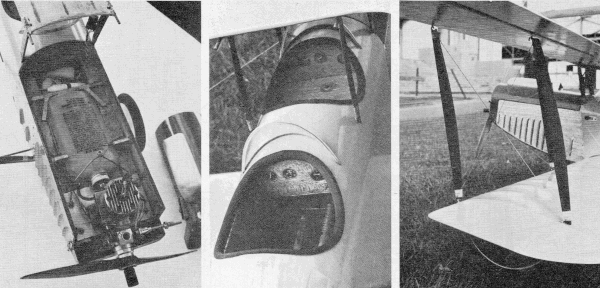
Left: Enya 60 installation offers lots of cooling for the engine, a large oval-shaped
fuel tank and break-away motor mounting. Note aileron plug and leads beside left, front
cabane strut. Center: Wood finish on panel and Tatone instruments. There were not
many gauges on real Jenny's either! Right: With six feet of wing span, the struts are
functional.
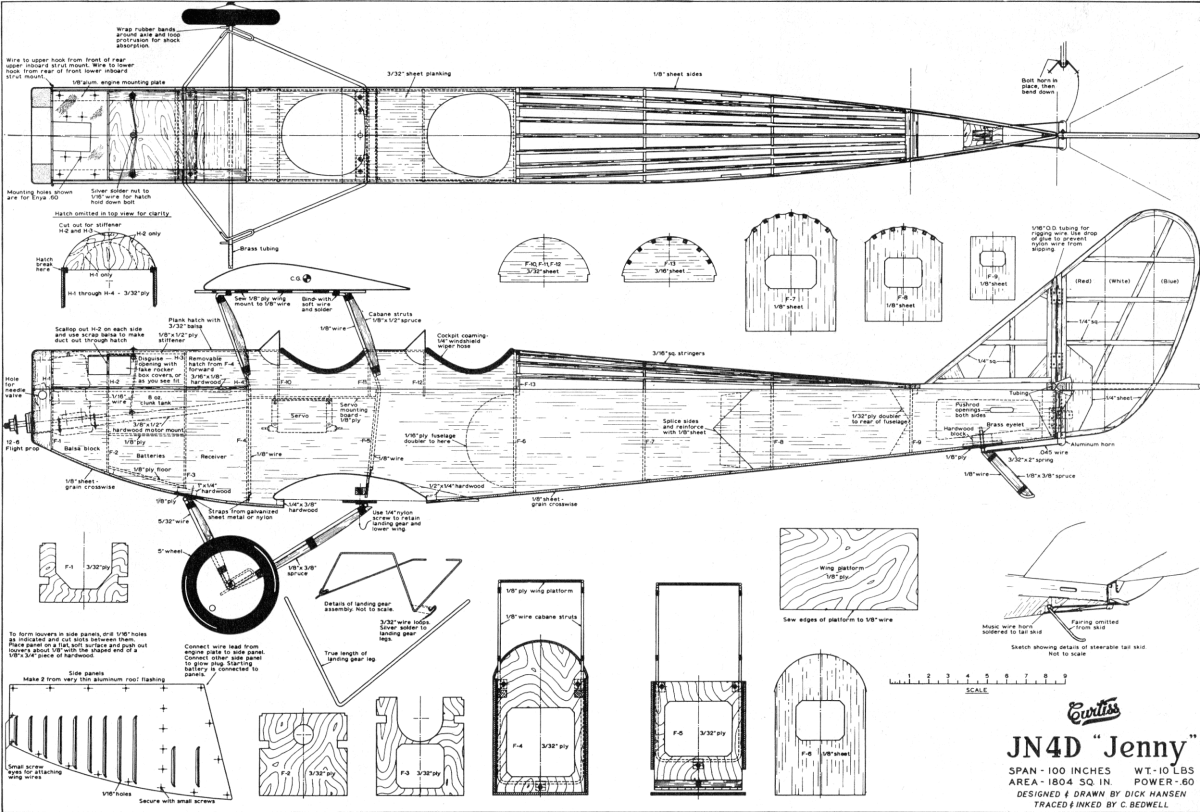
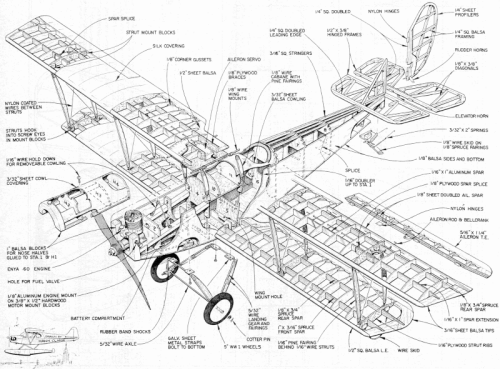
Fuselage:
Construct entire aircraft with Titebond glue except where noted. Cut fuselage sides from
1/8 sheet and splice where shown. Use 1/16 plywood doubler forward and 1/32 plywood doubler
at the tail. Use contact cement for these. Cut out all formers. Bend cabane struts from
1/8 wire and fit to formers F-4 and F-5 with straps of galvanized sheet metal before
these formers are glued in place. Join halves together at tail and glue all fuselage
formers in place. Glue in hardwood engine bearers, forward landing gear mounting block,
with blind nuts installed, and top and bottom of battery compartment. Fit lower nose
block. Glue the hatch rails together and let dry before pinning to fuselage for hatch
construction. Glue in servo mounting. Board under formers F-10 and F-11. Use 1" sq. balsa
for nose ring and 1/8 aluminum plate for engine mount.
After hatch rails are dry, pin to fuselage and glue formers in place. Plank hatch
with 3/23 x 3/8 balsa strips. Cut cooling holes in each side of hatch, scallop out former
H-2 and build air ducts from scrap balsa through each hole. To hide these outlets, I
used fake rocker box covers open at the rear; however, you may have better ideas closer
to scale. Construct a metal exhaust extension for the engine or build an exhaust duct
into the hatch. Hatch is held in place with a single bolt through top of hatch to nut
soldered to a loop of 1/16 wire screwed to engine bearers.
 <click for larger
version>
The nose side panels are made from very thin aluminum roof flashing. Drill 1/16 holes
where indicated and cut slot between them. Place panel on a flat soft surface and push
slots out about 1/8 to 3/16 with the sanded end of a 1/8 x 3/4 stick. Screw panels to
side with smallest wood screws available noting that two open screw eyes forward are
used for attaching flying wires from upper and lower wings.Bend landing gear from
5/32 wire and shock loops from 3/32 wire which are silver soldered to main gear. Make
axle from 5/32 wire using 5/32 I.D. brass tubing for extension. Drill small hole in each
extension to receive cotter pin keeper. Secure axle by wrapping rubber bands around it
and extended point of loop for shock absorption. Rear landing gear struts are attached
to 1/8 plywood plate with metal straps and the whole assembly pivots on the forward gear
mount.
 Author explains that wing tip skids are as important
on model as on real Jenny. On grass, all ground handling is easy with the effective,
steerable tail skid. However, it takes practice on hard surfaces. Tip skids prevent wearing
out wing tips! |
Cut two 8-3/16" lengths of 1/8 wire and wrap and solder to top of cabane struts then
sew and glue a 1/8 sheet of plywood between them for a wing mount. Cut out cockpit openings
after planking top of fuselage with 3/32 x 3/8 strips. Use automobile windshield wiper
hose for coaming. Windshields are cut from heavy acetate plastic.
Make aileron servo connector hole near one of the forward cabane struts and secure
connection by taping to cabane strut while flying. Glue 3/16" sq. stringers in place
and hardwood braces at lower wing opening. Glue 1/8 plywood tailskid mount in place before
sheeting bottom with 1/8 balsa. Make tailskid from 3/32 wire and brass eyelets and install
before gluing stabilizer in place. Solder 1/32 wire bellcrank to tailskid for steering
spring to hook on. Drill and install 1/16 O.D. brass tubing at bottom of tail for tail
bracing wire to pass through.
Sand well and cover with silk.
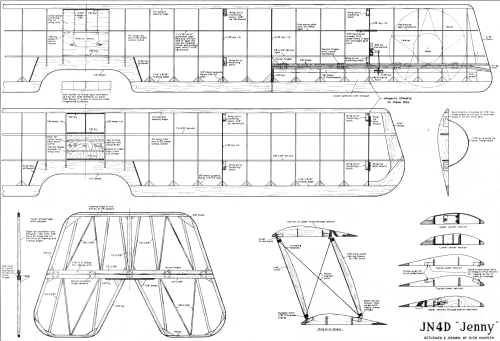
Wing construction, upper: Cut all ribs from 3/32 balsa sheet, except for those indicated
as plywood. The 6-foot aluminum spar is available from most building supply stores. You
can substitute a thicker wood spar if you like, but it will not flex as well nor be as
strong as the metal spar. Cut three inches from the end of the spar for use as dihedral
brace. Hacksaw two-thirds of the way down in the center of the spar and bend up so there
will be 5/8 under each wing tip. Rough up center area of spar so that epoxy glue will
hold well. Extend metal spar to tips with 1/16 hardwood. Bevel 1/2" sq. leading edge
to rough shape before pinning in place. Pin down spars and edges and glue in all ribs
using epoxy on the metal spar only.
Notice that the hardwood wing strut mounts are located flush with the lower surface
of the upper wing and flush with the upper surface of the lower wing. Use small screw
eyes cut down to receive 1/16 wire of wing struts. Fill screw holes with epoxy before
installing screw eyes permanently. The struts are held in place by tension from nylon-coated
stranded fishing wire at the lower wing strut mounts. Struts fold up against upper wing
for storage. The nylon wire with crimping pliers and metal sleeves are available at sporting
goods stores. Put in extra screw eye 1/4" ahead of rear inboard screw eye. The wire from
this goes to the upper open screw eye at the nose of the fuselage. Build ailerons along
with the wing using a plywood end rib. Hinge with nylon and use round toothpicks for
keepers.
Cut out small area in ~6 plywood rib for aileron bellcrank to pass through. Make sure
there is no slop in aileron linkage. Cover ailerons with Silkspan.
Lower wing: Make both spars of hardwood. Note the location of lower wing tip outline
on plan. The 1/8 plywood center plate has five holes in it. The center hole is for the
wing and landing gear hold-down screw and the other four are to clear the landing gear
strap nuts. Put in extra screw eye 1/4" behind front inboard screw eye for a line that
attaches to the lower open screw eye on nose of fuselage. Wing tip skids are made removable
for ease of covering and maintenance.
Make four rear and four front wing struts from 1/16 wire faired with 1/16 sheet pine
or hard balsa. Also make four fairings for cabane struts. Paint these and landing gear
struts brown and then wrap with heavy white thread where indicated on plans.
Cover both wings with silk, pulling just tight enough to remove wrinkles to prevent
warping. Cut out area just above holes in center plate for F -5 to fit into.
Tail construction: The vertical fin and rudder are 1/4 sq. balsa. Use larger hinge
at bottom of rudder to take shock from tail skid. Notice brass tube for wire brace. Bend
rudder tailskid horn from aluminum and bolt in place before bending arms down. Connect
skid to rudder with small springs from hardware store. Extend with 1/32 wire.
Horizontal stab and elevator require 1/2 x 3/8 main spars and 1/4 thick leading and
trailing edges. Taper all ribs from 3/8 to 1/4 for airfoil. Again put in tubing for bracing
wire. Cover empennage with silkspan. Line up and glue to fuselage.
Conclusion: The plane turns very well on the ground with the steerable tailskid, and
combined with the wing tip skids, it is almost impossible to turn over. Most realistic
takeoffs are made with a little down elevator to raise the tail before liftoff. For landings,
feed in the down elevator just as the main gear touches so that she does not balloon.
Don't panic when the wings flex up when pulling out of a loop or dive as they are quite
flexible and strong.
H is a big bird, but once you get used to the larger variety, you will never be satisfied
with the smaller spread!
 <click image for larger version> <e-mail
for 2500x1692 px version>
 <click image for larger version>
Notice:
The AMA Plans Service offers a
full-size version of many of the plans show here at a very reasonable cost. They
will scale the plans any size for you. It is always best to buy printed plans because
my scanner versions often have distortions that can cause parts to fit poorly. Purchasing
plans also help to support the operation of the
Academy of Model Aeronautics - the #1
advocate for model aviation throughout the world. If the AMA no longer has this
plan on file, I will be glad to send you my higher resolution version.
Try my Scale Calculator for
Model Airplane Plans.
Posted July 11, 2010
|