|
Website visitor Marlene B. wrote
to ask for me to scan the articles for the Pogo Formula I race and the Hot Canary Formula
II racer, both having appeared in the August 1971 American Aircraft Modeler. They were
presented as a matched pair even though each was created by a separate designer, Bob
Morse for the Pogo, and Bob Seiglekoff for the Hot Canary.
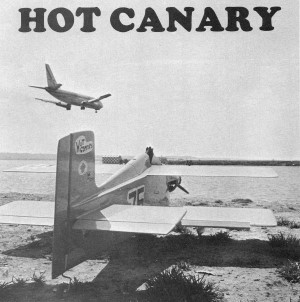
A pair of unique and well-designed racers for Formula I (Pogo) and Formula II/FAI NMPRA (Hot Canary) racing. These are just
as competitive as the usual planes.
Hot Canary
By Bob Seiglekoff
THE HOT CANARY is a really different airplane. A biplane racer is unusual enough,
but designer-builder and flier Bill Warwick wanted to see the pylons as he banked into
the turns so he put the upper wing behind the pilot!
Hot Canary
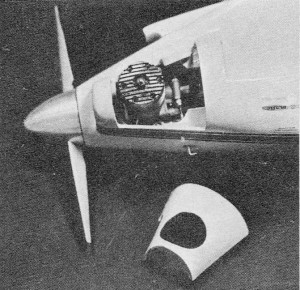
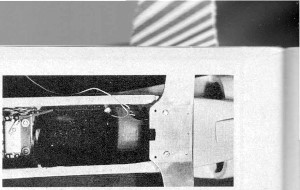
Lots of room in the engine compartment for easy, quick servicing.
Needle is quite handy.
Bottom wing leading edge notched to fit under aluminum landing gear
blank.
After seeing the Hot Canary at the 1970 Reno races, we felt the urge to build a miniature
pylon racing version. The design fits both the FAI International racing rules and the
AMA Formula II event. Total surface area is 705 sq. in. (698 required for FAI). It is
an excellent flyer, but control surface movements must be minimized. An eighth of an
inch up and down on both the elevators and ailerons should be more than sufficient for
trial flights. Movements can then be adjusted after trimming and altitude adjusting flights.
The bane of any fast pylon racer is that too much elevator will induce a snap roll,
and a t racing altitudes this is an immediate disaster-a characteristic of any model
turning pylons at over 100 mph. Consider the wing loading of a five-lb. plane at six
or eight g's with 600 sq. in. wing area. That's asking the wings to support a 40-lb.
weight (or 154 oz./sq. ft. wing loading)! Flying on the safe side of the elevator travel
is essential.
It's hard to believe, but the first prototype, with a plain wood finish, had its wings
an inch and a half farther aft than shown on the plans. What a goofball-looking thing
that was, but it flew, and fast. In several match races against a competitive Formula
I Ballerina, the Hot Canary held its own.
Because of too much elevator travel, the first prototype ended in a snap roll at about
a ten-ft. altitude in the No.2 pylon turn. The second prototype, with its wings moved
forward, appears far less sensitive in this respect, but it is still important to keep
all control throws down. Do not fly with a CG aft of that shown on the plans.
Construction
Building the Hot Canary poses no problem. The fuselage is a square box with no "fancies."
Begin with the fuselage side assemblies, adding the ply doubler to the balsa sides with
contact cement. Then add the 1/4" sq. longerons and 1/8" x 1/4" uprights with Titebond,
making right- and left-hand panels. Lightly score the ply doublers at the bend points
(shown in the plan view) and, with a straightedge over the scored line, gently crack
the side assemblies so that a sharp bend point results.
Begin fuselage assembly by gluing the sides to the intermediate cabin area bulkheads.
Add several temporary diagonal braces top and bottom to keep things square, then add
the firewall, top and bottom sheeting, landing gear mount, etc.
The 1/8" wing doublers should have the wing hold-down block cutouts cut right through,
serving as doublers for the anchor blocks.
The wing and tail construction is straightforward. Both the upper and lower wings
are made from the same foam cores, but are finished a little differently. Notch out the
cores and add the vertical grain blocks where the hold-down screws go through. Add the
trailing edge spar to each core and then the 1/16" lower skin. The top wing should have
enough lower skin to reach the trailing edge; the lower wing stops at the spar.
On the top wing, fill in the trailing edge area with foam or soft balsa. Then sand
this down to the wing contour, leaving a feather edge at the trailing edge. Add on the
upper wing), the balsa tips and finally the leading edges.
Finish the basic undercoat on the fuselage and tail before the tail surfaces are installed
in the fuselage. At this point, it is a lot easier to put on the two coats of surfacing
resin and sand them.
When this is done, place the elevator horn assembly, with its pushrod hooked up, in
the fuselage, then slide the stabilizer in place and cement securely. Install the elevator
onto the horn and hinges. Then cement the vertical fin in position and install the rudder.
This method provides a neat tail end with only a rudder pushrod hanging out in the wind.
"Surfacing" resin is suggested as a basic undercoat for Hobbypoxy finish colors. We
prefer this system of finishing primarily because we are lazy and like to get flying
sooner. It involves one quickly brushed-on coat of resin, lightly sanded after drying
about two hours. A second coat is flowed on carefully so that runs do not develop. After
this has set up in about two hours, it is ready to accept a color coat. For a superb
muscle-power finish, a third coat of DuPont gray lacquer primer can be sprayed on. This
is sanded off as completely as possible.
The K&B rear-rotor engine with its new fuel shut-off racing venturi installed
for NMPRA racing is shown, rather than the barrel throttle required for FAI. However,
there is room for the throttle for FAI.
We flew the first ship with an inverted engine and fixed cheek cowls; the second,
side-mounted as shown with a removable cheek cowl. We prefer the clear-running side mount,
but the inverted mount requires less work. Before any pylon turns are tried, take the
ship up quite high and, after everything is trimmed for level flight, try a vertical
full elevator turn. If the elevator throw is correct, a smooth tight turn will result
with no sign of snapping. If it does snap, level out, land the ship and cut down the
throw. Conversely, if the turn is too wide, increase the throw until full stick deflection
gets the plane around quickly.
 Hot Canary Plans<click
for larger version>
Notice:
The AMA Plans Service offers a
full-size version of many of the plans show here at a very reasonable cost. They
will scale the plans any size for you. It is always best to buy printed plans because
my scanner versions often have distortions that can cause parts to fit poorly. Purchasing
plans also help to support the operation of the
Academy of Model Aeronautics - the #1
advocate for model aviation throughout the world. If the AMA no longer has this
plan on file, I will be glad to send you my higher resolution version.
Try my Scale Calculator for
Model Airplane Plans.
Posted February 8, 2011
|