Control line speed has been around
for many decades. As with all other areas of specialty, the state of the art has
advanced significantly since the time of Bill Wisniewski's reign as king of the
C/L speed domain with his venerable Pink Ladies. Today's C/L speed models have a
single long inboard wing and often have computer-designed airfoils and fuselage
shapes. In the 1958 timeframe when this story appeared in American Modeler
magazine, the record speed was in the 160 mph range. The
video below
shows a new F2A world speed record of 208 mph being set in October of 2009.
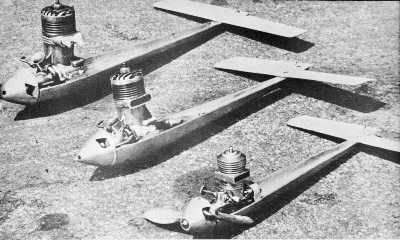
Bill Wisniewski's remarkable record-holding Pink Ladies
Record-holder Wisniewski with Class A "Pink
Lady" (left). From top, Ladies are Class A, FAI and A/2. Full size plans for "A"
version is on Group Plan # 858 from Hobby Helpers (7Sc)
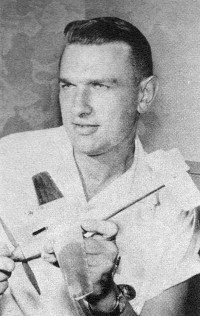
by Bill Wisniewski
The "Pink Ladies" have quite a history. The class "A" model detailed here has
won every contest it has entered... with speeds varying from 138 to 154 mph. It
has held the A.M.A. record for class "An since 1955. The first record was set at
141.40 that year at the Nationals held at Los Alamitos. This mark was upped to 145.10
during the California State Championships at Santa Ana in 1956. Shortly after the
State Championships I went to the Nationals at Dallas and raised the record again.
Latest achievement was during the 1957 Nationals at Willow Grove, when the little
beasts turned 154.58 mph. (An interesting note is that the 1956 record was broken
three times at the 1957 Nationals by three different people, Nick Sher, Arnold Nelson,
and myself.) I have used the same airplane since 1955 and it is still in good shape,
picking up speed all the time. Pink Lady "A" has been clocked unofficially over
157 mph.
I don't know exactly what is making the airplane go as fast as it is, unless
it is a combination of Mono-Line control, airplane design, and fuel. The engine
is the same old Torpedo 19 that has been so successful in the past. Reworked just
like the article in June, 1957 American Modeler. The fuel also is the same as in
that article.
Mono-Line is one of the greatest advances in speed flying. The models seem to
trim out better. The reduction in drag is quite evident. Speeds have gone up at
least 10 mph in all classes because of the switch to Mono-Line.
Assuming you have mastered the Mono-Line control you must learn to get around
the pylon. The best way to do this is through practice. Always fly from a pylon
when testing your airplane and you will soon learn how to keep from stumbling.
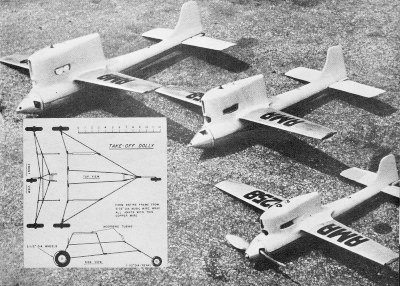
You should also have a reliable takeoff system, either a dolly or hand launch.
I prefer a dolly. A good one is sketched. The airplane should bind a little on the
two prongs going into the pan. This will assure a take off without jumping the dolly.
Your helper or your mechanic is very important. Pick an interested modeler to
help (not necessarily experienced as he can learn along with you). Learn to be familiar
with the sound of a rich or lean mixture in a running engine. Reworked engines combined
with hot fuels should be set rich on take off. Just how rich will have to be determined
by trial and error. Always let your helper set the needle valve to become familiar
with the sound. Since (unless you have unusually long arm's) you cannot change the
setting from the pylon.
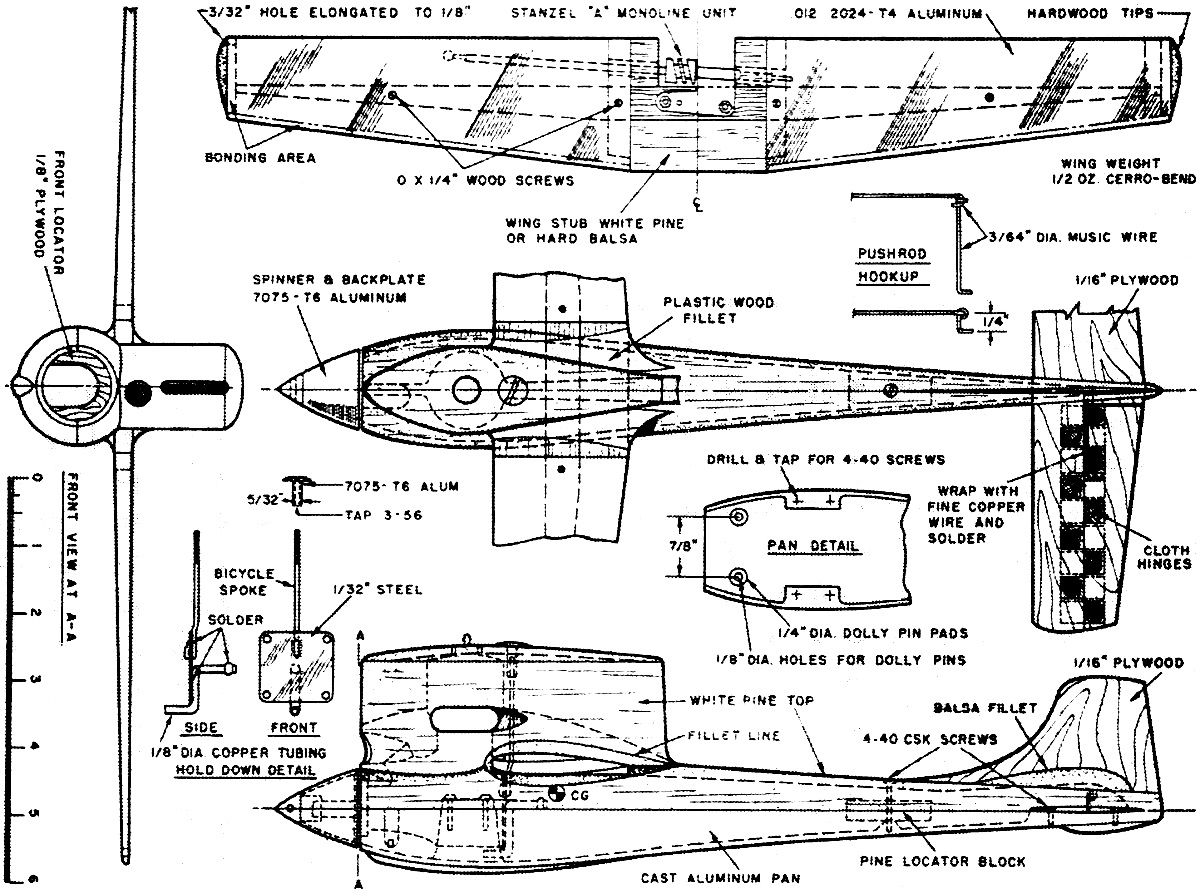
Making the pattern for the pan is simple. First select two blocks of white pine
or basswood 1" x 2" x 14". Install wood screws about 1/2" from the ends to hold
the blocks together. Turn fuselage on a lathe or carve by hand to the shape shown.
Leave it approximately 1/16" heavy all over. Take apart and hollow one half to approximately
1/8" thickness except where stab bolts on. Leave this part solid. This half will
be the pattern for your pan. Carve blocks for the motor mount pads allowing approximately
7° draft angle and cement in place. This enables the pattern to be lifted from the
mold without breaking it. Taper 1/4" dowels for the dolly pin supports and cement
in place. Also cement a small piece of 1/4" dowel for rear hold down bolt. Pan pattern
should be smooth finished by applying 4 or 5 coats of sanding sealer, sanding between
coats.
Pink Lady Lineup
Pink Lady Launch Dolly
Finish with coat of lacquer or dope. Have your local foundry cast your pattern in
aluminum or magnesium. If you can't find facilities for having them cast write to
me at the following address: 4261 Petaluma Avenue, Lakewood, California. I can supply
you with a pan at nominal cost.
Construction of the airplane itself is fairly easy. Sand the top of the pan to
make it flat. Drill and tap for the engine: File the pan to 3/32" thickness and
file the front to fit the spinner-which can be machined from bar aluminum or cut
down from a 1-3/4" Froom spinner.
Cut out the other half of the turned fuselage to fit over the engine. Spot cement
the fuselage top to the pan. After the cement has dried carve and sand the top to
fit the bottom and spinner as it was left oversize when turned. Remove top from
pan and hollow to 1/8" thickness.
Next comes the wing. Select a straight grained piece of hickory for the spar.
Cut to the dimensions shown. Two pieces of white pine make up the wing stub. Cement
the aft end of wing stub to spar permanently. Spot cement the forward end of stub.
Cut out the fuselage to take the wing. Lay wing on the fuselage and mark where fuselage
joins the wing. File the airfoil shape in the wing stub except where the wing joins
the fuselage. That part is left flat. No incidence is used. The wing panels are
made as follows:
Layout wing pattern on .012 2024- T4 aluminum. Bend in center on a brake or over
a straightedge to a 30° angle. Form the airfoil by hand. Make wing tips from hardwood.
Sand areas to be bonded with coarse sandpaper. Clean with acetone or Methyl-Ethyl
Ketone. Apply a coat of cement (Acorn #177 or brake bonding cement) to each surface.
Allow to dry to an aggressive tackiness. Clamp trailing edge together with wing
tip in place. Clamp only 1/16" of trailing edge. Otherwise the airfoil will flatten
out. Note that the tips are washed out slightly. Bake in an oven at 275° for 3 hours.
Notch the wing stub and file spar to slip inside the wing panels for positioning.
Mark area to clear Mono-Line unit. Remove forward end of wing stub and cut to clear
Mono-Line unit. Install Mono-Line unit on spar (note the angle). Drill hole to clear
stem of Mono-Line unit to allow free movement in inboard side of forward wing stub.
Cut outboard side of forward wing stub to clear other end of MonoLine unit. Cement
both pieces in place permanently. Pour 1/2 oz. of melted "cerro-bend" into outboard
wing panel and slip panel into place over spar and stub. Cerro-bend is a low melting
point alloy used to bend tubing. This might be of interest to you tricksters. It
is also used to make those spoons that melt in hot coffee. If cerro-bend hardens
before you get the. panel positioned simply hold wing over the gas or electric burner
of your stove until the cerro-bend melts. Drill a 3/32" hole in tip of inboard wing
panel and elongate to 1/8"; The aft side of hole should be in line with stem of
Mono-Line unit to' assure no-bind operation. Drill two 1/16" holes in each wing
panel and 1/16" into spar in position shown on plans to take #0 x 14 wood screws.
Cement wing in place on fuselage.
Cowl is made from a block of balsa wood 1-1/2" x 4-3/4"x 1-7/8". Drill a 1-5/32"
diameter hole for cylinder. Carve the outline leaving 1/32" wall at the hole. Carve
to fit over the exhaust stack and to fit fuselage. Cut off top of cowl to allow
3/32" of the cylinder head to stick thru when fuselage top and cowl are positioned
on the pan over the engine. Carve the baffles to the outline and depth shown on
the. plans. Make the top from a piece of hardwood. Carve to clear cylinder head.
Drill a %" hole to clear glow plug. Coat inside of cowl with a heat resistant paint
or fiberglass resin. Sand smooth. Cement the top on the cowl. Do not cement the
cowl on the fuselage at this time.
Make the rudder from 1/16" plywood. Sand to a symmetrical airfoil. Cut out to
clear pushrod and control horn as shown. Slot the rear of the fuselage to take the
rudder. Cement the rudder in place. No offset on. rudder. Cement 1/16" balsa covers
over clearance cutout in rudder.
Stabilizer is made from 1/16" plywood.
Mark area where stab is to set on pan. Sand to a symmetrical airfoil except where
stab rests on the pan. Leave this area flat. Cut the elevator from the stab and
sand the cut edges smooth. Cut a slot in the stab to clear the control horn. Make
the control horn from 3/64 music wire. The height of the control horn is critical.
It should be 14" plus or minus 1/32". If it is too long there will not be enough
control. If it is too short there will be too much control. Notch the elevator to
take the control horn wire. Install the control horn. Drill a series of small holes
through the elevator approximately 1/8" from control horn stem. Thread thin copper
wire through holes around control horn stem and solder. Install "Z" type cloth hinges.
Drill two holes in stab for hold down bolts. Drill and tap the pan to match. Make
the pushrod from 3/64 music wire. Install pushrod and bellcrank. Fit the rear alignment
block and cement in place. Make the pushrod cover from balsa. Cement in place. Be
sure that control system works freely. Cement cowl in place. Form wing fillets from
Plastic Wood. Fill all cracks and joints with Plastic Wood. Allow to dry at least
8 hours. Use a rat-tail file to file all fillets as it is easier to control than
sandpaper. Sand all surfaces smooth and apply 3 coats of clear dope. Drill holes
for hold-downs and cut the front of fuselage to clear Dooling type needle valve
assembly. Cover all surfaces including inside surfaces (except inside the cowl)
with #120 glass cloth using cement as the adhesive instead of resin. Sand surfaces
to remove rough spots at breaks in the glass cloth.
I have been using Ditzler synthetic primer for finishing as it is fuel proof
and is very easy to work with. It comes in 4 colors: White, Red Oxide, Grey, and
Orange-yellow. I use white with a little red enamel added to give a pink color.
It works best if sprayed on, The number of coats depends on how smooth the airplane
is before applying primer. I usually use 3 coats, Wet sanded with 320 wet or dry
sandpaper between coats. Wet sand with 400 wet or dry sandpaper on the final coat.
Then use rubbing compound to smooth it out. A coat of wax will give a slightly glossy
finish.
Make very sure your controls work freely. If they don't your model' will be washed
out the first time flown.
The tank is the old standard "pen bladder" type made from a natural rubber ink
sac. Get the smallest ink sac available. Cut off to 1" long. Cut a- piece of 1/8"
O. D. brass tubing about 1/4" long. Insert it into the end of a 1" piece of neoprene
tubing. Slip the ink sac over the end of the neoprene and brass tubing assembly.
Cut a penny balloon about 3/4" longer than the ink sac and put about 7 drops of
castor oil in it. Insert ink sac and tubing into balloon and wrap entire assembly
with thin wire or thread.
The dolly should track to the outside of the circle. If you fly on grass or dirt
more track-out is required than on cement or asphalt.
Pick a calm day to test fly. You should have no trouble flying this model.
Here is a video showing a new F2A world speed record set by Kalmár
Sándor (335,8 km/h) at on October 10, 2009, in Pécs Hungary.
Notice:
The AMA Plans Service offers a
full-size version of many of the plans show here at a very reasonable cost. They
will scale the plans any size for you. It is always best to buy printed plans because
my scanner versions often have distortions that can cause parts to fit poorly. Purchasing
plans also help to support the operation of the
Academy of Model Aeronautics - the #1
advocate for model aviation throughout the world. If the AMA no longer has this
plan on file, I will be glad to send you my higher resolution version.
Posted May 25, 2022 (updated from original post
on 1/22/2011)
About Airplanes & Rockets
Kirt Blattenberger
Carpe Diem! (Seize the Day!)
Even during the busiest times of my life I have endeavored to maintain some form
of model building activity. This site has been created to help me chronicle my journey
through a lifelong involvement in model aviation, which
all began in Mayo, MD
...
Copyright 1996 - 2026 All trademarks, copyrights, patents, and other rights of ownership to images
and text used on the Airplanes and Rockets website are hereby acknowledged.