|
Website visitor Pat M.
wrote to ask that I scan and post this article for the Yako free flight rubber model.
The unique feature of the Yako is that it is a canard - wing in the back and horizontal
stabilizer up front. It appeared in the December 1971 edition of American Aircraft
Modeler magazine. "For the Tenderfoot" catered to beginner model builders -
mostly kids. They were typically small free flight or control line jobs that could
easily be built without help from an experienced modeler, although of course seeking
assistance was encouraged. I have been surprised at the number of requests I have
received for models from the "For the Tenderfoot" series that ran for many years.
Could it indicate a resurgence of people interested in building, trimming, and flying
model airplanes rather than an entire generation settling for ready-to-fly airplanes
that were built in a far-away factory, often by workers who do not earn enough to
buy the models they produce?
Yako
 By Clarence Mather By Clarence Mather
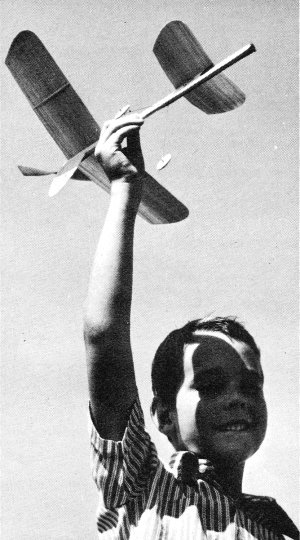 Nice thing about canards-they can carry plenty
of wing area for their size and fly all that much better as a result.
|
When the wing is in back and the stabilizer in front, the plane is called a canard.
They seem to be backward, offer unique appearance and excellent flyability.
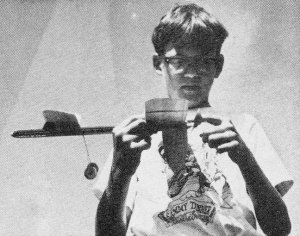
A peppy little tail-first sportster, Yako provides a lot of fun and performance
for a small investment of time and materials. With perhaps 300 turns cranked into
the motor it will zip up over treetop height and then glide down nicely to a landing.
The tail-first or canard configuration has more stability than the more common
tractor and presents a distinctive appearance. But it needs to be built closely
to specifications for proper flight characteristics.
Construction
Yako should be constructed mainly of medium hardness balsa. (If you are new to
balsa wood ask the shop proprietor for guidance.) Measurements can be made directly
from the full-size plans. Parts can be traced onto sheet balsa by utilizing soft
carbon paper. Single-edge razor blades work well for cutting balsa and a metal straight
edge helps to keep true lines. A piece of fine sandpaper; perhaps No. 250, wrapped
around a wooden block is useful for smoothing balsa edges. A dozen pins or so are
needed to hold pieces at various stages of construction. A 6 x 18" piece of insulating
board or soft wood can be used as a working surface. Fast-drying plastic model airplane
glues can be used, but the slower-drying white glues are preferable as they are
less likely to warp the surfaces.
Cut the wing out as a single piece and mark rib locations on underside. Glue
the ribs into position and immediately place the wing on the work board and pin
flat, placing a piece of waxed paper between the wing and the board to prevent the
wet glue from sticking to the board. If necessary, use pins to hold the wing to
the curve of the ribs. Forcing the surfaces to dry in the flat position helps reduce
warps so repeat the same procedure for the stabilizer.
After the glue has dried thoroughly, remove the surfaces from the work board
and cut in two down the center. Prop each tip up for the required dihedral and observe
the gaps at the center joint. Take each half and cut and sand the edge carefully
until the joint fits snugly. If high-shrinkage plastic glues are put into a poor
fitting joint there will probably be warpage. Gaps can be filled with white glues
with little danger.
Glue the longerons to the fuselage side and add the cabin piece. Plug the front
and rear spaces between the longerons to support the front hook and the prop shaft
bearing. Shape the bottom of the wing center so the wing sets flush on the fuselage,
as in the drawing. Then glue it into place making certain that the wing is square
with the fuselage from the top view. Fit the stabilizer to the top of the cabin
so that the leading edge is 5/16" higher than the trailing edge! Observe the structure
from the rear and line up the stabilizer with the wing.
Round-nose pliers will facilitate bending the hooks for the rubber. Use steel
"piano" wire. Bend the front hook and glue securely in position. Bend the rear hook,
but leave other end straight. Cutting burrs should be removed with a file or a grind
stone.
There are several types of plastic props on the market, but the red, square-tipped
type is recommended because of light weight and high pitch. Obtain one of seven-in.
diameter and cut 1/4," off each tip. The hole in the prop is too large for the wire,
so drill it to 1/16 size and plug with a piece of 1/16" aluminum tubing. The props
come with a free-wheeling ridge on the wrong end of the hub, so cut and sand the
front flat.
Cut a second piece of tubing for the fuselage bearing. A razor blade will cut
aluminum tubing nicely if it is pressed firmly into the tubing and rolled back and
forth. Nick the surface of this tube all over so that the glue will grip it securely.
Slip the prop shaft through this tube, the glass bead, and then the propeller. Bend
the wire shaft over at a right angle.
On the first Yako the shaft was bent over past a right angle so that it would
catch on a blade. During the glide, the prop would stop and the model would wander
about depending upon the rudder effect of the particular prop position. This model
was lost in a thermal. The second Yako has a free-wheeling prop (sketched on plan)
which reduces drag and allows a constant glide circle. The small piece of tubing
is glued to the prop and lashed with thread. The ratchet is bent so that it flips
free when the prop turns clockwise by the slipstream, but catches the bent-over
shaft when turned by the rubber. Attach the prop assembly to the fuselage by gluing
the nicked tubing to the rear balsa plug and wrapping with fine thread a few times.
Take care not to get any glue into the shaft-tubing joint. Angle the prop as shown
in the side and top views - the right tip of the prop should be about 1/4" closer
to the wing than the left side. These angles help keep Yako in a smooth climb.
Bend the landing gear and secure in position, lining it up so that the model
sets level. Wheels can be built up or purchased - plastic wheels are heavier but
they work well.
 Just because it looks backward,
doesn't make it tough to build or fly. Climb is straight ahead with a slow right-turning
glide.
|
Purchase enough rubber for several motors, as they break, wear out, etc. To make
a secure knot, first tie it loosely then work saliva into the knot by chewing. Now
pull the knot tight-right to the breaking point of the rubber. Rub some castor oil,
glycerin, or commercial lubricant into the rubber so that it appears moist. Slip
the rubber into the hooks with the knot at the front.
Observe the model from the rear to check for warped wings or stabilizer. The
trailing edges should be parallel to the leading edges of each surface. Small warps
will probably be tolerable, but large ones should be reduced or removed. Hold the
wood between the thumb and forefinger, then pinch and bend opposite the warp. Apply
the process over an area rather than in one spot. If a warp is persistent, one of
the regular, fast-drying model airplane glues can help remove it. To bend the wood
down, rub a thin layer of glue under the area. If the wood needs to be bent up,
rub the glue above the area. Hold the wood in the bent position while the glue sets.
The rear part of the fin should be bent to the right about 1/32" to produce a right
turning tendency.
This will counteract the left turning effect of the propeller.
Flying
Test fly Yako over the softest area you can find. At our San Diego flying site
that means picking the spot where the rocks are smallest! Select a time when the
air is near calm such as early morning or late evening. Wind the motor by turning
the prop counterclockwise about 100 times. Launch Yako with flying speed slightly
nose up and just to the right of any wind. The model should climb at a shallow angle
with little or no turn.
Learning the correct launch speed may require some practice. If launched too
fast Yako may zoom up and stall; if launched too slow it will dive. If either condition
persists small adjustments can be made on the stabilizer. (It is assumed that the
wing and stabilizer angles and the model balance point were checked during construction.)
The outer part of the stabilizer can be bent down to correct dives or up to correct
stalls by the methods described to remove warps. Any sharp turning tendencies should
be countered by bending the rudder opposite the turn.
When the flight pattern is satisfactory, put more turns into the rudder and observe
closely as models often require additional trimming under the higher torques. The
number of turns that can be put into the rubber depends upon its quality. Most motors
will take 300 hand turns. When fully wound our Yako climbs steeply, then rolls into
a climbing turn to the left. As the torque lessens, the model flies nearly straight
- then glides in a large right circle. Occasionally we use a long motor - perhaps
18" - and stretch it out and wind it with a winder. With such power this model has
climbed to surprising heights. If Yako seems sluggish, it may be due to low torque
rubber - try a larger size. Keep the prop shaft and bearing well-oiled.
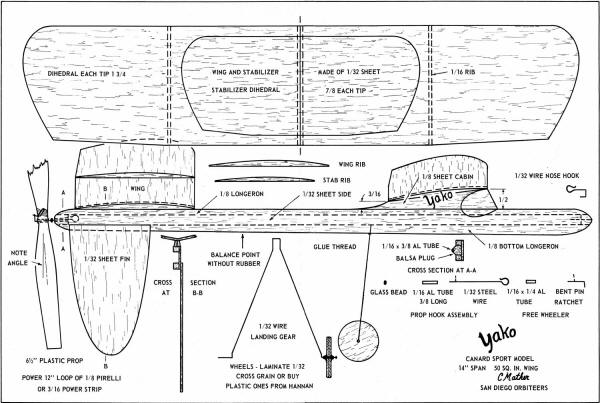
Yako Plans
<click for larger image>
Notice:
The AMA Plans Service offers a
full-size version of many of the plans show here at a very reasonable cost. They
will scale the plans any size for you. It is always best to buy printed plans because
my scanner versions often have distortions that can cause parts to fit poorly. Purchasing
plans also help to support the operation of the
Academy of Model Aeronautics - the #1
advocate for model aviation throughout the world. If the AMA no longer has this
plan on file, I will be glad to send you my higher resolution version.
Try my Scale Calculator for
Model Airplane Plans.
Posted February 22, 2014
|


