|
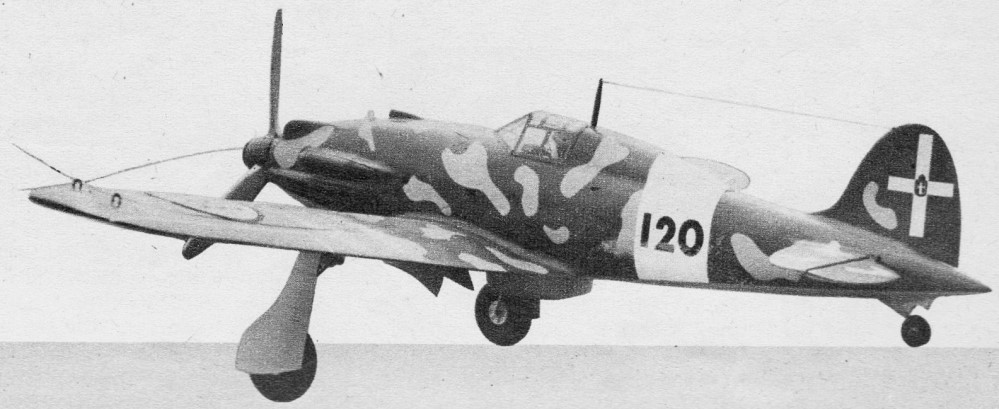
Walter Musciano designed
and built this fine control line version of the Italian Macchi "Saetta" Fighter
that can be configured either as the C-200 or the C-202 version. At a scale
of 3/4":1', the wingspan came out at 36", and a Fox .29 inverted-mounted engine
was used. Italy never was a big producer of aircraft in either of the world
wars, but the Saetta (Google translates it to "lightning"
or "arrow") did its part in helping the Allies achieve air superiority
over its country's skies and in North Africa. As with nearly models of the era,
construction is on the rugged side in order to withstand constant impulses from
the internal combustion engine. If you elect to build the Saetta and use electric
power, some weight can be saved by selecting lighter and therefore less structurally
strong balsa and substituting hard balsa in place of some plywood parts. I welcome
a photo of your completed model for posting here on the website.
Italian Macchi "Saetta" Fighter
Modeled in the popular 3/4 inch to the foot scale is this World War II
C-20 and C-202 fighter
By Walter A. Musciano
Despite the fact that the Italian Air Force did not make a spectacular showing
during World War II, it did possess some interesting airplanes that make attractive
control line models. One of these is the standard first-line fighter used by
Italy during the aerial battles over Malta, Libya and Egypt as well as over
the Italian mainland.
Aeronautica Macchi developed the Macchi C-200 "Saetta" (lightning-swift)
from the long line of successful Macchi record-holding racers. Powered by a
Fiat A-74 RC/38 radial, air-cooled engine of 840 hp, the C-200 attained a top
speed of 305 mph and weighed only 4850 lbs. This light weight created a very
maneuverable plane. However, the comparatively low speed and armament of only
two 12.7-mm machine guns proved no match for the Spitfires, Hurricanes and Warhawks.
In order to meet these Allied fighters on more equal terms and be able to
better support the faster German fighters, the C-200 was fitted with the German
Daimler-Benz DB-601 N inverted, liquid-cooled, 12-cylinder engine developing
1,200 hp. With the bigger engine and the addition of four .30 caliber wing guns
the weight of the C-202, as it was now designated, jumped up to 6400 lbs. This
cut down the maneuverability somewhat but the speed increased to 345 mph at
18,000 ft. with a service ceiling of 34,500 ft.
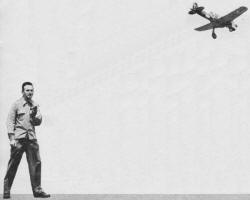
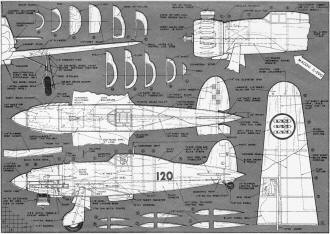
Constructed to a scale of 3/4" to the foot, our model Macchi will accommodate
engines of from .14 to .29 cubic inch displacement. After flying for some time
with an O.K. Cub .14, we decided to switch to something "heavier." A Fox .29
was installed in a remodeled nose and control was excellent with flights a bit
on the fast side. Plans illustrate both the C-200 and C-202 as well as engines
installed upright and inverted in beam and bulkhead mounted fashion.

The first item to be fabricated is the wing, which is started by sawing the
plywood joiner to shape in one piece. Cut the balsa spars and taper as the plans
describe. Firmly cement the spars to the joiner, thereby automatically forming
the correct amount of dihedral. While this is drying cut the wing ribs to shape.
Sand smooth and cement the ribs to the spars.
The wing covering material should be butt-joined with cement in order to
form the full chord width. Trace the wing outline onto the sheet and cut to
shape. Cement the lower covering to the spar, holding it in place with pins
until dry. Apply liberal quantities of cement to underside of the wing ribs
and attach the lower covering to them, again holding it in place with straight
pins until dry.
Bend the landing gear struts to shape with pliers, being sure to make one
left and one right-hand strut. Saw the plywood landing gear strut foundations
to shape and sandwich the struts between them, using plenty of cement. Make
a small hole in the covering at the exact spot where the strut emerges from
the wing. Now, slip the strut through this hole, from the top, and firmly cement
the plywood assembly to the spar, lower covering and the adjoining ribs. Apply
several coats of cement to this joint.
While the wing is drying cut the upper covering to shape. Bevel the lower
covering edges in order to fair the covering into the rib contour. Apply plenty
of cement to the top of the spar and attach the upper sheet covering to it.
Hold this in place with straight pins until dry. Now, add a liberal amount of
cement to the beveled portion of the lower covering and to the top of the ribs.
Push the covering against the ribs and lower sheet bevel. Again, hold in place
with straight pins until dry. Cut the balsa wingtips to shape and cement in
place. Set the wing aside to dry.
Trace the empennage onto sheet balsa and cut to shape with a single-edge
razor blade or a coping saw. Carve and sand the surfaces to a streamline shape.
Cement the elevator halves to the dowel joiner.
When dry, firmly install the commercial control horn and hinge the elevator
assembly to the stabilizer using cloth hinges or any other popular method you
prefer.

Cut the vertical keel to shape after it has been placed onto 1/4" sheet balsa.
Be sure to cut away for the location of the wing, stabilizer, fuel tank and
bellcrank. The first two openings mentioned must be cut accurately in order
to insure proper wing and empennage alignment.
Attach the music wire lead-out lines to the bellcrank by twisting the ends
as shown and soldering lightly. Cut the hardwood bellcrank mount to shape and
drill a hole for the mounting bolt. Bolt the bellcrank to the mount with washers
inserted between them. Firmly cement the bellcrank mount to the top of the wing.
It will be necessary to make a small hole in the wing to accommodate the nut.
Apply several coats of cement around this joint to insure a secure mounting.
Cement the wing and stabilizer to 'the sheet balsa keel. While this is drying
cut the fuselage formers and bulkhead to shape and cement the formers to each
side of the keel while the bulkhead is attached to the front of the keel.
Bend the control rod to shape and then attach to the bellcrank and control
horn. Test the control system to make sure it operates without binding. The
tail wheel strut should now be bent to shape and imbedded into the keel. Sew
this securely to the keel with heavy thread and cement well.
Numerous commercial fuel tanks can fit this plane. Among these tanks are
Maeco, Perfect, Froom, Acme, Kap Pak. It may be necessary to cut away a portion
of the keel and the front of the wing in order to install the tank. Be certain
that the tank is firmly mounted in order to prevent excessive foaming that will
cause erratic engine operation. Add plastic tube filling and vent line extensions
as well as the feed line. The latter should be long enough to reach the engine
needle valve body without kinks. Pass this line through a hole in the bulkhead
and we are ready to fit the mounts to our model.
The prototype model used metal triangle mounts of the K&B variety. These
come in a variety of sizes to fit many engines. The mounts are firmly bolted
to the bulkhead. If it is not desired to use this type of metal mount the conventional
hardwood beam mounts can be installed by cutting rectangular openings in the
bulkhead and formers and sliding the mounts in place. Use plenty of cement and
be sure that the mounts extend as far aft as the alternate installation illustrates.
The model can now be planked.
It is important, when planking, to remember to cement the strips to each
other as well as to the formers and bulkheads. Start by cementing one strip
to each side and to the top and bottom of the fuselage. Hold these in place
with straight pins until the cement is dry. Now, add a planking strip to each
side of the four strips already in place. Continue in this fashion until the
fuselage is completely covered, It will be necessary to taper and bevel each
strip as the planking progresses in order to insure complete coverage and close
fitting.
The cockpit fairing may produce a bit of difficulty if not approached correctly.
It is suggested that this fairing be ignored during the initial planking, then
tackled as separate unit by trimming the strips as required to form the lower
contour. The cockpit opening is cut to shape after all planking is completed.
The nose block is carved from medium-soft balsa. This is made in two pieces
joined at the horizontal center line. First, trace the top view of the nose
onto the blocks and saw to shape. Repeat this for the side view and carve roughly
to shape. Hollow the block to clear the mounts and engine. Firmly cement the
blocks to each other and to the plywood bulkhead. The tail cone is made by cementing
two 1/4" thick pieces of balsa to each side of the keel. Cement this in place
and set the model aside to dry thoroughly.
While the model is drying the radiator, exhausts, and scoops can be cut from
scrap balsa. It will be noted that the exhaust stacks are built up from thin
sheet balsa with the separations inserted at an angle as shown in the top view.
Returning to fuselage, trim the planking strips, nose block and tail cone
with a sharp knife. Extra care should be taken with the nose block because of
the peculiar shape of the upper portion. It is advisable to have the commercial
spinner that you intend to use on hand when shaping the nose block, to insure
good fit.
Complete building instructions are available on the full-size plans. Full-size
drawings of Macchi are part of Group Plan #954, Hobby Helpers, 770 Hunts Pt.
Ave., NYC 59 (35c).
Italian Macchi "Saetta" Fighter
Plans
Notice:
The AMA Plans Service offers a
full-size version of many of the plans show here at a very reasonable cost. They
will scale the plans any size for you. It is always best to buy printed plans because
my scanner versions often have distortions that can cause parts to fit poorly. Purchasing
plans also help to support the operation of the
Academy of Model Aeronautics - the #1
advocate for model aviation throughout the world. If the AMA no longer has this
plan on file, I will be glad to send you my higher resolution version.
Try my Scale Calculator for
Model Airplane Plans.
Posted April 17, 2015
|