|
Website visitor Dan Taylor wrote
to ask that I scan and post this article, which appeared in the 1962 Annual edition
of American Modeler magazine, on making fiberglass cowls. It is a variation
on vacuum bagging that exploits the even tension applied by the elasticity of a
rubber balloon. Although limited to relatively small forms, it has the advantage
of low cost and complexity, and it eliminates the potential nuisance of the mold
release agent not being fully coated and causing separation issues. This method
will probably not work too well with shapes that need localized indented areas more
than 1/32" to maybe 1/16" deep (like cooling fins). The article did not originally
make direct reference to the numbered photos, so I added them as best as I could
guess based on the text. If you use this method of making a fiberglass cowl, please
send a photo of your work and I'll be glad to post it here.

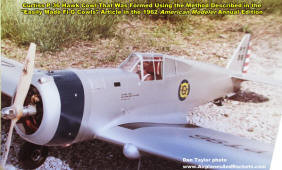
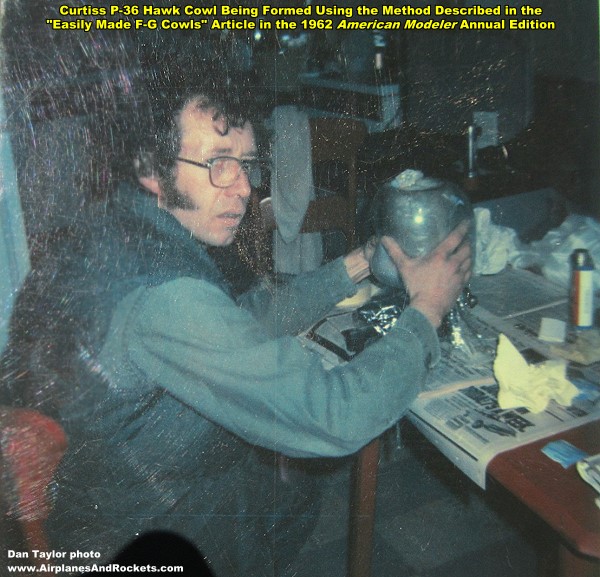
Here is Dan Taylor using this very method back in the last century to make a
fiberglass cowl for his
Curtiss P-36 Hawk!
Easily Made F-G Cowls
 Carrier Champ Ray Randall Lets You in on
the Secret of How to Fabricate Fiberglass (F-G) Cowls with No Sweat - and Quickly Carrier Champ Ray Randall Lets You in on
the Secret of How to Fabricate Fiberglass (F-G) Cowls with No Sweat - and Quickly
 When fiberglass first became available as
a model construction material I tried an engine cowl using a male mold. The result
was not too good because the natural resiliency of the glass cloth made it spring
away from the mold. I tried again using a female mold and had better luck, but still
had to use too much resin to fill the loose layers of cloth. When fiberglass first became available as
a model construction material I tried an engine cowl using a male mold. The result
was not too good because the natural resiliency of the glass cloth made it spring
away from the mold. I tried again using a female mold and had better luck, but still
had to use too much resin to fill the loose layers of cloth.
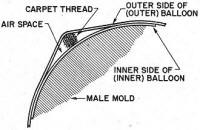
Then I remembered that many years ago Lockheed had used a rubber bag to force
wooden laminations into a concrete mold. I tried inflating a balloon inside my mold
after I had laid in the glass cloth and found I had the answer. The pressure of
the air-filled balloon forced the glass fabric tightly together and forced out all
excess resin, which gave a cowl with a minimum of weight-adding resin.
 This still left the work of making the sample
cowl, casting this in plaster and the use of parting agents. I had noticed that
my balloon pulled away from the hardened resin easily and finally arrived at the
present process which has proved successful for seven years. This still left the work of making the sample
cowl, casting this in plaster and the use of parting agents. I had noticed that
my balloon pulled away from the hardened resin easily and finally arrived at the
present process which has proved successful for seven years.
 The master mold may be made from any convenient
material (balsa, hardwood, soap, plaster). This mold should be made 3/64" smaller
than the desired outside dimensions of your finished cowl. If round in cross section,
it may be turned on a lathe. Using a lag bolt as mounting, I have made many "masters"
under three inches in diameter by chucking a long 1/8" wood screw in a hand grinder.
If the cowl is elliptical in cross-section it will be necessary to hand-carve the
master. The openings in the front of all of these cowls should be recessed approximately
1/8". The master mold may be made from any convenient
material (balsa, hardwood, soap, plaster). This mold should be made 3/64" smaller
than the desired outside dimensions of your finished cowl. If round in cross section,
it may be turned on a lathe. Using a lag bolt as mounting, I have made many "masters"
under three inches in diameter by chucking a long 1/8" wood screw in a hand grinder.
If the cowl is elliptical in cross-section it will be necessary to hand-carve the
master. The openings in the front of all of these cowls should be recessed approximately
1/8".
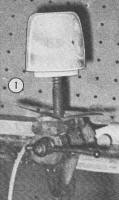
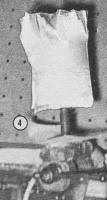
Mount the cowl (small end up) on some convenient post as shown in photo #1. If
this post is to be held in a vise, slip a piece of cardboard on the post to prevent
resin from dripping into the tension screw. A block of wood will do if you do not
have a vise. Balloons of synthetic rubber which can be inflated to at least 12"
diameter can be purchased at toy or novelty stores. Two balloons will be needed
for each cowl, and a few spares are a good idea.
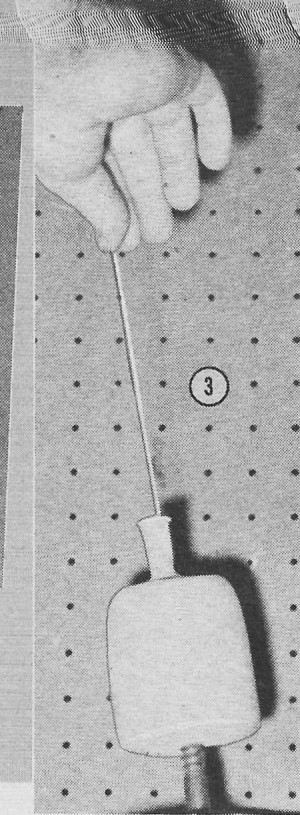
 Drop from eight to twelve inches of carpet
thread or light string into the open end of the balloon with at least three inches
folded over outside. Inflate the balloon fully and press down onto the mold forcing
the balloon to double inside itself (#3). The thread inside the balloon should fall
down the side of the mold between the two layers of rubber. Gradually valve out
the air as the balloon is pressed down until your hands touch the top of the mold.
This will seal the opening in the balloon. Drop from eight to twelve inches of carpet
thread or light string into the open end of the balloon with at least three inches
folded over outside. Inflate the balloon fully and press down onto the mold forcing
the balloon to double inside itself (#3). The thread inside the balloon should fall
down the side of the mold between the two layers of rubber. Gradually valve out
the air as the balloon is pressed down until your hands touch the top of the mold.
This will seal the opening in the balloon.
 Slide your hands down the side of the mold,
forcing the bulged section ahead of your hands, until at least two inches of air-filled
bulge extends past the bottom of the mold. Squeeze this excess under the bottom
of the mold until the trapped air escapes through the passageway formed by the thread
(sketch). When all air has escaped, pull out the thread (#4). Slide your hands down the side of the mold,
forcing the bulged section ahead of your hands, until at least two inches of air-filled
bulge extends past the bottom of the mold. Squeeze this excess under the bottom
of the mold until the trapped air escapes through the passageway formed by the thread
(sketch). When all air has escaped, pull out the thread (#4).
 Fiberglass kits available in hobby shops
include a satisfactory glass cloth, or a heavier grade may be purchased in a boat
shop. Pull off several strands of glass from the cut edge and put to one side. Cut
a piece of the cloth two inches wider than the length of the finished cowl and long
enough to circle the cowl four times, in the case of the fine kit cloth (two layers
of the boat cloth). Wrap this around the mold and hold in place with the extra strands
mentioned above. Slit cloth every 1/2" at nose of cowl to prevent folds in areas
of sharp curvature. Be careful not to puncture balloon with scissors. Fiberglass kits available in hobby shops
include a satisfactory glass cloth, or a heavier grade may be purchased in a boat
shop. Pull off several strands of glass from the cut edge and put to one side. Cut
a piece of the cloth two inches wider than the length of the finished cowl and long
enough to circle the cowl four times, in the case of the fine kit cloth (two layers
of the boat cloth). Wrap this around the mold and hold in place with the extra strands
mentioned above. Slit cloth every 1/2" at nose of cowl to prevent folds in areas
of sharp curvature. Be careful not to puncture balloon with scissors.
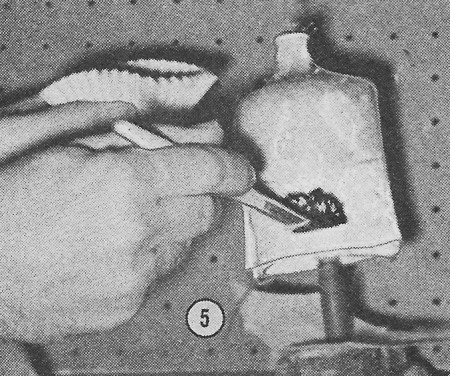
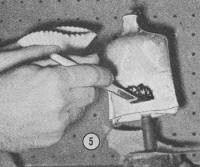
 I mix my resin in the proportion of 15 drops
of hardener to each ounce of resin. Start brushing inner layer of cloth down to
the mold and work outward along the spiral of cloth layers (#5). Then coat rest
of cloth, using plenty of resin in order to wet it through to the mold. I mix my resin in the proportion of 15 drops
of hardener to each ounce of resin. Start brushing inner layer of cloth down to
the mold and work outward along the spiral of cloth layers (#5). Then coat rest
of cloth, using plenty of resin in order to wet it through to the mold.
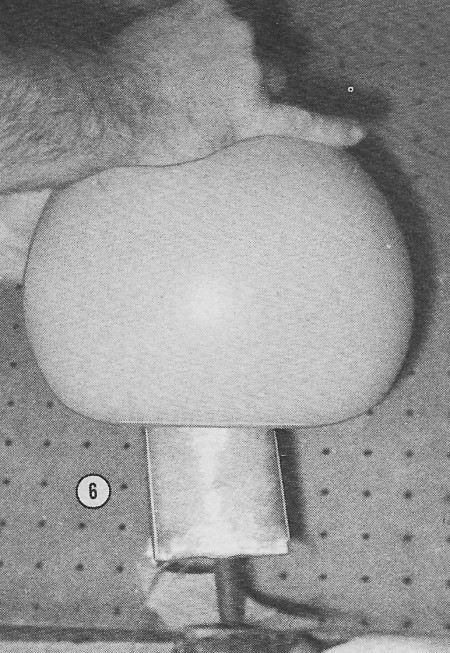
  Cover immediately with another balloon in
the same manner as used in covering the mold (#6), except that it should be brought
down somewhat more slowly in order to permit excess resin to be squeezed ahead of
the balloon (#7). The thread may be left in this balloon and it is a good idea to
have some other person wrap several turns of masking tape around the cowl bottom
while you hold the deflated balloon in place. (The resin is slippery and the balloon
might pop off.) Cover immediately with another balloon in
the same manner as used in covering the mold (#6), except that it should be brought
down somewhat more slowly in order to permit excess resin to be squeezed ahead of
the balloon (#7). The thread may be left in this balloon and it is a good idea to
have some other person wrap several turns of masking tape around the cowl bottom
while you hold the deflated balloon in place. (The resin is slippery and the balloon
might pop off.)
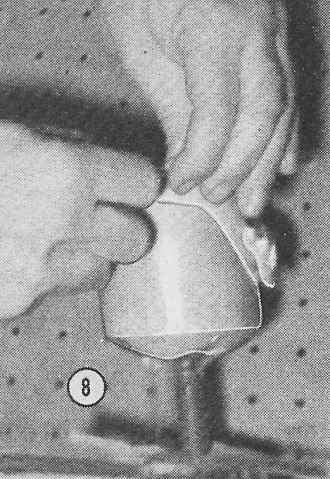
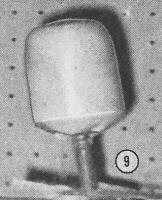
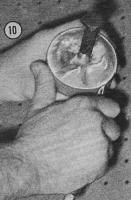
Permit the resin to harden for two hours and then peel off the outer balloon
(#8). The resin at this point will be rather sticky (#9), and it is a good idea
to rub baby powder on your fingers before cutting off excess fiberglass at rear
of cowl (#10).
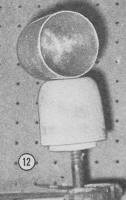
 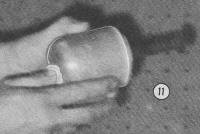 Cut a rough hole at front of cowl (no larger
than finished cowl opening). Put a steady pressure on the mold through this opening
(#11) and the inner layers of rubber will slide and permit the mold to be ejected
(#12). The shell is left overnight to harden completely. The pressure of the outer
balloon will have forced the cloth into the front recess of the mold far enough
to show a clear outline of its shape inside the cowl. I use a jeweler's saw to cut
the full size opening. Cut a rough hole at front of cowl (no larger
than finished cowl opening). Put a steady pressure on the mold through this opening
(#11) and the inner layers of rubber will slide and permit the mold to be ejected
(#12). The shell is left overnight to harden completely. The pressure of the outer
balloon will have forced the cloth into the front recess of the mold far enough
to show a clear outline of its shape inside the cowl. I use a jeweler's saw to cut
the full size opening.
It will be seen that the lapped glass fabric has built up the cowl thickness
in front. This should be thinned out with a file or coarse sandpaper and the entire
surface sanded to form a base for painting.
 Note: the glass fibres are very irritating
to the skin and eyes. Roll down your sleeves, and first let some soap dry on your
hands. Do all sanding outdoors so that the wind will blow the dust away from you. Note: the glass fibres are very irritating
to the skin and eyes. Roll down your sleeves, and first let some soap dry on your
hands. Do all sanding outdoors so that the wind will blow the dust away from you.
Posted May 19, 2018
|