|
Technical details of gas-powered free flight have changed since
this article was published in a 1968 issue of American Aircraft
Modeler magazine, but the basics of construction, rigging,
and flight trim are the same. Free flighters like to say that their
particular facet of aeromodeling is the purest form since success
or failure depends on the practitioner's ability to master all the
'natural' forces acting on their craft. I agree to a point, except
that unless you are considering the whirlybird flight of a maple
tree seedling heading earthward or a similar airborne inanimate
object, the fact is most flight in nature is controlled either by
the animal exercising the ability or a human inputting some means
of control over the aircraft's flight path. That's not to knock
the often envious ability of a free flighter to trim his model for
a perfect flight, but let's not put him on a pedestal any higher
than a champion control liner or R/C pattern flyer.
Get into Free Flight Competition
All the basic techniques and many pointers from an expert's experience
Bob Stalick
This article asks and answers the questions necessary to get
you into the air with a contest-winning free flight. If some of
the terms are mysterious, you will find a glossary of terms at the
end of the article.
Where do I start? You can expect to spend $20 if you buy the
"best" new equipment for a 1/2A contest model. If you already have
a suitable 1/2A engine, the cost might be as low as $5, or less.
It all depends on what you already have. Let's assume that you have
to start from scratch and that you have a $20 bill.
First, we'll want a good contest engine.
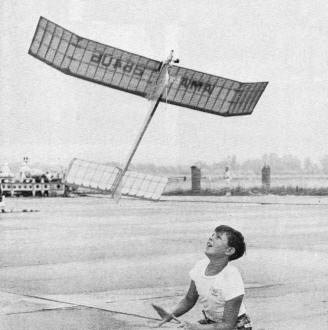
Young Marty Thompson VTO's a Class B gassie at AMA's Nationals.
Ten mad seconds of climb, minutes of quiet gliding.
What kind? Well, after looking at the contest winners columns
in the national magazines, we see that practically all of them are
using the Tee-Dee .049 - cost $9.95 (plus tax in some places). Next
we know that the plane kit must also be a proven winner. Two kits
stand out - the Viking and the Starduster. The cost is about the
same - $3.50 to $3.95.
A few more things will be needed. First is a timer to shut off
the engine, and a fuel tank. A Tatone timer sets us back $4.50 and
a Tee-Dee tank mount adds another $1.85. You need glue, clear dope,
dethermalizer fuse, perhaps a couple more sheets of Jap tissue (to
replace what you will waste), a propeller (6 in. diameter by 3 in.
pitch), and fuel.
Building:
Clear a space on your work bench (or kitchen table, if it's O.K.
- be sure to put a building board down under the plans). Read the
plans again, carefully this time. Read everything! When the plans
are thoroughly understood, carefully cut out all the die-cut parts
and pieces that are printed. Use a sharp razor or X-Acto knife.
Lightly sand off the fuzz on the edges of the cut-out parts.
Pin the plan down to begin construction of the wing. Cover the
wing portion of the plan with a sheet of waxed paper, so the glue
won't adhere to the plan. Cut off the leading and trailing edge
stock, exactly as indicated, and the spar or spars, too. Pre-glue
all joints. By that we mean to put a light coat of glue wherever
the ribs join with the other surfaces, and then rub the glue into
the wood with your fingers. Do this to all mating parts.
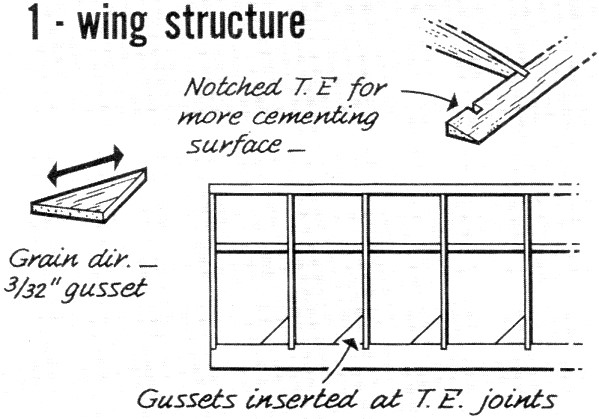
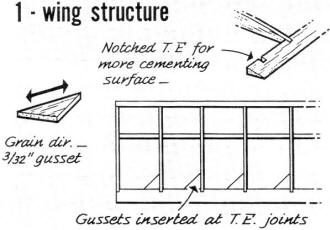
Notch the trailing edge (Sketch 1). Pin the leading edge to the
plan, place the spar in position, line up and pin down the trailing
edge. After the pre-glue coat is dry, coat with glue all the joints
on the rib and slip each one into its place, making certain that
they are snugly pushed down, so that the bottom of each touches
the plan. Don't add the ribs at the dihedral breaks yet - they are
added later. While all of this is drying, cut diagonal gussets and
insert along the trailing edge joints (Sketch 1). This gives additional
rigidity and helps to counteract warps.
Allow the wing to dry at least several hours, preferably overnight,
still fastened to the plan. If you wish, you can add a fillet of
glue to all joints to insure strength. To do this, cut a piece of
balsa to a thick point and use this to work the glue around all
joints.
The stabilizer is built in the same way as the wing, but don't
add gussets along the trailing edge joints, except where indicated.
After the wing and stab are completely dry, you are ready to add
dihedral and to shape the leading edges.
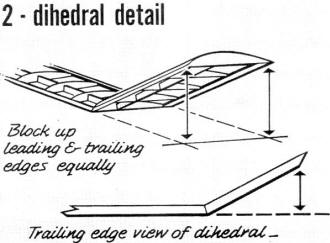
Adding dihedral to wing: Dihedral provides stability in your
plane. If you are careful with this step, you will have fewer problems
in flying, and fewer warps. Sand a slight angle at the top ends
of the leading and trailing edges of your wing where the panels
join each other (i.e., where the main panels join to the tips, etc.).
Pin the main panels securely to the plan after pregluing all joints.
Then, after the glue has dried, add another coat of glue and pin
the tip wing sections to the main panels (Sketch 2), blocking up
the tips the distance required on the plans. Be sure that the trailing
edge half is blocked up the same amount as the leading edge. While
this is drying, add the necessary gussets and joint ribs. When this
assembly is dry (allow at least several hours), add the dihedral
to the center panels - in the same manner as in the tip panels.
Again, be certain that both the leading and the trailing edges are
blocked up exactly the same amount.
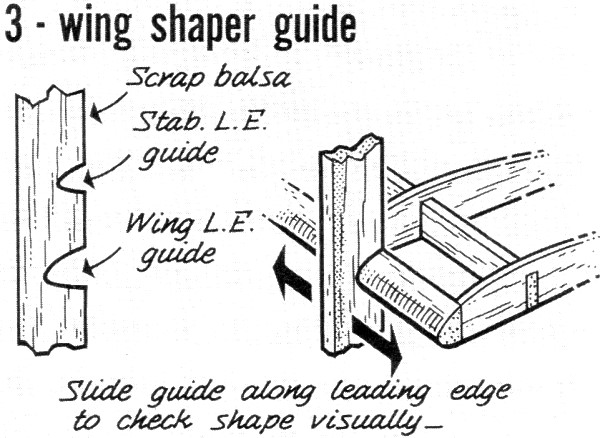
Shaping the leading edges: There is a definite shape prescribed
for the wing and stab airfoils. Cut a piece of scrap balsa to this
shape (Sketch 3). Carefully carve and sand the leading edges to
conform to this shape. Use your scrap balsa guide frequently to
check this. When done carefully sand, with extra fine sandpaper,
the entire wing and stab structure, removing all bumps of glue and
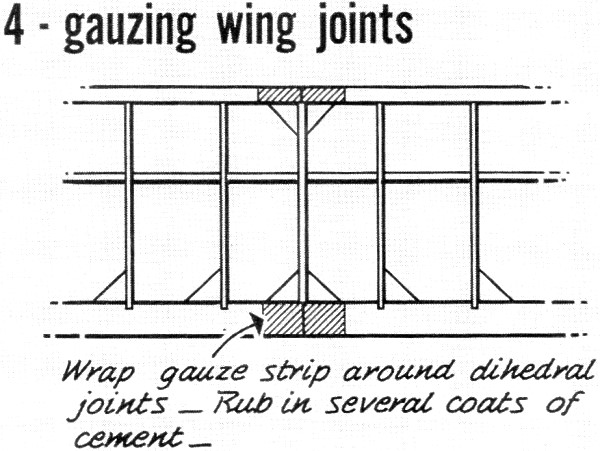
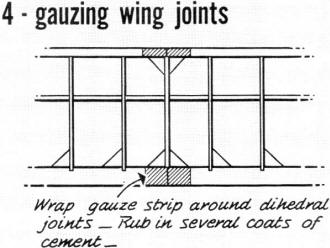
balsa. For additional strength, glue a piece of gauze or silk to
the dihedral joints on the wing's leading and trailing edges. Rub
three coats of glue over it - until it dries to a dull gloss (Sketch
4).

Covering:
Covering the wing and stab causes a great concern for most newcomers.
It is very easy if you follow these steps:
1) Dope all leading and trailing edges, all dihedral joint and
tip ribs, both on the top and bottom. Sand very lightly and dope
again. If your model has an undercambered wing (as in the case of
the Viking), also apply several coats of dope to the underside of-
each rib. This pre-doping gives the tissue something to "grab" onto,
stops it pulling away.
2) Cut your tissue so that the grain runs lengthwise (spanwise)
with the wing or stab. In order to find the grain of tissue, tear
a corner slightly; if you are tearing with the grain, it will be
a "straight" tear - if not, the tear will be jagged. Cut the tissue
you plan to use at least an inch oversize, so you have some leeway
in case of goofs.
3) Always cover the bottom and then the top of the same panel
before going to the next panel. Always cover the center panels first.
4) Always dope the leading and trailing edges and the dihedral
ribs heavily, then immediately put the tissue over this area. Work
out all the large wrinkles by pulling gently and rubbing on the
edges of the tissue. Try to pull evenly so the grain remains running
directly span-wise. This minimizes warpage. It is a good idea to
have a bottle of dope thinner nearby along with a brush - just in
case you have made a severe mistake in applying the tissue, then
you can brush thinner over the offending part, releasing the tissue
from the structure.
5) Always lay the tissue evenly on the leading edges first and
then pull snugly to the trailing edges. After the dope is fairly
dry, dope right through the paper on the leading and trailing edges
and the dihedral ribs. If your wing is under-cambered, dope through
the tissue onto each wing rib bottom. It will be necessary for you
to press your finger along this dope line to make the tissue adhere
to the underside. After the dope has dried on, the bottom of each
rib, turn the wing over and add a small bead of dope along each
rib bottom where it meets the tissue. This insures that the tissue
will not pull away from the frame.
6) After the wing has been covered and has dried, sand the excess
paper off carefully and then run your dope brush around the edges
to bond the tissue fragments to the wing.
7) Sprinkle water over the entire wing (or stab) and set on a
level place to dry. (I use a drawer to allow the wing to set down
fiat.) This will pull out all the minor wrinkles, and if you set
your wing up on its leading edge or on a drawer, it will not warp
while drying.
8) Only after the wing (or stab) is completely dry, do you dope
it. Usually four or five thin coats of fuel-proof clear dope is
sufficient. Be sure you have added your AMA numbers to the right-hand
top of the wing panel. If you want a high gloss finish, simply keep
doping. Some modelers will put on ten or 12 coats of dope, but remember
every additional coat will add just that much more weight.
9) Set the wing and stab aside in a level place so that they
will "cure" while you construct the rest of your model.
The fuselage: It must be light but strong, therefore pregluing
is desirable. Be certain that the wing and stab platforms are level
and installed exactly according to plan. The rudder is mounted on
the bottom of the fuselage, in the case of the Starduster. Try to
align the fuselage so that it is perfectly straight, and care must
be taken to see that the rudder is lined up correctly, too.
The motor pod:
The motor pod installation is very important. It must be strong,
and exact.
First:
Drill the plywood firewall and mount the nuts (blind nuts are
preferred) so that the tank mount can be bolted to it. Check its
fit. Make your corrections now. Glue three nuts securely in place.
Second:
Glue the firewall to the pylon - pre-glue and use plenty of glue
afterwards. Use white glue, if possible, on all hardwood joints.
Be sure that the firewall is facing dead ahead with no side, up
or down tilt. Reinforce with the gauze inside of the firewall where
it joins the pylon, and rub into it several coats of glue.
Third:
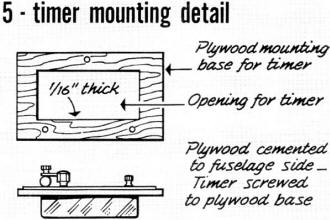
Add the balsa sides, being sure to cut the left side so that
it will ac-commodate the tick-off timer (Sketch 5). Glue on the
pod bottoms and end plates.
Fourth:
Glue a strip of gauze around the entire firewall and then fold
it, so that it is also glued to the balsa pod sides and bottom.
Rub several coats of cement into the gauze. Allow to dry thoroughly.
When doping the fuselage, be certain the firewall area gets six
or eight good coats to help seal and fuel-proof it.
Covering the fuselage:
You may not wish to cover the fuselage with tissue, but if you
do, you will add considerable strength at only a slight increase
in weight. Also, the additional color will make your plane easier
to spot in the air or on the ground. If you don't cover it, be sure
that you use at least four or five coats of dope for fuel protection.
Follow these steps:
1) Dope the entire fuselage and rudder, sand lightly and dope
again.
2) Cut your tissue - grain lengthwise - so you can cover one
side at a time, with a 1/2-in. overlap at top and bottom. Dope a
small section of the fuselage at either end. Attach one end of the
tissue at these points, smoothing out the wrinkles. Then, holding
the tissue away from the fuselage, dope the rest of the fuselage
side. Pull the tissue tight and smooth it onto the doped wood.
3) Repeat for the other side, the pylon and the rudder. The overlap
on the fuselage can be doped onto the fuselage top and bottom, or
can be trimmed off. Cover the top and bottom of the fuselage in
the same manner.
4) Do not water-shrink tissue on the fuselage. Simply apply several
coats of dope, and it's finished.
Installation of rigging:
We are ready to install the wing hold-down dowels. Drill the
necessary holes according to the plan - right below the wing rest
platform. Drill them at least one inch deep; coat a 1 1/2 to 2 in.
section of dowel with cement and push into each hole.
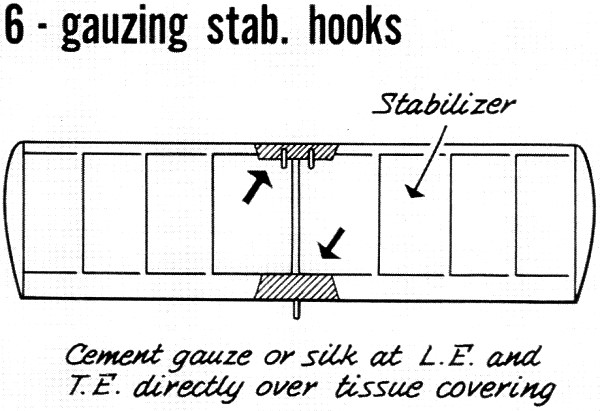
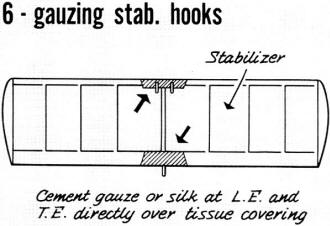
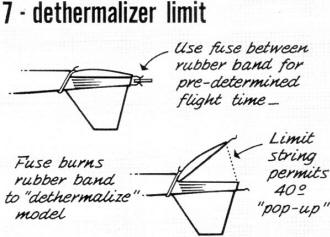
The stab rigging is more involved so that the plane can dethermalize.
You don't want to lose the model because of carelessness. Using
paper clips, bend two hooks as indicated on the plans and insert,
after gluing well, into the false ribs on the front end of the stab.
Bend another clip and fasten to the back of the stab - glue securely.
After the glue has dried, cut a thin slice of silk or gauze and
glue it onto the wire and the stab. (Sketch 6.) Glue another hook
onto the rudder, as indicated. Fasten the wing and the stab to the
fuselage with rubber bands. Line them up so that they are exactly
centered on their respective mounts. Using 1/8 in. dowels split
in half, glue them on both sides of the wing and stab right next
to the platforms at the leading and trailing edges. This insures
that the wing and stab are always put back in the same place when
you rubber band them together at the field. After the keys have
dried, tie a limit string or wire to the trailing edge of the stab
and fasten the other end of the string to the fuselage. Allow an
angle of about 40 degrees (Sketch 7). Securely glue the string or
wire.
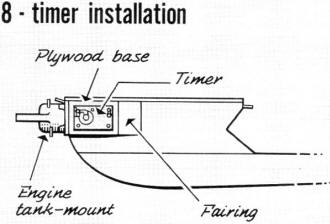
Mounting the engine and timer: Let's finish the assembly. Put
the propeller on, and bolt the tank mount to the firewall. Bolt
the engine to the tank. Install the timer using the small screws
that come with it. (Sketch 8.) Cut a length of fuel line that will
go from the fuel tank, through the timer loop, to the engine without
kinks, or being loose and floppy.
Before we take out the ship, see that the balance point falls
within 1/4 in. of that indicated on the plan. If the balance point
is more than a 1/4 in. off, add weight to the nose or tail to compensate.
Be sure of the keying and dethermalizer setup.
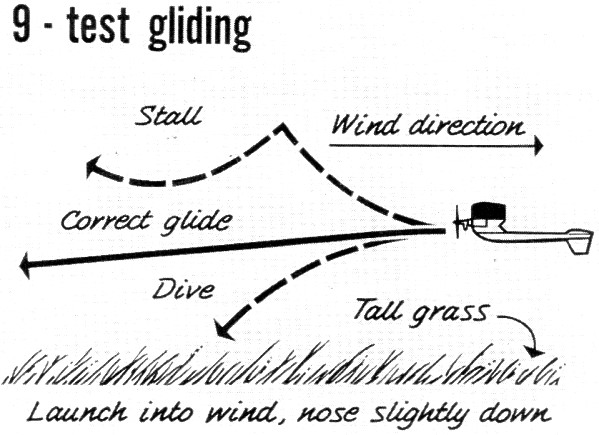
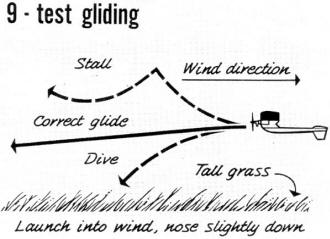
Test gliding:
Go out on a day when the wind is mild or not even blowing (that'll
be a day to remember!), Go to a field where the grass is at least
a foot high. Be sure that wing and stab are well rubber-banded down.
Facing the wind hold the model at the bottom just underneath the
wing trailing edge and give it a smooth, easy toss to a spot on
the ground about 50 ft. in front of you. It should glide in a straight
line to the ground - with perhaps a slight left turn, but it probably
won't. Most likely, it will tend to nose up slightly (stall). If,
after several similar launches, it keeps doing the same thing, add
a 1/32" shim to the trailing edge of the wing platform. This will
lower the angle of attack of the wing.
If the plane does not stall, but dives into the ground (Sketch
9), add a 1/32" shim to the trailing edge of the stab platform.
After the shims have dried, glide again. Keep adding shims until
the plane has a glide with little or no stall or dive tendencies.
Now, when we fly this model under power, we don't want it to glide
straight ahead, but in circles. Otherwise, we will end up on a real
cross-country chase; so add a 1/16" shim to the stab platform on
the left-hand side (view from the rear), so that the stab is tilted
with its left tip higher than the right tip. This will cause the
plane to glide in left hand circles.
First power flights:
This is a crucial part of your testing, so go easy. Follow these
three simple steps:
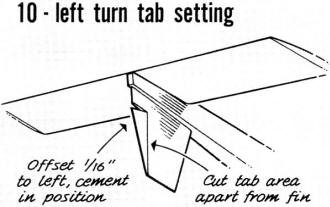
1) First flight: set the timer to run only three or four seconds.
Put your prop on backwards. Start engine and open needle valve enough
so that engine runs a bit rich; light your dethermalizer fuse, and
push the plane gently into the wind with a slight "up" angle as
you release your timer. The plane should go straight ahead and up,
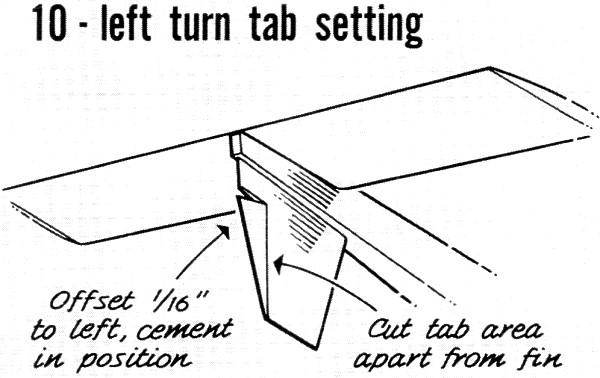
or slightly to the left and up. If it doesn't, cut a small tab (Sketch
10) and bend and glue it so that it has about 1/16 in. left rudder,
and repeat this step. If it flies correctly and has no violent tendencies,
proceed to step 2.
2) Put the prop on the correct way, set the timer for five or
six seconds, lean the engine out, light the fuse, and release gently
into the wind, after releasing the timer. Again, the plane should
climb almost straight, or slightly to the left at a high angle.
After the engine cuts, check the glide - if it stalls, take out
part of the stab trailing edge shim, if it dives, take out the wing
shim. If the plane glides in wide left-hand circles, proceed to
the next step. If it doesn't, add a bit more stab tilt.
3) Set the timer for about ten seconds, lean the engine out all
the way so that it is running as fast as it can, and then turn open
the needle valve about 1/4 turn; light the fuse and launch into
the wind at about a 45- to 60-degree angle. The model should climb
quickly at a high angle, with a slight left turn. When the engine
cuts, it should pull out into a wide left-hand glide circle. If
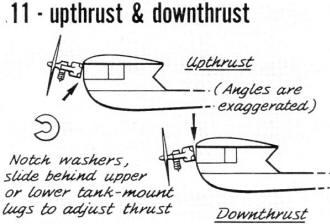
your plane climbs with a shallow angle, add upthrust (Sketch 11).
If it climbs too steeply and tends to loop over onto its back, add
downthrust (Sketch 11). If everything is right at this point, you
are ready to increase your engine run to the full amount - 12 seconds
for hand launch and 15 seconds for a vertical takeoff. Be sure to
light the fuse.
Transitions:
When the power cuts, does the plane tend to flounder around for
awhile before going into a left-hand glide pattern? (Meanwhile,
it is probably losing altitude much more rapidly than is necessary.)
If this is the case with your model, you have a power-to-glide transition
problem. To solve it, add a slight bit more left turn to the rudder
tab, or tilt the stab an extra 1/32 in. Or you may wish to add a
slight bit of left thrust to your engine (just add a shim washer
behind the fuel tank where it bolts to the firewall on the top,
and bottom bolts on the right side - this tilts the engine left).
With all of these changes, it is wise to recheck your plane according
to the three steps above.
Conclusions: Write your name and address on the model, so you
can get it back in case of loss. But try not to lose it by always
using a fuse - and always light it! Never forget to release your
engine timer. Practice so that you know what your plane is going
to do each time you let go of it.
Glossary:
Pylon: The portion of a model which raises the wing a distance
above the fuselage. Also, a type of model which has the wing mounted
above the fuselage on a pylon, the engine being mounted on the front
of the fuselage proper.
High-Thrust: A model in which the engine is mounted above the
fuselage proper, usually near the wing line.
Dihedral: The bend in the wing of a model which raises the tips
above the center panel. Adds stability.
Dethermalizer: A device, usually a fuse or timer, used to bring
the model down after a predetermined amount of time - usually three
or five minutes.
Incidence: The angle of the wing, or stab, on the fuselage. Usually
the wing is angled several degrees more than the stab angle.
Stab-Tilt: A device used to turn the model in the glide. One
side of the stabilizer is raised above the other. Has little effect
on the power portion of flight.
Vertical Take Off: When the model is launched from the ground
with one point, usually the rudder, touching the ground.
Nine Hints for Improving Performance:
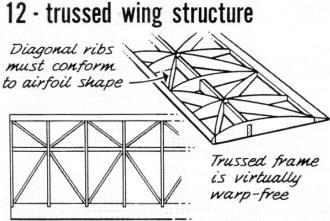
1) Half of the problem of consistent flying can be whipped by
building sturdy wings and stabs. Trussing is perhaps the best and
lightest way of achieving this goal (See sketch 12).
2) There is nothing like knowing exactly what your model is going
to do each time it is launched. Build correctly and sturdily (not
heavily) and practice flying in all kinds of weather. Get the timer
set so that it shuts off just under the limit - there is nothing
worse than an engine overrun in the wind with a five-minute fuse.
Check your dethermalizer timer settings or fuse lengths to avoid
dethermalizing too soon or too late (losing a trophy in the first
case and a plane in the second).
3) Pressure fuel systems. Pressure gives clean and positive fuel
shut-offs and the advantages of steady power. Also, if you bore
out your venturi, it will give you a bit more power.
4) Short nose lengths (nose moment arms). Some modelers will
disagree with this statement, but I've seen it work. If you can
eliminate some of the frontal overhang, you will get better stall
recovery and pull-out after the power cuts, because there is less
inertia to overcome.
5) Keep it simple. Excess gadgetry just gives you that much more
to go wrong. Everything you use should be as fool-proof and dependable
as possible. Leave auto-rudder and auto-stab to the experts.
6) Go to a contest with a winning attitude; you have a better
chance of taking home the hardware. Think positive. Above all, put
in all your flights. Don't quit when behind - even experts make
mistakes.
7) Give competition credit for ability. Do your best to be better.
This gives you something to shoot for. If you convince yourself
your opposition is going to "max out," you will have to do the same
- and more.
8) Know the flying area. If possible, try to fly the day before
the contest on the site where the meet is to be held. In that way,
you can figure on the best chase routes for retrieving. You also
find the "hole-spots" and thermal areas.
9) Be prepared. Go to the contest with everything you need to
fly. This includes repair materials as well - glue, pins, dope,
razor, brushes, and tissue.
Posted January 9, 2016
|