This is part two of an article
that began in the September 1974 American Aircraft Modeler magazine. The
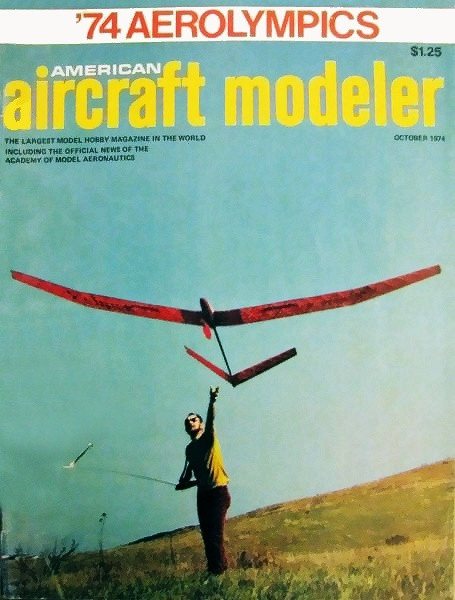
Supersweep was used to break the long-standing
Indoor Hand Launched Glider (IHLG) record of one minute and thirty seconds. In 2009,
Stan Buddenbohm set a new record for 1:52.12 (see
video below). Website visitor Ward B. recently wrote asking that I post
the second article on the Supersweep, so, here it is. Plans can be found in the
September 1974 edition of American Aircraft
Modeler.
Supersweep
Here's what to do with all those balsa parts with which you were left hanging
last month. Now you, too, can have a record-setting hand launch glider (conclusion).
By Ron Wittman, as told to Bob Meuser
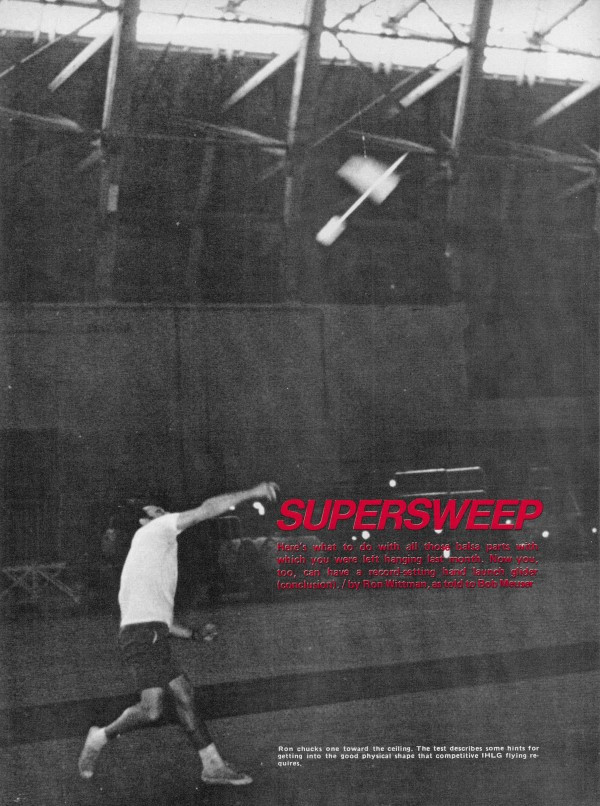
Ron chucks one toward the ceiling. The test describes some hints
for getting into the good physical shape that competitive IHLG flying requires.
(From last month, we continue Ron Wittman's construction and finishing techniques
for his record-setting design. The full-size plans appeared in the August issue.
For those who missed Part 1, the Supersweep broke the long-standing 1:30 barrier
for IHLG, for an AMA Open Record. Ron's son, Steve, set a Junior mark with the same
design. Last month, the text described the cutting, shaping and final sanding of
all the components. -php.)
Assembly: Before gluing any of the parts together, make sure
that they fit together perfectly. Any gaps must be filled with glue, which will
add weight and causes warping. Note that the top of the fuselage is sloped downward
and to the left in the region where the wing goes - the dihedral joint is to be
flush with the left edge of the fuselage.
The bottom of the fuselage must be carefully shaped to conform to the shape of
the top surface of the stabilizer. Otherwise, the bottom of the stabilizer will
not be flat after the glue dries. Check the fit as follows: Lay the stabilizer on
a flat surface, and position the fuselage over it. With the fuselage nose resting
on the flat surface, the fuselage should fit the stabilizer. At the same time, check
the wing mount to ensure that it is exactly parallel to the flat surface.
Ron usually uses a white glue, although Ron's record-setting "22" is assembled
with a model airplane cement. Ron's advice: If you prefer a white glue, use Titebond.
If you prefer a model airplane cement, use Ambroid. All parts should be "pre-glued"
before assembly. That is, each part is coated with glue and allowed to dry. When
the parts are to be joined, each part is again coated with a thin layer of glue.
After the glue becomes tacky, press the parts together. There will usually be enough
tack to the glue to hold the parts together without pins or clamps. As most of the
solvent will have evaporated before the parts have been joined, a thin, strong,
non-warping joint will result.
After the final polish-sanding, saw the wing into four parts, using a jigsaw
or a fine-tooth razor saw. Cut carefully, especially at the trailing edges. Sand
a bevel into each edge for the correct dihedral angle. Every builder has his own
trick for doing this. Hold the part down on a hard, flat surface with a true edge
- the plate glass sanding board again. With a sanding block, sand the edge to be
beveled flush with the edge of the work surface. The hard edge of the work surface
will ensure that the joint is straight. A template taped to the work surface will
aid in obtaining the correct angle. Ron sands the bevel on the corresponding parts
of both halves of the wing at the same time, to ensure that they have the same angle.
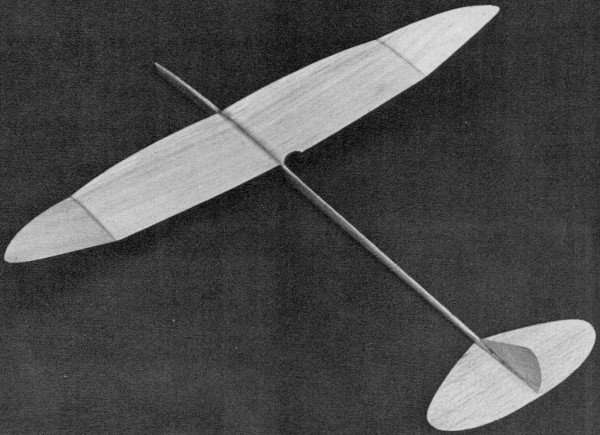
The Supersweep 22 was developed over a period of a year. It has
many subtle features that distinguish it as the champion that it is.
Glue the four panels of the wing together. While the glue is drying, prop the
parts up to the proper dihedral angles. Some builders prefer to make the outer dihedral
joints first, while the inner panels are held flat on the work surface. Then, after
those joints are dry, the center joint is glued.
Glue the fuselage to the stabilizer while the stabilizer is resting on a flat
surface. Then glue the rudder in place. As you sight along the fuselage from the
back, the trailing edge of the rudder should appear slightly to the left - no more
than 1/32".
After the tail joints are thoroughly dry, glue the wing to the fuselage with
the dihedral joint flush with the left edge of the fuselage. Prop up both wing tips
equally. Ensure that the wing is slightly skewed (the right tip forward) by measuring
the distances from the outer dihedral joints (at the trailing edge) to the point
where the stabilizer intersects the fuselage. The distance on the left side should
be 1/16" less than that on the right.
Finally, sand the finger guard to fit snugly between the wing and the fuselage,
and glue it in place. When all of the joints have dried, cut the finger notch into
the trailing edge. The notch should be about 3/8" deep, and should be formed to
fit your finger snugly, comfortably, and naturally. This is essential for good control
during the launch.
The final assembly operation consists of applying a glue fillet to the outside
of all the joints. Apply a little glue to the joint, then spread it with your finger.
Several thin layers are better than one thick one. Five-minute epoxy is convenient
for the fillets.
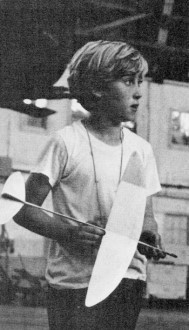
At age 11, Steve Wittman is hardly big enough to heave a glider
of this size, yet he set a new Junior record with the Supersweep 22.
Finishing: Some theorists claim that, at the low Reynolds numbers
at which models operate, the boundary layer has such-and-such a thickness. Therefore,
there is no use trying to make the bumps and wiggles of the surface smaller than
some fraction of the boundary layer thickness - so, a mirror-like finish is a waste
of time. Perhaps. Ron's gliders do have a mirror-like finish. Take your choice:
either a plausible theoretical argument, or the experience of a guy who regularly
gets flights of more than 1:25. It takes a long time to obtain a good finish, so
relax and enjoy the procedure.
If you have read many how-to-do-its, you'll know that every glider expert has
his own special recipes for the various brews and nostrums used for finishing. Fasten
your seat belts; here is Ron's magic potion: plain, ordinary lacquer sanding sealer,
straight out of the can!
It is available at most large paint stores. Be sure to get lacquer-base sanding
sealer, not the oil-base type. Some sanding sealers are called "water white" and
have a creamy, often slightly yellowish appearance. Some are clear. The water white
is the stuff to get.
A small amount of plasticizer added to the sealer will prevent the finish from
being too brittle; but, if you overdo it, the surfaces will be too limber. One drop
of castor oil to an ounce of sealer will probably be enough. Ron's gliders have
many hairline cracks in the finish, particularly where adjustments have been made.
If the sealer is too thin, let the excess thinner evaporate until the sealer
has a creamy consistency - the finish is supposed to go on the wood, not into it.
Ron applies two or three thick, flowing coats of sealer. The first coats should
be sanded with 400 paper, and the final coat with 600. Use new sandpaper, and discard
it when it begins to clog.
For polishing, use (would you believe) a polishing compound, not a rubbing compound,
DuPont Polishing Compound, available at auto supply and automotive paint stores,
is a good one.
Support the surface to be polished on a flat surface, as it will be necessary
to apply a light pressure. Work on a small area at a time - about half of a wing
panel. Dab a few pea-size gobs of compound on the surface and, with a soft cloth
such as a piece of a T-shirt, start rubbing lightly. A little pressure is required,
but go easy or the bare wood will become exposed.
After the compound starts to dry, the surface will start to shine. If dull spots
appear, you have probably rubbed the sealer right down to the wood, so you'll have
to start all over. When the polishing is completed, remove any dried bits of polishing
compound with a damp rag. Apply a paste-type silicone auto wax, using a ball of
cotton cheesecloth, and wipe off the excess immediately with a soft rag. Rub everything
to a mirror finish with a clean cloth.
For decades, the practice has been to glue pieces of sandpaper on the sides of
the fuselage, forward of the wing, to ensure that the model won't slip from the
thrower's hand at the wrong time. Instead, Ron cleans his fingers with lacquer thinner,
then applies violinists' bow rosin (available at music stores) or bowlers' wax to
his fingers.
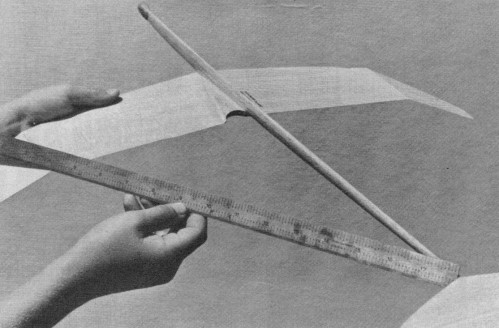
Check the distance from the dihedral break to the stabilizer
center. The left wing measurement should be 1/16" less than the right.
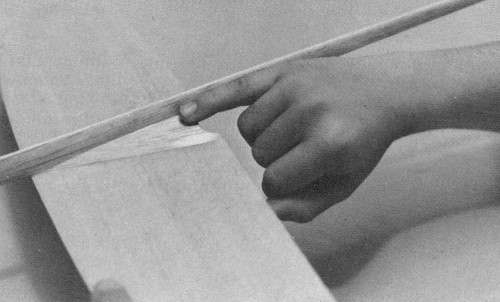
Finger-molded glue fillets add strength and streamlining to all
joints.
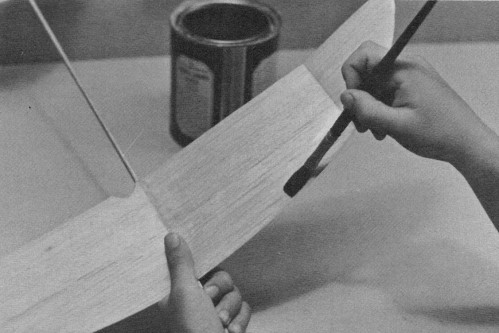
Apply Ron's patented Magic Potion (see text) with long, even
strokes.
Trimming and Flying: The moment of truth has arrived: Will the
bird fly? First comes the preflight check. See that no warps have developed, and
that everything is the way it was planned - fuselage straight, wing panels and stabilizer
flat, rudder slightly to the left. Turn the model upside down, and balance the fuselage
on your fingers. The left wing (the one on the inside of the turn) should drop.
If it doesn't, add a bit of clay to the left wing tip, and smooth it out.
Add washout to each outboard wing panel by bending the trailing edge up and pushing
it forward at the same time. If you just bend it without pushing, the bottom surface
will probably crack, and you might end up with a piece of wing in your hand. Pushing
forward keeps the wood in compression while it is being bent, and tension cracks
can't develop. The extreme tips are washed out about 5°. As you sight along
the wing from the rear, the trailing edge will be up nearly 1/8" at a point 1 1/2"
from the tip (relative to the wing at the tip-dihedral joint). That is a lot!
Bend down a 2" portion of the trailing edge of the left inboard wing panel, near
the dihedral break. The deflection here is about 1/16".
Add clay to the nose, until the model balances at a point about 1/4" ahead of
the CG position shown on the plans. Launch the model at what you expect its gliding
attitude and speed will be, and note its reactions. If it tends to dive or stall,
bend the trailing edge of the stabilizer up or down, respectively. The model should
show a tendency to turn to the left.
If all is well, launch the model a little harder, slightly upward, and with a
slight left bank. The model should go smoothly into its normal glide at an altitude
of about eight feet. If it tends to maintain an excessive left bank and flies too
fast, add more "up" to the trailing edge of the stabilizer. At this stage, it should
demonstrate its ability to recover from a slightly harder throw with a steeper left
bank without showing any tendency to spiral in. Launch the model up at about a 60°
angle above the horizontal, with enough speed for it to recover at an altitude of
around 50 feet. Watch its recovery.
From here on in, it is impossible to tell you exactly what to do to correct every
fault, but we can lay down some general rules. The tightness of the glide turn should
be controlled primarily by the stabilizer warp (left trailing edge up, right down)
or by a slight amount of stab tilt (left tip high). The amount of wash-in in the
left inboard wing panel will affect the turn, too, but its main use is to prevent
the model from spinning in. Attempting to tighten the turn by increasing the amount
of left-rudder can lead to instant disaster. Add weight to the left wing tip if
necessary.
A tendency to roll too much one way or the other during the launch and transition
can be corrected by warping one side of the stabilizer trailing edge up and the
other down very slightly. Whatever you do, do it gradually. After you have worked
out the bugs with a moderate chuck, start increasing the launching speed. As you
do, you will find it advisable to remove some nose clay. Then bend the trailing
edge of the stabilizer down to maintain sufficient speed in the glide, and to prevent
the model from "mushing."
Ron's model makes about 5/8ths of a complete circle to the right during the climb,
then makes a gradual transition into a rather fast half-turn to the left, before
settling down into its steady, left-circling glide pattern.
If you can launch the model straight up with your full force, by all means do
so. But, if attempting to launch straight up causes your throwing speed to decrease,
launch at a more moderate angle. Ron launches at about a 60° angle (that is
about the angle at which most fellows launch when they think they are throwing straight
up!).
You might try copying the launching techniques used by the local hotshots, or
someone you have seen at the NATS or some other contest. Ultimately, you will have
to develop a style that suits you best, and trim your model accordingly.
The finger notch must be snug, but not tight, for proper launch control.
The glide circle should be as wide as the flying site permits. The model should
glide slightly nose-high, and slowly, But, it should not be trimmed to fly at the
slowest possible speed just short of a stall. Better flight times will be obtained
if the model flies a little faster, Try adding or removing clay, and let the stopwatch
be the judge.
A polishing compound, then a final waxing, gives the model a super shine (and
it may just help the time).
Stan Buddenbohm in
Tustin Blimp
Hangar - F1N (Indoor Hand Launched Glider). New endurance record set for 1:52.12
(minutes:seconds)
Those Other Factors
A good glider is only one of the requirements for winning performance - you also
have to be able to throw it. This means that you should be in pretty fair physical
shape, but it doesn't mean that you have to be an Olympic star (although it might
help). There does not seem to be a "typical" IHLG physique. Being tall or short,
heavy or skinny doesn't seem to make a lot of difference, What little difference
this makes is outweighed by the many other factors.
However, whatever your size and shape, you should get yourself in the best possible
physical condition if you are at all serious about this IHLG business. This means
general physical conditioning (jogging, bicycling, tennis, swimming) and specific
physical conditioning - developing your throwing arm.
Ron threw a baseball for a half-hour every evening for months before breaking
the record. Throwing horizontally is not the same as throwing vertically, so try
to get in a little high-angle throwing, too. If you have to do your practicing alone,
try throwing a gob of modeling clay against a wall or, better still, against the
ceiling of the garage - it won't bounce and roll like a ball will. All is lost if
you can't throw with good control, so try throwing for accuracy also.
Finally, chucking a glider requires concentration. Before chucking the glider,
stand still awhile. Run through all of the launching operations in your mind: The
approach run to the chosen launching spot, the wind-up, exactly how you are going
to swing your arm to get the right elevation and bank angle, the particular spot
on the wall or ceiling toward which you are going to aim.
Those factors must be programmed into your brain cells before you start the approach
run, so that your body, in the final split second of the launch, will follow its
programmed routine automatically. Getting that glider up should be the only thing
on your mind.
Ron takes a long run (perhaps 25 yards) before launching. This is not to get
up speed, but for psychological reasons - it is part of the automatic countdown
he has trained his mind and body to go through during the launching process.
A Word of Caution: Unless you have built several IHLGs before,
by methods similar to the ones recommended in this article, we suggest that you
don't start building the ultimate Supersweep 22 right off the bat. Rather, we suggest
that you build a couple of "learning machines," possibly from kits, to get the hang
of each operation involved in building and flying an IHLG. Those models will be
useful later for warming up your throwing arm.
Posted June 29, 2014
About Airplanes & Rockets
Kirt Blattenberger
Even during the busiest times of my life I have endeavored to maintain some form
of model building activity. This website has been created to help me chronicle my journey
through a lifelong involvement in model aviation, which
all began in Mayo,
Maryland...
Copyright 1996 - 2026
All trademarks, copyrights,
patents, and other rights of ownership to images and text used on the Airplanes
and Rockets website are hereby acknowledged.