|
Website visitor Kenneth E. wrote
to say that he is working to build a complete collection of the Tenderfoot models
that were published in the Academy of Model Aeronautics' American Aircraft Modeler
magazine. The Tenderfoot series was an attempt to provide motivation to young newcomers
to the hobby. They were a mix of freeflight rubber powered airplanes and helicopters,
gliders, and 1/4A & 1/2A control line designs that built quickly, simply, and
cheaply.
Kenneth requested reprints of the following three models:
Saucerer, Ray Malmström:
C/L 1/2A, January 1970
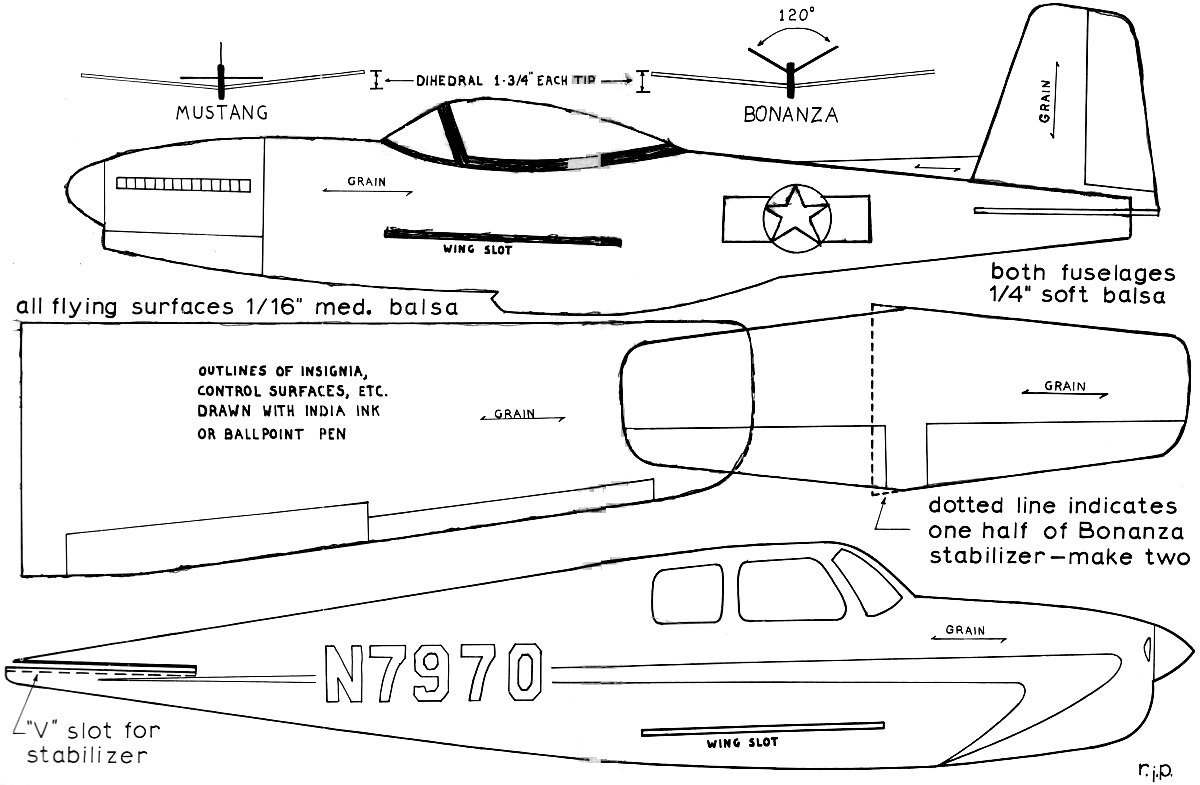
Bonanza and Mustang,
David Thornburg: FF HLG, January 1971
Clodhopper, Paul Denson:
FF Rubber February 1973
Bonanza and Mustang
 A basic hand-launched glider can be patterned
after almost any real aircraft. These fly great. A basic hand-launched glider can be patterned
after almost any real aircraft. These fly great.
By David Thornburg
Heave ho! Trim model for left turn in glide if you launch right-handed.
Then model makes a curling climb and arrives at maximum altitude with wings level
and at glide speed.
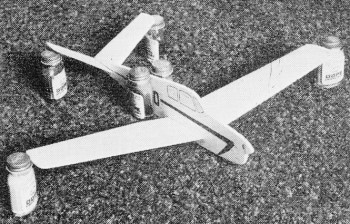
Setting dihedral joints is merely a matter of having enough small
dope bottles.

Models use same wings but Bonanza's tail is slightly longer.
Color with Magic-Marker.
LIKE TO BUILD a flying model that's simple, quick, and fairly realistic? Here
it is! Choose either of two well-known aircraft-the Mustang or the Beech Bonanza-and
build the plane directly from the full-size plans. Or, better yet, build both at
once for a real ball! A single sheet of 1/4 x 3 x 36" will build three fuselages,
and two pieces of 1/16 x 3 x 36" will easily build all of the flying surfaces for
two to three models. By building two or more planes at once, airplanes can be turned
out in less time than by building them singly, especially if they are the same or
nearly the same in design. This is a trick the experts use in building their stables
of high-performance contest jobs.
In performance as well as appearance, both planes are a cut above most of the
chuck gliders that can be bought in the stores. The Mustang flew out of sight in
a big, lazy thermal the third time I had it out-good thing I got pictures first!
There are a number of ways to build from full-size plans. The easiest is to cut
out the magazine pages, tape them together, and use carbon paper to trace the parts
onto balsa. However, once this is done the plan is as good as lost, and the book
is pretty well ruined. Most modelers like to keep their books intact, both for reference
and for nostalgia. My own collection dates back into the early 1950's, and I often
turn to it for design ideas and performance tips. Aerodynamic theory doesn't change
much, so books don't really get out of date.
It's best, then, to avoid mutilating the I book. Instead, either trace the part
outlines directly onto thin paper, using carbon paper, or run the page through a
Xerox machine available at most libraries or schools. This last method is not against
the law as long as the plans are for personal use only. Be sure to ask for legal
size, and the whole plan should come out in a single printing.
To trace the parts from the copy of the plan, use carbon paper or the pin-prick
method - aligning the plan over the wood and punching shallow pinholes every 1/4"
or so all around the outlines of the parts. Notice the grain direction of all of
the parts, because it's very important. Learning to use wood grains to their best
advantage for strength and warp-resistance is one of a modeler's most valuable skills.
Use the softest wood available for the fuselage. If no really soft 1/4" is in
the balsa rack, drop down to 3/16" and pick a piece of medium softness. The harder
the wood, the heavier it will be, and neither model can stand a great deal of extra
weight if it is to fly well.
The only difficult cuts on the fuselage are the wing and stabilizer slots. They
must be marked accurately. A modeler's knife with a triangular blade helps in the
cutting. The cut can be made with a single-edge razor, but the slots must go through
the fuselage exactly on the perpendicular. Otherwise either the wing or the stabilizer
will have a high side and a low side. These perpendicular cuts are much easier to
make with a long-handled knife than with a razor blade. When using a razor, prop
it against a scrap piece of 1/4" balsa (one with a square edge) to guide it into
the wood straight.
Cut the wing and tail out of medium-weight, straight-grained balsa. Don't be
backward about asking the hobby dealer to help in selecting this piece of wood.
Tell him what it's for, and ask if he has C-grain balsa. C-grain indicates the way
the balsa was sawed out of the log; it is particularly good for strong, light sheet
surfaces.
What about airfoils? Most models this size have some sort of curve to their wing
cross-section, whether it's a scientifically plotted shape or simply a warp made
by spraying the top side of the wing with water and pinning it to a flat surface
until dry.
The plans show no airfoils, just a flat plate, and that's what the planes pictured
have. I tried airfoiling the wings, but it didn't increase. the performance much.
However, later models were built with 3/16" wood for the wings and a conventional
airfoil sanded into them. (Both the wood and the instructions in Jetco Thermic B
hand-launch kits are ideal for this purpose.) This increases the performance of
both gliders amazingly, and makes them almost contest quality. Try it on your second
or third model and see!
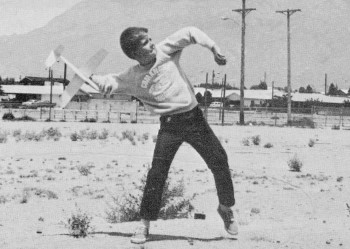
Flying is simple. Add nose weight until the plane balances about 1" back from
the front of the wing. A coin glued onto the side of the fuselage as far forward
as possible makes a fine weight. Throw the plane gently, aiming it at the ground
about 30 ft. in front of you, and observe the turn. If you are right-handed, the
plane should turn left; opposite for lefties.
Now tightly grip the fuselage, under the wing, between thumb and third finger,
putting the tips of the first and second fingers behind the wing trailing edge and
snug against both sides of the fuselage. Throw the plane sidearm, so that it starts
out in a right bank and circles. If you have the proper amount of left turn in the
glide,. it should "s-out" into a left turn at the very top of the throw.
Experiment with the direction of throw in relation to the wind to find the best
altitude. Generally it will be just slightly to the left of the wind, but the choice
of direction depends on the individual. Good flying!
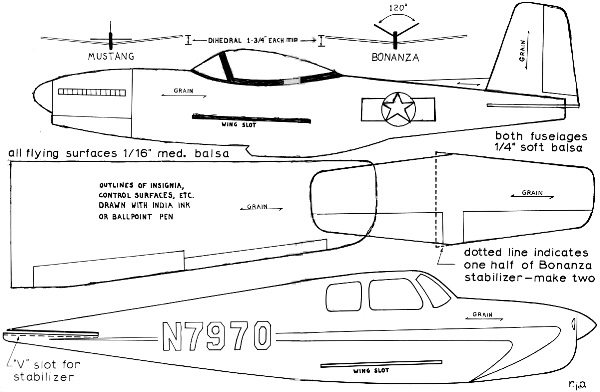
Bonanza and Mustang Plans
<click for larger version>
Notice:
The AMA Plans Service offers a
full-size version of many of the plans show here at a very reasonable cost. They
will scale the plans any size for you. It is always best to buy printed plans because
my scanner versions often have distortions that can cause parts to fit poorly. Purchasing
plans also help to support the operation of the
Academy of Model Aeronautics - the #1
advocate for model aviation throughout the world. If the AMA no longer has this
plan on file, I will be glad to send you my higher resolution version.
Try my Scale Calculator for
Model Airplane Plans.
Posted July 5, 2023
(updated from original post
on 6/26/2011)
|