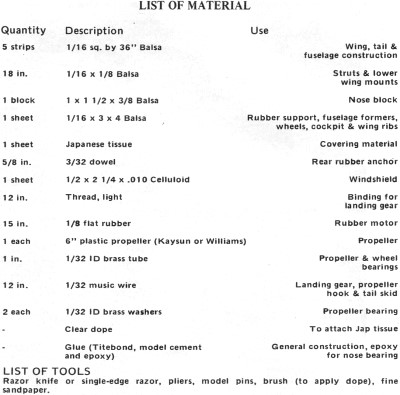
|
Website visitor Tom A. wrote to ask
me to post this "Baby Biplane" article from the October 1971 edition of American Aircraft
Modeler magazine. It was one of the For the Tenderfoot models that the magazine published
almost monthly for many years. The Baby Biplane uses a very simple structure but as with
any biplane of any size, the extra work of building a second wing and adjusting it to
fly properly take a little more work. Using the modern trick of printing a colored patter
on the Jap tissue prior to attaching it would make Baby Biplane look really spiffy.
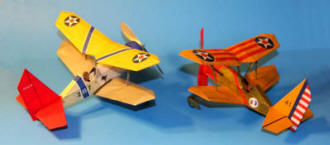 9/17/2012 Update: Tom Akeryas was kind enough to send photos of the two versions
of the Baby Biplane that he built. Ironically (or not), Tom actually implemented the
inkjet printing method that I mentioned. One model is covered in the
F11C Goshawk
(Navy)color and marking scheme, and the other is the
P-6E Hawk
II (Army). A very detailed documentation of the entire process is posted on his
StickAndTissue.com website
(as of 2025, it appears to be defunct). Note the attention to panel lines, hardware,
pilot, etc. Does that pilot look anything like Tom?. Note the attention to panel lines,
hardware, pilot, etc. 9/17/2012 Update: Tom Akeryas was kind enough to send photos of the two versions
of the Baby Biplane that he built. Ironically (or not), Tom actually implemented the
inkjet printing method that I mentioned. One model is covered in the
F11C Goshawk
(Navy)color and marking scheme, and the other is the
P-6E Hawk
II (Army). A very detailed documentation of the entire process is posted on his
StickAndTissue.com website
(as of 2025, it appears to be defunct). Note the attention to panel lines, hardware,
pilot, etc. Does that pilot look anything like Tom?. Note the attention to panel lines,
hardware, pilot, etc.
Baby Biplane
 By
George Wilson By
George Wilson
 This
stick and tissue job is designed for learning and flying. Clear step-by-step instructions
and building sequence photos make construction most enjoyable. This
stick and tissue job is designed for learning and flying. Clear step-by-step instructions
and building sequence photos make construction most enjoyable.
The Baby Biplane is an "advanced beginner's" project. Simple to build, stable in flight
and possessing more than its share of eye appeal, it should attract many of our more
experienced builders as well as the novices. It's a great change-of-pace project and
shouldn't take an experienced builder more than four hours to build. We did Biplane No.
2 in two evenings and a Saturday morning, taking pictures as we built.
If any of you were active in the early 1930's, you may remember a model that looks
like the Baby Biplane. For many years your author has been looking for the plans of a
model, kitted by Comet in the thirties, called the C-1 Pursuit. We finally gave up and
decided to do our best to come up with a similar design, with hopes that memory will
serve us well after more than thirty years.
The C-1 Pursuit flew well in the thirties and its modern counterpart at least duplicates
its performance. The Baby Biplane, designed to fly stably, has lots of dihedral and generous
fin/rudder area to make up for its short tail length. The upper wing has considerably
more incidence than the lower one; the result is a gentle stall. For my novice readers,
this means the front wing loses its lift (stalls) when the model tries to climb too steeply.
The nose drops as a result, and the tendency to climb too much is automatically controlled.
In monoplanes and poorly designed biplanes, violent stalls can lead to disaster.
Personally, your author has another reason for liking biplanes. In the mid-thirties,
Clarence Chamberlain "barnstormed" a Curtiss Condor into Squantumirport at Quincy, Massachusetts
and sold airplane rides on a Sunday afternoon. That afternoon I had my first airplane
ride-in a biplane capable of carrying about ten passengers. It had two engines, one on
each of its lower wings; it vibrated so badly you had to keep your teeth clenched or
they chattered as if you had a bad case of the chills! Airport at Quincy, Massachusetts
and sold airplane rides on a Sunday afternoon. That afternoon I had my first airplane
ride-in a biplane capable of carrying about ten passengers. It had two engines, one on
each of its lower wings; it vibrated so badly you had to keep your teeth clenched or
they chattered as if you had a bad case of the chills!
Step 1) The plan is covered with waxed paper to prevent glue.
The gentle stalling characteristic and the ability to crowd a lot of wing area into a
small space were two of the most important biplane characteristics. These factors made
the biplane design the overwhelming choice for fighter and aerobatic airplanes for many
years.
Step 2) More wing parts are made and fuselage side is assembled.
Wheels are made of balsa with brass tubing for the bearing. A drop of glue retains them
on the gear wire.
Step 3) Fuselage sides are assembled upside down over the plan. Four
sets of cross braces are glued in place; top Is assembled with half bulkheads and stringers.
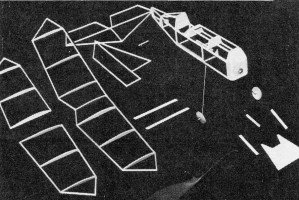
Step 4) The flimsy skeleton of a Baby Biplane gains from sticking
to it. Wing ribs and other parts were cut out considerable strength when covered. At
this stage, all parts with templates described In text. Parts are now being must be given
final sanding and one coat of clear dope. assembled.
Step 5) With all parts covered, bottom wings may be glued to
the fuselage and blocked for proper dihedral. Rudder/stab unit is mounted and aligned.
Rear cabane strut is also glued in place.
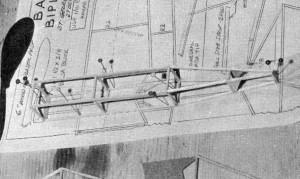
Step 6) Top wing mounting is quite easy and accurate using the
cardboard template. Note use of pins to hold alignment before gluing in the struts. Windshield
also braces the rear strut.
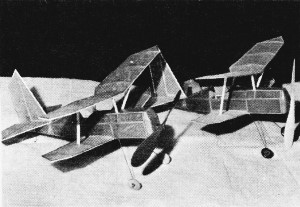
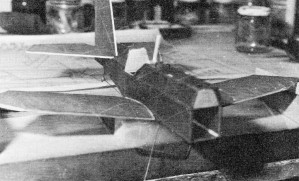
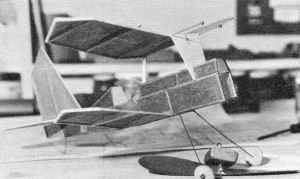
Step 7) A pair of Baby Biplanes. Note that plane at right has light
balsa prop but Williams plastic wheels. All color is in the tissue. (One can buy some
wildly colored tissue, too.)
Construction
The Baby Biplane is easy to build. A simple three-strut cab and structure and a jig
arrangement make mounting the upper wing a simple task. You'll need a single-edged razor
blade or hobby knife like X-acto, a pair of pointed-nose pliers, a ruler, a brush
for applying dope, fine sandpaper, a razor saw or jeweler's file and some fine pins (we
like the ones with glass bead heads). The materials are described in the material list
and can be obtained in most hobby stores. Ask your dealer to help you select medium-weight
straight grain balsa. Makes, a pair of pointed-nose pliers, a ruler, a brush for applying
dope, fine sandpaper, a razor saw or jeweler's file and some fine pins (we like the ones
with glass bead heads). The materials are described in the material list and can be obtained
in most hobby stores. Ask your dealer to help you select medium-weight straight grain
balsa.
With the exception of mounting the windshield, propeller and wheel bearings, we prefer
building with Titebond glue. However, any white glue (Sig, Ambroid, Elmer's, etc.) will
work well. Conventional model cements will also work, but they tend to take longer to
develop working strength. The propeller and wheel bearings should be installed with epoxy
cement if available. Otherwise, for all areas use a good model cement like Ambroid or
Aerogloss.
The first step in building is to make templates of the wing ribs, fuselage formers,
rear motor support, and the jig for mounting the top wing. Bond paper makes a good template.
It is sufficiently translucent so that with a good light you can trace the ribs, formers,
motor supports and jig from the plan. (A glass-topped table with a light underneath is
a helpful arrangement for tracing.) Cut the templates out with scissors; glue them to
a piece of cardboard and cut out again.
The wings, tail surfaces and fuselage sides are built directly over the plans, using
waxed paper to prevent the structures from sticking. Construct the rudder, one left wing
panel with the leading edge missing, the top right wing panel with the leading edge projecting
to the left' for later use by the left wing panel, and the right half of the stabilizer
with the center spar projecting to the left for later use by the left hand stabilizer
panel. Allow these parts to dry before unpinning them; the cardboard template. Note use
of pins to hold alignment before gluing in the struts. Windshield also braces the rear
strut. Titebond-glued work can be unpinned in about an hour.
The plan is now free to complete the top wing and stabilizer and to construct one
fuselage side and the lower left wing. Tilt rib R-3 to allow for the wing's dihedral
angle. Put dihedral in the top wing by cracking the leading and trailing edges (nick
them on the bottom with your razor first) and bending up one side. Using waxed paper
to prevent sticking, apply glue to the center joints, pin one side to the work surface,
block the other tip up one in. and let the assembly dry.
The lower right wing is built over the plan for the top right wing - both top and
bottom wing panels are, of course, alike. Don't forget to tilt rib R-3 for the dihedral
angle. The second side of the fuselage can also be built at this time.
While waiting for the glue to dry, bend the wire parts and cut the brass tube bearings.
The landing gear is bent using the layout on the plan as a guide. Then, the top is bent
to be flat with the bottom of the fuselage at the two points marked on the plan. Bend
an "L" on the front end of the skid where it bridges across the fuselage for easy gluing.
Use 1/32" wire for the tail skid if 1/64" wire is not easily available. The brass tube
is cut with a razor saw or by filing a notch in it and breaking it at the notch. File
or saw the ends of the bearing tube flat and square.
The fuselage is put together upside down over the plan. The cabane and interplane
struts are cut from 1/16" x 1/8" balsa using the full-size layout on the plan. Don't
forget the 1/16" x 1/8" balsa pieces on the lower sides of the fuselage, where the root
ribs of the lower wings will be attached to the fuselage. Remove the fuselage from the
plan and add the top formers and stringers.
Rough cut the nose block and lightly glue it (a tiny dab will do) to the front of
the fuselage. Give it a final sanding along with the rest of the fuselage; then remove
it, attach Former F-3 and mount the propeller bearing. The down and right thrust angles
are not critical but about 3 degrees each way is about right for a two-strand 1/8" flat
rubber motor. To get the side and down thrust, just angle the bearing in the nose block.
The landing gear is attached using a few turns of thin thread to bind it, in addition
to a generous coat of cement. It's best to omit the tail skid until the bottom wings
are attached.
At this stage, all the structures should have been completed and are now ready for
covering. Use light tissue which tears easily when wet or doped (while the dope is wet).
Cut out tissue to fit each area to be covered and give yourself an extra 1/2 in. all
the way around for trimming off later. Starting with the stabilizer, carefully put a
coat of clear dope on the side of the structure to be covered and let dry. Lay the tissue
on the waxed paper, re-dope the stab and immediately lay the frame over the tissue, pulling
out any big wrinkles. (Incidentally, if the tissue won't lie flat because of creases
or wrinkles, you can have Mom iron the tissue before beginning the covering job.) When
dope is dry, trim the excess with scissors or razor blade.
Repeat same process for the rudder. Remember, cover only one side of the stab and
rudder. You will use the covered stab with the tissue on top, and the rudder with the
tissue at the right side. Don't dope the tissue between the spars and ribs.
The fuselage is covered similarly. Pre-dope the entire structure first. Start with
one side, redo ping the frame, carefully laying the tissue over the still-wet dope and
smooth out. Pull out only the big wrinkles. Trim excess tissue when dry. Repeat the same
process for the other three sides of the fuselage. Now spray a very light mist of water
on the tissue on the fuselage, trying not to soak it. Hang it up to dry. The dampness
will cause the tissue to shrink, pull tight, and any wrinkles will disappear. Dope the
open frame areas of fuselage tissue with thinned dope (half thinner and half clear dope).
Do all sides at the same time, then hang up to dry. This coat of dope adds a lot of strength,
so one coat is enough.
Having gained some covering experience while working on the stab, rudder and fuselage,
it is now time to cover the wings - they are more difficult but the process is the same.
Start with bottom wings first; dope the structures and let dry. Lay the tissue on the
waxed paper. Re-dope one wing panel, then immediately ease it accurately over the tissue,
touching the trailing edge, the ribs and leading edge. Pull out any wrinkles. If you
need more time to ease the wrinkles out, use thinner on the doped spars to release the
dope. With a small airfoiled wing, a beginner is bound to have some wrinkles in the covering,
so don't worry about them too much-only the most experienced modeler can avoid the wrinkles.
The top wing, with its dihedral, will be the most difficult. Dope the structure and
let dry. Cover the right wing panel first, then the left. Re-dope the right wing structure
and immediately take the tissue and gently place it over the wing frame. Pull out wrinkles,
carefully handling the center rib. When dope has dried, trim the edges and the left side
of the center rib. When covering the left side of the top wing, you must carefully align
the tissue; overlay the tissue of the right panel at the center rib by 1/8 in. Try this
a few times without dope. Trim the tissue for uniform fit. Now proceed with the dope
and cover. Touch at the center rib, first observing the required overlay. When dry, trim
around the wing structure; it is almost certain that you will have some wrinkles, especially
around the center of the wing.
The
final step in the assembly of your Baby Biplane begins with gluing the stabilizer incidence
shim to the very top rear of the stabilizer mount platform. It may overhang the fuselage
sides a bit. This piece provides the angular difference between the wings and stabilizer
to make the plane fly.
Glue the rudder to the stabilizer. Remember, tissue-side up on the stabilizer. Rudder
must be straight and vertical.
Attach the lower wings to the fuselage by pinning the fuselage to the edge of the
work bench as shown. (Be sure to have waxed paper under the wing mounting area. Glue
the area of the joint on both sides and mount the wings. Block up the wing tips 7/8 in.
each. Let this dry completely. While the wing is drying, glue the stabilizer/rudder assembly
to the stabilizer mount. Align it so that the stabilizer' is level with the wing.
While this assembly is still drying, glue the windshield and rear cabane strut, and
pin the wing front jig in place. After these parts have dried and while the assembly
is still in place on the edge of your bench, start mounting the top wing. The wing should
sit in place, accurately aligned with the fuselage, bottom wing and stab sitting on the
template and rear cabane strut. Adjust wherever necessary to achieve proper alignment,
as shown on the plans and in the pictures. Glue the rear cabane strut joint and the front
struts; add the interplane struts very carefully-be sure they don't cause any misalignments.
 When all joints are dry, make up
the loop. of 1/8 in. flat rubber for the motor. It should be an inch longer than the
distance from the rear hook to the nose hook. Wash the rubber with a' non-detergent soap
to remove the preservative, dry and tie the knot. (A simple square knot will do.) When
you install the rubber in the plane, locate the knot at the rear hook and attach rubber
to propeller hook. When all joints are dry, make up
the loop. of 1/8 in. flat rubber for the motor. It should be an inch longer than the
distance from the rear hook to the nose hook. Wash the rubber with a' non-detergent soap
to remove the preservative, dry and tie the knot. (A simple square knot will do.) When
you install the rubber in the plane, locate the knot at the rear hook and attach rubber
to propeller hook.
The completed plane must balance levelly when held by two fingers just under the leading
edge spar of the bottom wing. If not, add a dab of modeling clay to the nose or tail
to achieve balance.
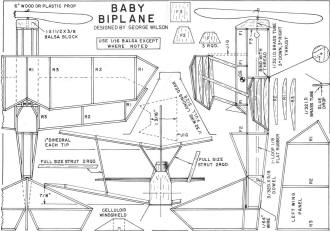
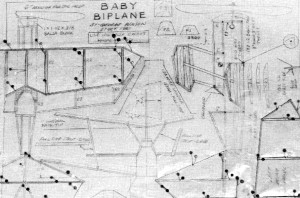
Baby Biplane Plans
<click for larger
version> Flying
Glide test with a gentle, slightly downward launch in calm air. Correct (1) stalling,
by warping the elevators down; (2) diving, by warping the elevators up; (3) turning,
by warping the rudder right or left as needed. When properly trimmed for initial flights,
glide should be straight ahead and slightly flared to achieve a flat two-point handling.
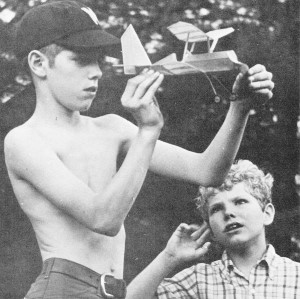
Wind fifty turns in the motor and launch the same way. The model should fly out in
a gentle left turn. If this works smoothly, add more turns with each progressive flight.
A pretty left turn under power and gentle left glide should result; add a bit of left
rudder, if not.
From here on, it's a matter of your gaining experience in trimming out the model.
Be patient-fifteen to twenty second flights can be expected from novice-built Baby Biplanes.
However, the Baby Biplane was not intended to be an endurance record breaker. Its light
weight, small and relatively strong construction make it an ideal sport model that will
provide many thrilling flights in local Dark or school gymnasium.
Notice:
The AMA Plans Service offers a
full-size version of many of the plans show here at a very reasonable cost. They
will scale the plans any size for you. It is always best to buy printed plans because
my scanner versions often have distortions that can cause parts to fit poorly. Purchasing
plans also help to support the operation of the
Academy of Model Aeronautics - the #1
advocate for model aviation throughout the world. If the AMA no longer has this
plan on file, I will be glad to send you my higher resolution version.
Try my Scale Calculator for
Model Airplane Plans.
|