|
Control line flying seems to be making somewhat of a comeback lately
- some ARF C/L models are appearing in the magazines. It is still
not as popular, but gaining ground. A fly-in here in Erie, PA, recently
included a local C/L club that I did not even know existed - the
Bean Hill Flyers. Unfortunately, the ranks of today's top fliers
are not populated like with the R/C world. The rapid reflexes and
incredible hand-eye coordination of the teenagers who dominate extreme
R/C flying would clean up in the control line realm. I'm guessing
a cloverleaf would be a piece of cake to a 16-year-old who could
invent maneuvers that would make Bob Hunt's or Windy Urtnowski 's
hair stand on end.
Hawker Typhoon
Slick semi-scale Nats winner was designed, described and pencil-drawn
by 14-year-old Junior Stunt Champion.
By Dennis Adamisin
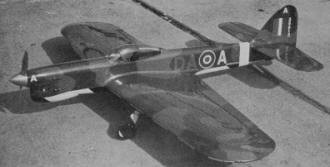
"It certainly separates the men from the boys!" Such was one
pilot's evaluation of the Typhoon. When it proved to be an ineffective
high-altitude fighter, the Typhoon seemed doomed. However, it later
saw action as a ground-attack support fighter.
This model represents a phase of stunt design which has featured
jets, Goodyears and originals. The Typhoon is the first semi-scale
airplane in this group, but it has many of the features of earlier
models. It is definitely the best ship I have had, and I am building
another one for a spare.
The paint scheme is semi-scale, different, flashy, and easy to
do. The camouflage is green and brown; the green sprayed first and
the brown air-brushed on later. The bottom is yellow with black
diagonal stripes. The first two letters of the identification are
red, the last letter is yellow and the letters on the rudder and
the nose are white. The band on the back of the body is light blue.
The white letters on the cowl read, "If this engine catches fire
on starting, don't just wave your arms at the pilot, try putting
the bloody thing out as well." The letters on the side of the body
just ahead of the elevator read, "If fate decrees that I should
fail, then fate will not have watched my tail." These two tidbits
were on the real Typhoon. My best flights were made with this airplane
when it was flown slow and smooth. Not to say that it won't fly
any other way - but who knocks success? The Nats' victory was mine
after only one official flight! The advantages of flying smooth,
instead of by the book, are several. It's easier to fudge in at
the right altitudes, especially at the bottoms of everything. Most
important, bobbies or "bombing out" on the bottoms of the square
maneuvers can be avoided. Less practice is needed and one can stay
in practice longer. A smooth pattern impresses the judges because,
without all the bobbles and imperfections of a square pattern, a
smooth pattern just naturally looks better.
A few general comments on Stunt should be made. First, many fliers
are unhappy with the AMA method of scoring. Some would like to change
the point values or adopt F AI scoring; others have their own systems.
All these proposals have the same fault: they depend on humans to
operate them. As long as this is true, the end result will be the
same. Second, many people disagree with appearance points. Some
want to halve their values; others want to double them. I feel increasing
these values emphasizes them too much. If values are decreased,
too many people will be content with a kit, because realism and
originality wouldn't be enough to work for. If anything, I'd like
to see a fifth category for general appearance. The total point
value would remain at 40, with each category being worth three to
eight points. Third, I don't favor iron-on finishes, but I do feel
that if a builder does a nice job of putting one on, he deserves
credit.
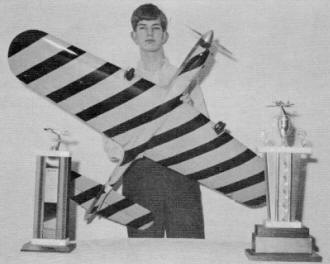
Psychedelic paint job on the plane's underside
is for real. Colors are copied from a Profile Publication showing
a target tug. It really catches judges' eyes - a help in winning.
A problem which has plagued stunt models for years is that nasty
little word, weight! The general consensus is to avoid using hard
balsa and hope for the best. We, and there are five of us here who
build and fly stunt, have discovered a new method which allows us
to build airplanes with fully-sheeted wings as light or lighter
than the conventional "open-bay" configuration. Un-fortunately,
this technique was not used in the Typhoon because I had not realized
its potential. My model is 48 oz., four or five oz. heavier than
it could 'have been.
I refer to the idea of using a gram scale in the selection of
the wood. A sheet of 1/16 x 3 x 36" should weigh less than ten grams.
The difference between 10 and 14 grams may not sound like much,
but if four grams are saved per sheet on the ten pieces of wood
needed to sheet the wing, 40 grams or roughly one and a half oz.
are eliminated on the sheeting alone! Apply this to the ribs, spars,
tips, and flaps, and two and a half to three oz. are saved just
in the wing. The fact that stunt planes are already overbuilt allows
this to be used to a weight-saving advantage. Hard, heavy wood need
not be used in building the fuselage.
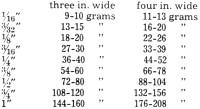 Light
wood in the tail section cuts down on ballast needed in the nose.
The three to four, or even five. oz. are the difference between
an average airplane and an excellent competition stunt ship! Listed
is a table of weights which should help in the selection of light
balsa. This chart gives the approximate weight for 36-in. lengths.
Lighter wood would be great; but avoid using wood heavier than this.
With light wood, you are halfway home. Sensible techniques in gluing
add to weight savings. Use only enough glue to hold the joint, not
the world. The joint is only as strong as the wood. In areas which
have to endure severe strains, use epoxy. Light
wood in the tail section cuts down on ballast needed in the nose.
The three to four, or even five. oz. are the difference between
an average airplane and an excellent competition stunt ship! Listed
is a table of weights which should help in the selection of light
balsa. This chart gives the approximate weight for 36-in. lengths.
Lighter wood would be great; but avoid using wood heavier than this.
With light wood, you are halfway home. Sensible techniques in gluing
add to weight savings. Use only enough glue to hold the joint, not
the world. The joint is only as strong as the wood. In areas which
have to endure severe strains, use epoxy.
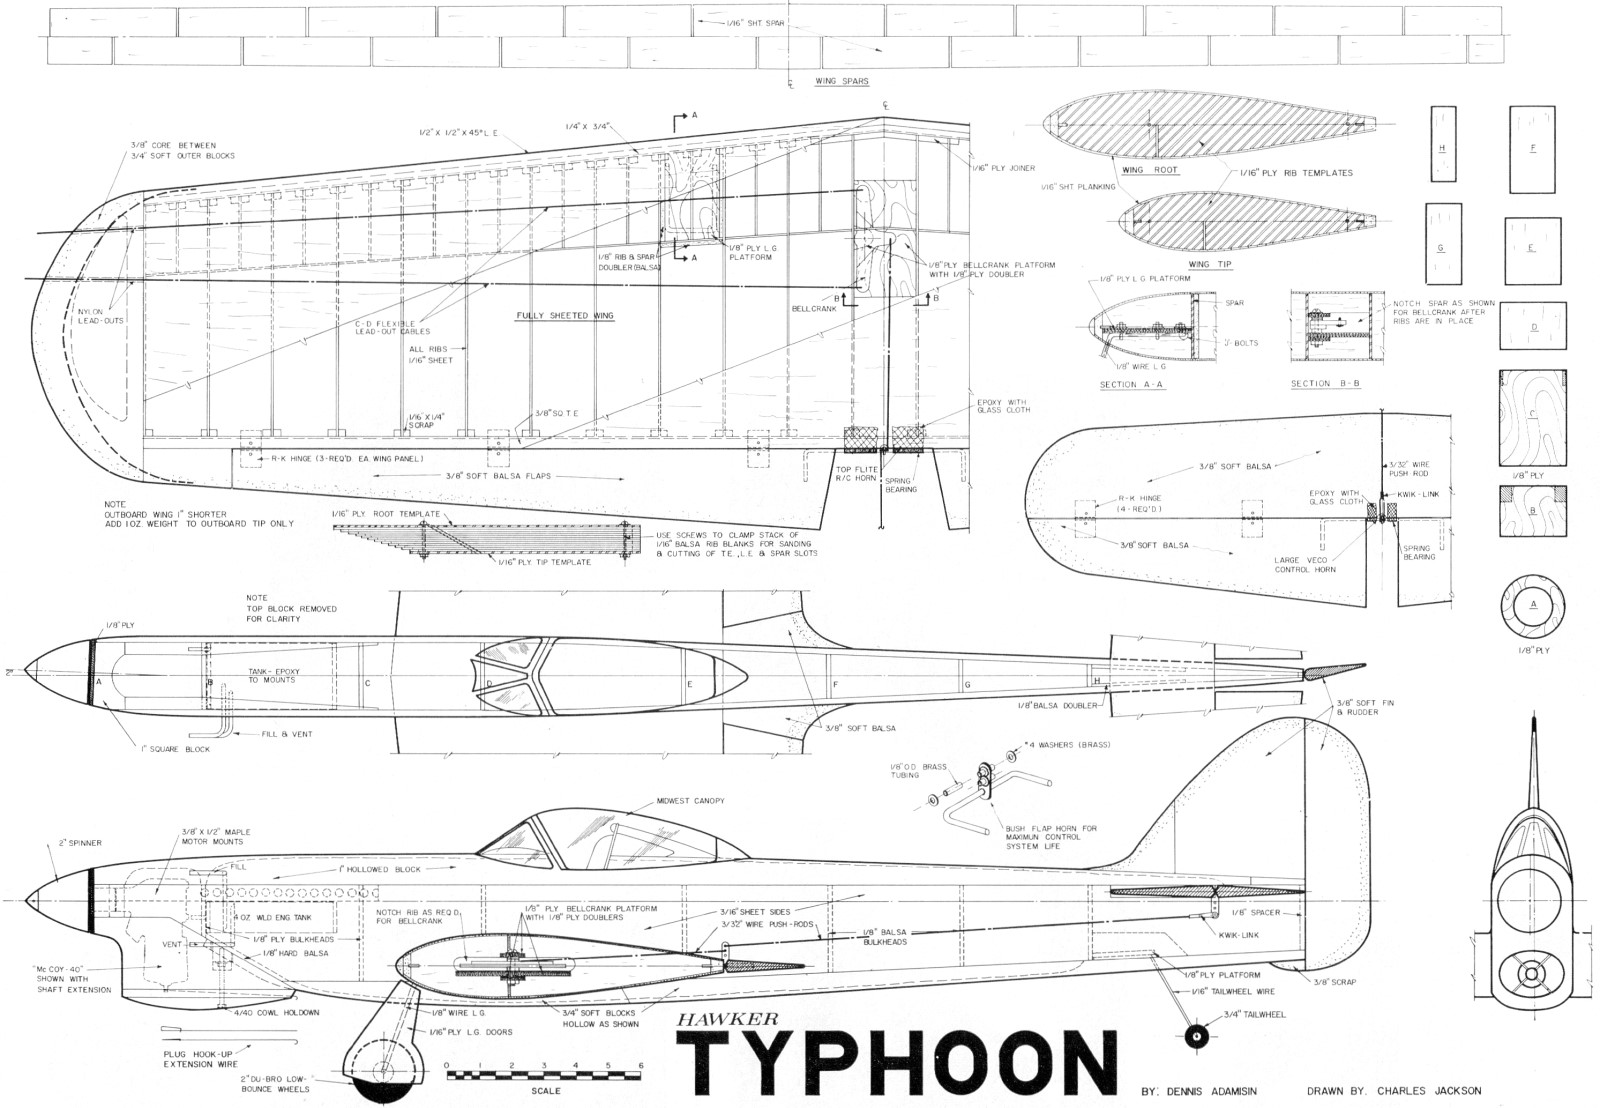
Construction
Since it is the heart of the airplane, begin with the wing. Its
construction is different but simple. The 1/16 x 1/4" pieces help
line up the ribs and are cut with a Woodruff key-cutter in a drill
press set at the proper height. This allows the wing to be built
in a jig, which helps prevent building warps into it. Begin by cutting
notches about 1/16" deep into the leading and trailing edges. The
ribs are made by cutting the center and the end rib templates out
of 1/16" plywood. Sandwich 13 pieces of 1/16" medium soft balsa
between them for each wing. Carve and sand them and then repeat
the procedure for the other wing.
Cut the notches for the leading and trailing edges and for the
spar; hollow as shown. Use the front of the rib templates for making
the half-ribs. These will be cut to length later. Cut the spar out
of medium to soft 1/16" sheet, making sure that the outboard spar
is one inch shorter. The ribs are then slipped onto the spar. On
a large flat board, the leading and trailing edges then are blocked
up high enough to clear the ribs.
Cut the bell crank floor out of 1/8" five-ply plywood. Slide
the ribs and spar into the jig and slide the bellcrank floor into
the spars. Line up the ribs and glue them into place. Cut an opening
large enough for the bellcrank in the spar. Epoxy Vg" plywood doublers
onto the bell crank floor. Drill the hole and install the bellcrank
with a 3/32" pushrod. Install a second platform to help carry the
load. Sand down the leading and trailing edges until they match
the airfoil.
Cut the landing gear platform out of 1/8" plywood. Bend the landing
gear out of 1/8" wire and tie it to the platforms with J-bolts.
Install the platforms and reinforce the ribs and spar with 1/8"
balsa. Cut and install the half ribs. Sand the entire structure.
Now to sheet the wing. Cut all the edges using a straightedge
to insure a close fit. Pin the trailing edge down on the board with
the landing gear hanging over the edge. The first sheet is four
in. wide and can be full length on the trailing edge. The next sheet
is six in. wide and must be joined in the middle. This still leaves
part of the leading edge uncovered. Cover it and repeat the procedure
on the bottom. Allow to dry thoroughly.
Cut out the flaps. Cut, notch, and drill hole for Top Flite radio
control horn. Carve flaps and assemble them. Cut wing tip cores
out of 3/8" soft balsa. Cut the top and bottom blocks out of 3/4"
soft and spot glue them together. Locate and drill leadout positions.
Sand the flaps flat and spot glue them to the wing. Carve and sand
to shape, then remove. Hollow tips, add leadout tubes, three-quarters
to one oz. of wing tip weight. Assemble and glue to the wing. Hinge
the flaps; add and carve the stationary flap. Glue the 3/8 x 3/8"
triangular cap to the leading edge and sand the entire wing.
The stab and elevator are cut out of 3/8" soft balsa. Carve to
shape, leaving the area in the center of the elevator one-in. wide,
flat and square. Install the control horn and hinges.
Cut the outline of the fuselage from 3/16" soft balsa sheet.
Using the wing, make a template of the airfoil. Mark the center
of the leading edge and trailing edge on it for cutting out the
hole for the wing.
Cut out the motor mounts and taper and drill them as shown. Epoxy
these to the body sides. Cut out the two plywood bulk-heads. I used
a World Engines' four-oz. stunt tank with a stock venting. It ran
well, but too long for the seven-minute FAI Pattern. However, for
the regular AMA Pattern, it is excellent. Epoxy the tank and the
bulkheads to the inside (left) body side. When this has set, make
a jig for holding the fuselage together and in line during assembly.
Epoxy the front-end assembly to the right (outside) body side
and slide the whole thing into the jig. Pull the back of the body
together and glue it around the 1/8" spacer. Add the bulkheads,
which are cut from 1/8" balsa. Cut out the small part of the body
by the trailing edge. Block up the wing in the jig so that when
it is glued in, it won't be cocked or leaning. With this done, the
wing can be glued in. If the center of the stab was left flat, it
can be glued into the fuselage at the same time, lining it up perfectly.
Then make the pushrod. I used 3/32" wire with a Kwik-Link on
the end by the stab. Install the fairleads, making sure that they
don't foul on the pushrod, which would make it bind. With the fairleads
installed, the controls should be almost free enough to work on
one leadout. If they are tight, work on the controls until they
are free. Twenty flights can't be wasted waiting for the controls
to work free.
Locate the engine, drilling for a two degree offset. Sand the
front end at a two-degree angle. Cut out the nose ring from 1/8"
plywood, locate and epoxy it to the front block. When the epoxy
hardens, cut out the top block and spot glue it to the body. Cut
out the back half of the bottom block and spot glue it to the body.
Cut out the front half of the bottom block, sand the airfoil out
of it and spot glue it to the body. When all of this is dry, carve
and sand to shape. Pop them off and hollow. The top block, when
hollowed, should not exceed one oz.; the same applies for both of
the bottom blocks together.
Bend the tail-wheel .075" wire and bind it to the 1/8" plywood
platform with 1/2A flying line. Epoxy the entire structure. Cut
out the doublers for the body sides and epoxy the doublers and the
platform to the body. When hard, cut the clearance for the wire
into the bottom block. With this done, all of the blocks can be
glued on.
Now to begin construction of the cowl. Cut out the 3/8" sides,
1/4" spacer (on the face of the angled part), the 3/4" block, and
the front blocks. Line up all the blocks and epoxy them together.
When the epoxy is hard, spot glue the cowl to the rest of the airplane.
While this is drying, cut out the rudder and fin and glue these
pieces together. Carving the cowl isn't as hard as it might look.
Just use the cross-sections on page 37, September 1969 AAM. With
this done, pop it off and hollow it out. Make the hold-down. Cut
out the exhaust hole, the air outlet and air intake, and coat its
interior with epoxy, making sure to work the epoxy into the wood
to fuel-proof it. Carve the fin-rudder assembly and add it in place.
I used an eight-in. Midwest canopy because of the ridges that
show where the back half of the bubble is separated from the windscreen.
When painted, they add to the overall realism. Notch the canopy
into the top block and add the cockpit detail. If a pilot is added,
his size must be comparative to the plane's scale. Epoxy the canopy
into the notch. Epoxy is the only adhesive that won't dissolve the
canopy but will still hold it down. Cut out, carve, and glue on
the flap fairings. Perfectionists may add elevator fairings.
Put on the fillets. I use Epoxolite putty because of its toughness
and its resistance to cracking. It dries so hard that the fillets
must be as close as possible to their final shape while they are
still wet. To accomplish this, tape the outline of the fillet onto
the airplane. Then smear the goop into the outline, shape with finger
and water. Allow to dry for 20-30 minutes. At that time, peel off
the tape and feather the edges, once again with finger and water.
When satisfied with the shape, allow the fillets to harden overnight.
Sand with coarse paper.
Covering the structure with light tissue is essential for obtaining
a light, high-quality finish. Grain, pinholes, small knicks and
other small surface imperfections are hidden. I use "Jap tissue"
because it is light, fills quickly, and therefore suits the purpose
nicely. My covering procedure is different, so it is given in detail.
After filling in the big dents and/or gouges, apply three unthinned
coats of clear, sanding between each one. Now for my method. Place
the dry tissue on the surface to be covered. Saturate the tissue
with thinner. This softens the clear and causes the tissue to be
virtually absorbed into the surface. Rubbing the tissue into the
clear helps fill the tissue with clear from the bottom. When dry,
fill with clear and talcum-clear. Use your favorite finishing method
or, if in doubt, consult the articles on finishing by Dave Gierke
or Don Bambrick.
The only other detail needing explanation is the wire used as
an extension of the plug post. On the plans, it is shown just below
the cowl. It is hooked onto the plug and trailed through the air
outlet. I used this device to eliminate a large, unsightly hole
in the bottom of the cowl. It worked well and I had no problems
with starting the beast.
Wait for a relatively calm day to test fly. Except for a little
nose weight and an extra quarter-oz. tip weight (I originally had
a half ounce) I had no difficulty in trimming the Typhoon.

<click for larger version>
Notice:
The AMA Plans Service offers a
full-size version of many of the plans show here at a very reasonable cost. They
will scale the plans any size for you. It is always best to buy printed plans because
my scanner versions often have distortions that can cause parts to fit poorly. Purchasing
plans also help to support the operation of the
Academy of Model Aeronautics - the #1
advocate for model aviation throughout the world. If the AMA no longer has this
plan on file, I will be glad to send you my higher resolution version.
Try my Scale Calculator for
Model Airplane Plans.
Posted October 2, 2010
|