|
Not a lot of information
is available about the Roland D-2 "Wahlfisch" (Whale) on the WWW (World Wide Web).
Wikipedia has a entry for the C-II Wahlfisch, but nothing on the D-II. The C-II
was also a biplane, but its wing configuration had a lower and a shoulder location
on the fuselage, whereas this D-II has a lower wing and a high wing mounted on a
centrally located solid pylon. It seems that would be a real annoyance to the pilot
with an obstruction that hinders stereoscopic vision when looking straight ahead.
The dual, wood stick cabane strut arrangement must have been a lot better, although
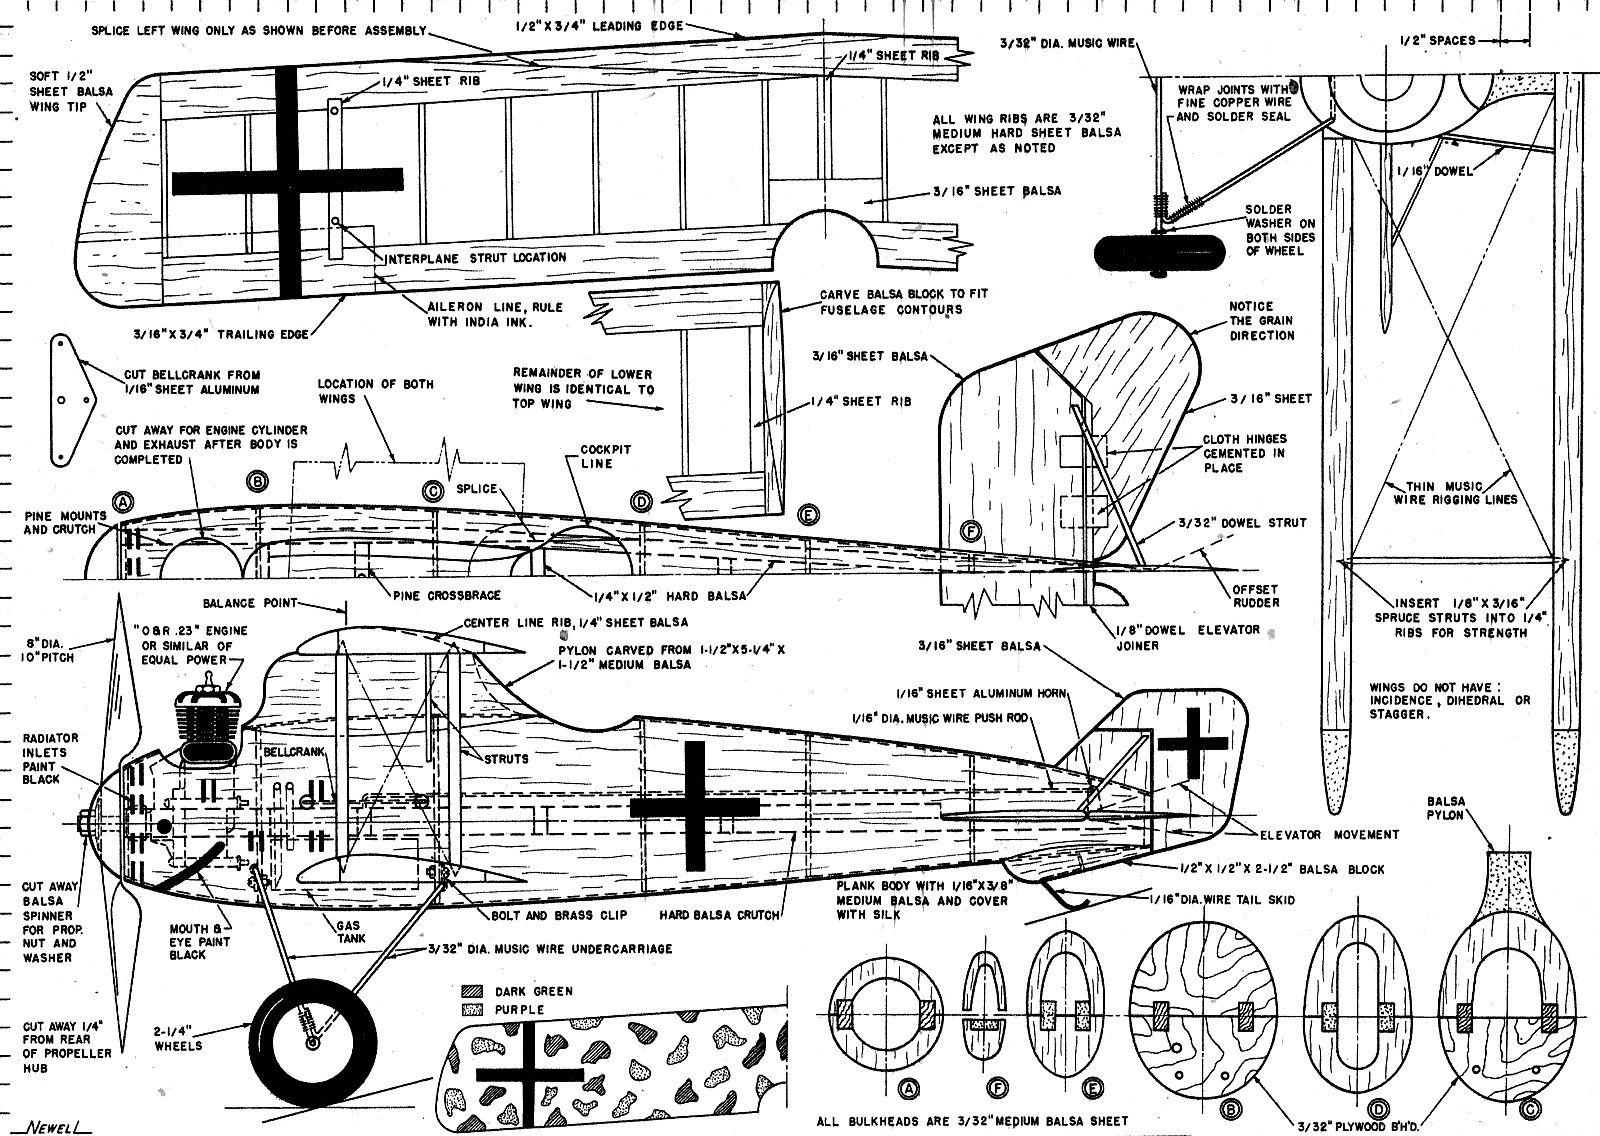
more difficult to construct. The plans are nicely done by the author, D.A. Newell,
but I do not see a rib pattern.
See also
World
War-1 Ace von Schleich and His Roland C-II "Wahlfisch" in the September
1962 American Modeler.
Just what the doctor ordered! U-control bipe with pylon.
By D. A. Newell
The Black Knight, of Germany," Hauptman Ritter E. von Schleich, leader of the
"Bavarian Blue Tails," attained many of his thirty-five victories using the Roland
D-2. Because of its streamlined shape, this plane was nicknamed "The Whale" (Wahlfisch),
and many pilots painted a mouth and eyes on the nose to simulate a whale. Although
used in action with success for quite some time, the "Whale" somehow never achieved
the popularity of the Fokker and Albatros fighters. Unlike the average bullet-nosed
planes with liquid-cooled engines, the D-2 did not have a radiator protruding into
the air-stream. Instead the radiator was cleverly concealed in the nose just behind
the spinner, with inlet and outlet. slot as the plans indicate.
Of all the biplanes used in World War I the Roland D-2 is one of the best adapted
to control-line use because of its exceptional streamlining and sturdy construction.
The latter is due to the fact that the usual cabane struts are replaced by a husky
streamlined pylon - which, incidentally, hindered the pilot's forward vision. No
dihedral was used, which makes the wings very easy to build, even with the slight
amount of sweepback. The model is easy to fly and should bring back to mind the
1917-18 period when flying man machines were assemblies of wood, wire, and fabric.
The fuselage is built up and planked for three reasons: lightness, economy and
rapid construction. This type has all these advantages over the hollowed balsa block
fuselage. A crutch made from 1/4" x 1/2"serves as a jig, engine mount and backbone.
This is built first and the bellcrank attached securely. Cut out the tail surfaces
and trim and sandpaper to shape. Add the fabric hinges and cement the stabilizer
to the crutch. Cut out the bulkheads and cement them in place on the crutch. Attach
the gas tank and bolt the landing gear in place to the plywood bulkhead. Hook up
the control push rod and then cover the whole body with 1/16" thick balsa. Strips
of about 3/8" wide are good for this purpose. Make sure the strips are cemented
to each other as well as to the bulkheads. Sandpaper the body until smooth and then
cover it with very fine silk. This makes. it almost indestructible. Dope it twice
and sandpaper smooth. Cut the pylon and cement it in place. Fillet pylon with Aero
Gloss plastic balsa. Cut out the cockpit and engine recess, and add vertical tail
and strut.
When you make the top wing, extend the right wing leading edge straight through
past the center line, as the plans show. This will make a very strong wing. The
bottom wing is made in two pieces. Only the root is shown in the plan because the
rest is the same as the top wing. A small balsa block is used to fair the wing into
the fuselage. Both wings are covered with fine silk. Dope well.
The top wing is cemented in place first. Plenty of cement must be used when doing
this. When this is thoroughly dry, the wing struts can be cemented in place. These
should be sharpened and pushed into the wing ribs as shown on the plans. Lay the
plane on its back and cement the bottom wing panels in place, inserting the struts
in the ribs. Carve the spinner from soft balsa and cement to the propeller, cutting
away for the propeller nut and washer.
Once the model has been clear doped three or four times, it is ready to paint.
Using Aero Gloss dope the entire model was painted pale yellow three times. The
mouth and eyes are black. The upper surface of the top wing is covered with splotches
of green and purple. The horizontal tail surfaces and top side of the body are colored
in the same manner. All struts are either dark green or purple, and all crosses
are black. Of course you can paint the plane any color you wish but be sure to use
a paint that is impervious to hot glow plug fuels. It is a good idea to use fuel-proof
cement as well. Fine music wire is used for the rigging. This is not necessary but
adds quite a bit to the appearance of the model. Machine guns can be made from a
hair curler.
The model flies at about 65 mph. I used 50-foot lines for flying, the size of
which should be at least .010 in dia. A line guide made of wire or plywood should
be cemented to the inboard wing strut. Balance the model 1/4 in forward of the pivot
point. Do not fly if the model is tail-heavy or a crack-up will occur. Add lead
weight in the tail or nose to balance the model. Be sure to offset the rudder to
turn the model away, from the center of the circle. This will keep the lines taut."

Full size drawings of the D-2 are found on Air Trails Full Size Plan #949.
Posted December 11, 2021
|