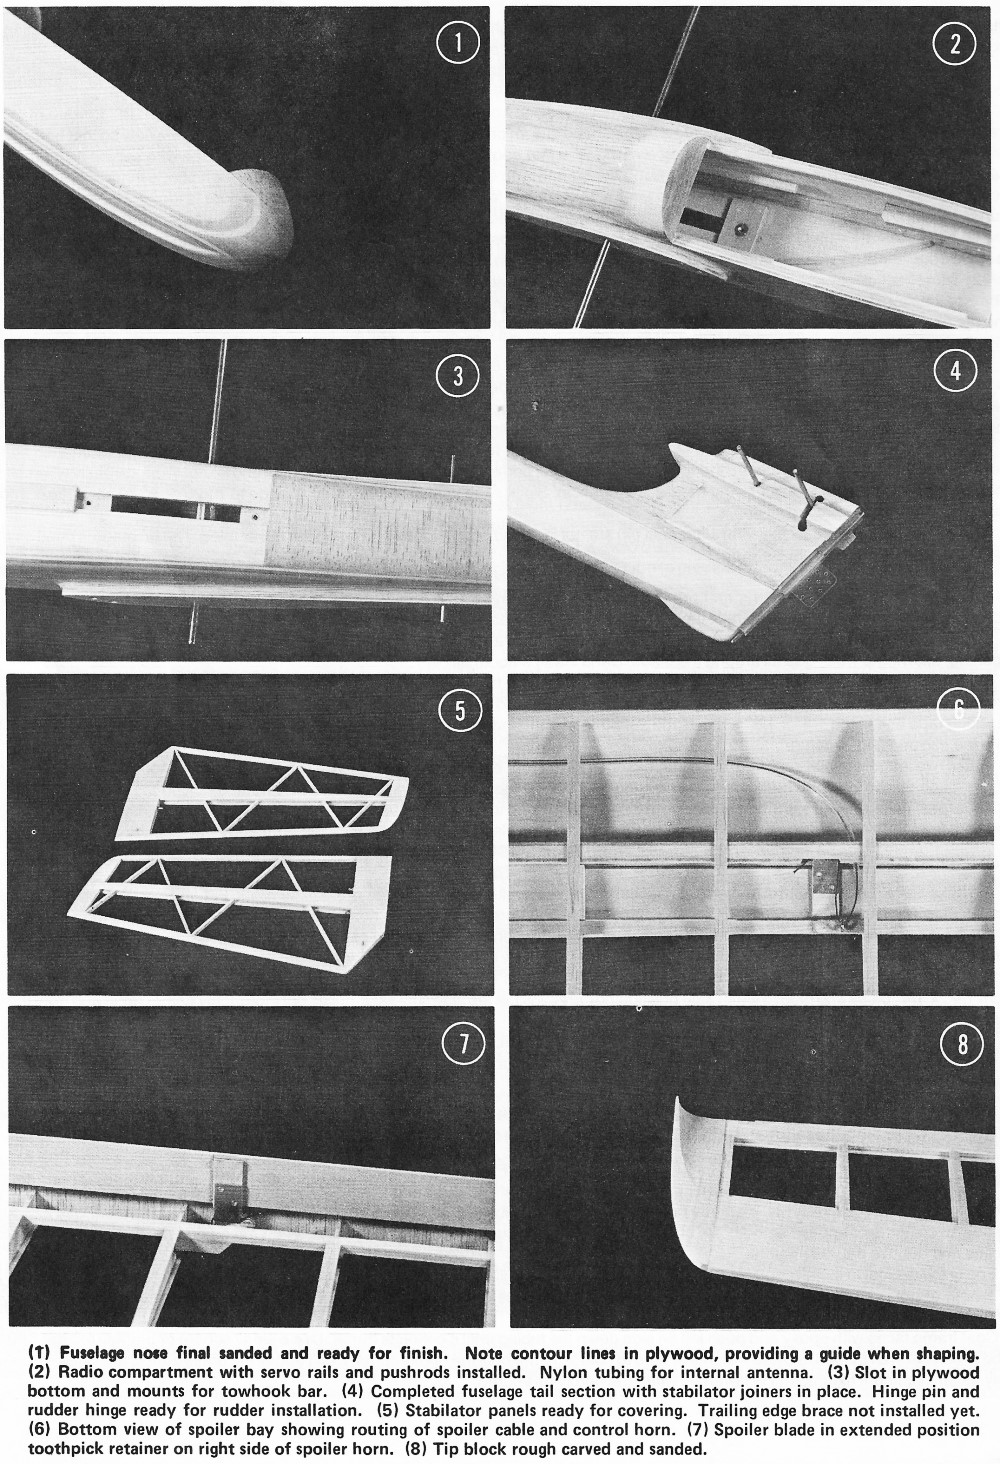
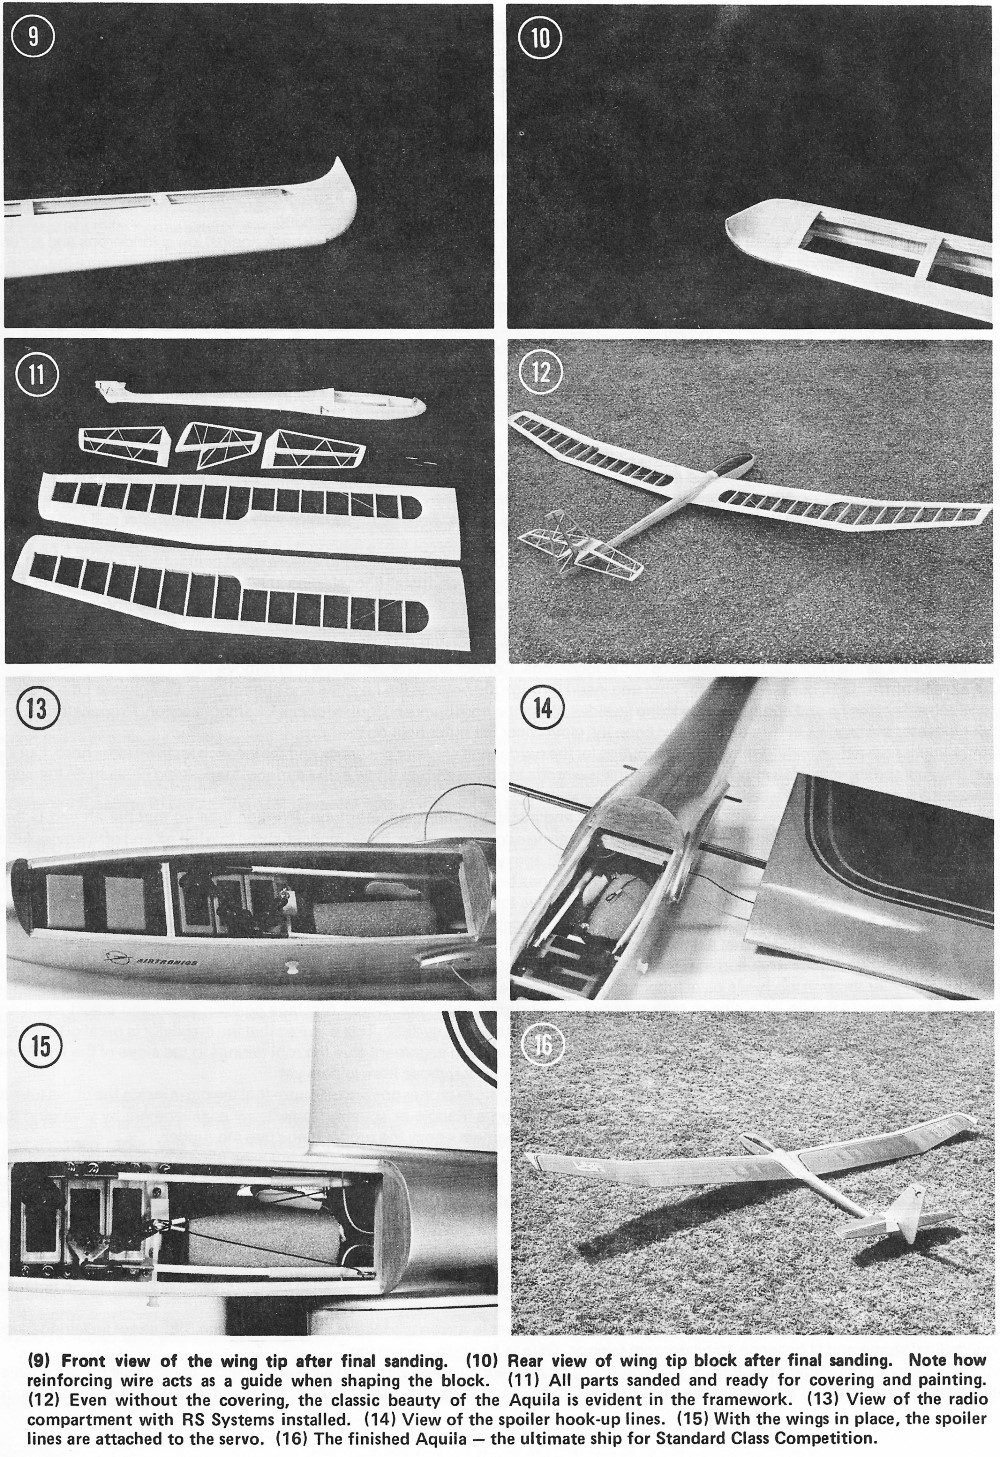
|
 Here is the full set of building instructions
for the beautiful 1970s era Airtronics Aquila sailplane. A fairly compressive building
description was published in the May 1975 issue of R/C Modeler magazine
when the Aquila first appeared, but these are much more extensive. Aquila kits have
not been manufactured for many years, and some of the ones that appear on eBay are
missing the instruction booklet, so now you can access a copy of the original in
its entirety. Photos of the kit parts and plans can be seen on my main
Airtronics Aquila page. You can also see the
105% Aquila I built from enlarged plans. Here is the full set of building instructions
for the beautiful 1970s era Airtronics Aquila sailplane. A fairly compressive building
description was published in the May 1975 issue of R/C Modeler magazine
when the Aquila first appeared, but these are much more extensive. Aquila kits have
not been manufactured for many years, and some of the ones that appear on eBay are
missing the instruction booklet, so now you can access a copy of the original in
its entirety. Photos of the kit parts and plans can be seen on my main
Airtronics Aquila page. You can also see the
105% Aquila I built from enlarged plans.
INTRODUCTION
The sport of R/C Soaring has advanced rapidly in technology and performance during
the past five years. Radio systems, accessories, launching methods and aircraft
design have been improved and refined so that today's models provide outstanding
flights in all conditions of terrain and weather conditions. The thrills and aesthetic
reward of flying with the eagles has attracted many new modelers until R/C sailplane
flying has become a major segment of radio control modeling. We believe that the
Aquila represents another step forward in the state of the art of aircraft design
and flight performance.
Standard Class sailplanes offer many advantages over their Unlimited Class counterparts,
particularly in cost and ease of transportation. However, most design development
has been in the larger ships particularly for thermal duration tasks, as the larger
ships theoretically fly better. Despite this, Standard models have completed very
successfully in major contests flying against the larger ships. Mark Smith won the
1974 LSF Tournament outright and Dave Shadel narrowly missed winning overall in
the 1974 Soar-Nats with a two channel Standard Class ship. For 1975 contests the
NSS rules permit unlimited control functions and the use of thermal sensors in Standard
Class.
The Aquila (pronounced ah-keel'-ah as in tequila) provides Unlimited Class performance
with a Standard Class model. This has been achieved by aerodynamic design and structural
refinement. It is, basically, a chopped wing span Unlimited Class model.
The wing chord is 9" to increase Reynolds number and provide increased wing area.
We feel that these factors are more important than the reduction in induced drag
from higher aspect ratios. The wider chord provides greater visibility at high altitudes
since the width of the wing is more significant than the span. The increased area
also provides higher launches as it will carry the weight of the launch line better
than the smaller area ships. (As long as all models are flown on the same launch
equipment and the launch device is sized to lift the big ships the smaller ships
are at a disadvantage.)
The airfoil is a medium thickness, flat bottomed section with a low entry point.
The leading edge radius is fairly large to provide a soft stall and the high point
is located at 30%. Our experience shows that this type of airfoil performs better
than the undercambered sections under all conditions except dead calm. Since some
wind seems to prevail during most contests, the ease of building and covering far
offsets the minor loss of performance under atypical conditions.
The wing planform with constant Chord center panels and double tapered tips is
nearly as efficient as an elliptical planform and much easier to build and repair.
Positive Hoerner tips are utilized to reduce tip vortex losses and increase effective
span. This style tip is used on the full-scale Duster sailplane and discussions
with Hank Thor, the Duster designer, while researching a scale model convinced us
that this type of tip would improve model performance. Polyhedral is used because
of the superior tu rn characteristics over Vee dihedral. The change in leading edge
radius on the tip panels eliminates tip stalling and avoids the loss of lift caused
when wash out is used for this purpose.
The use of a large diameter joiner and double shear webs in the center panels
provide a very rigid wing. We believe that span-wise wing flex causes significant
reduction in launch height and can contribute to poor handling while flying in gusty
air. The overall wing structure is quite light but very strong and rigid, while
still retaining a low moment of inertia around the Center of Gravity.
The empennage design features a lightweight structure with thick sections and
all flying control surfaces. The diamond section airfoil provides excellent control
response and avoids premature stalling problems inherent in flat plate surfaces.
The stabilator provides positive pitch control with less drag than a conventional
elevator surface. Detachable stabilator panels and rudder permit packing in a smaller
box for ease in transportation. Two complete models can be easily packed in a box
measuring 10" x 12" x 50".
The fuselage design is conventional and provides a large accessible radio compartment
and room between the wings for a thermal sensor. Ballast space is provided to hold
up to 20 ounces of C.G. weight plus extra nose weight. The structural design provides
a lightweight and easily aligned fuselage. The canopy and overall lines are very
scale-like and contribute to the Aquila's beauty. While not as quick to build as
a slab sided box the extra carving and sanding payoff when you examine the finished
model.
Optional lift spoilers are incorporated in the design. These are very effective
(more than those on the Grand Esprit) and provide exceptional glide path control
with minimum pitch disturbance. They provide a controlled means of descent from
high altitude and also stabilize the ship while landing in turbulent ground conditions.
Recently, there has been a great deal of controversy regarding two-function versus
unrestricted Standard Class contest rules. Frankly, we don't understand what the
fuss is all about. Certainly spoilers provide more control of the model and increase
the pilot's available options for his flight plan. They are not, however, a cure-all,
and will not magically place the model on the landing spot. Pilot skill and practice
is still the major determining factor in winning contests and this will be true
under any set of rules. Trying to write rules to legislate a "beginner's" event
has never worked in modeling or any other competitive sport. Personally, we like
spoilers and will fly with them as often as possible. However, if rule Changes prohibit
their use in competition flying we'll just tape the blades closed and keep on flying.
The Aquila will slow up and land easily without spoilers so the choice is up to
you. If you have three servos try the spoilers for an added dimension in R/C Soaring
and don't knock it until you've tried it!
The spoilers can be very useful when slope flying as they permit landing in very
restricted areas. Instead of flying behind the slope into the normal sink area,
turn closer in and extend the spoilers. This technique is a lot easier on the model
than landing in the trees or trying to fly into the ground.
Since the spoilers reduce the lift of the wing, they effectively increase the
wing loading of the model. We have had good results when flying on the slope by
cracking the spoilers open in windy conditions. The same technique seems to work
well when thermal flying in strong winds, but further experimentation of this technique
is required.
Let us know if you try this technique as a substitute for ballasting the model.
The flying characteristics of the Aquila are outstanding! The ship has a very broad
speed range in the un-ballasted condition and will really smoke if a little down
trim is fed into the elevator. By adding up-trim and holding some up-stick she will
really slow down to walking speed without dropping a tip. With normal trim and stabilator
throw, stalls must be deliberately introduced. The stall is soft and straight ahead
with no tendency to fall off. Rudder control is very positive and effective in all
conditions. Turns are flat without skid or slip tendencies. Tight turns with high
bank angles are easily achieved by holding a little up-stick to maintain glide path.
When properly trimmed you can set up a thermal turn and neutralize both sticks.
The Aquila will hold the turn for several minutes without additional command - in
fact we have flown for 15 minutes without touching the transmitter. Lift response
is very positive and provides strong visual response. Even when you can't find the
lift the Aquila will!
Tow characteristics are excellent. With the hook properly positioned she will
climb like an arrow and get higher much faster than any other ship we have flown.
On a heavy duty surgical tubing Hi-Start, point the nose up and heave javelin style
while holding a little up-stick. Alternately, launches from a six volt winch are
also superb.
Handling is also great. Despite the high performance potential, the Aquila is
a very easy ship to fly. Control response is immediate with no adverse characteristics.
In fact, we think the Aquila is as easy to fly as an Olympic with the advantage
of better penetration. If this sounds like the kind of sailplane you would like
to fly, clear off the workbench and get started. If you are a serious contest flier,
build two so that you have a back-up model available throughout the contest season.
Read through the building instructions and study the plans to familiarize yourself
with the design before starting construction. We suggest that you cut out all parts
before starting assembly creating your own kit. This method reduces overall building
time and lets you build several parts simultaneously.
You will need a flat surface at least 4S" long and 1 0" wide into which you can
push pins to build the model. No special jigs or tools will be required. Cut the
plan to fit your work surface, tape down and cover with Handi-Wrap or the equivalent.
We don't recommend the use of model airplane cements for structural assembly.
Wilhold aliphatic glue or similar glues can be used for all joints except the brass
tube installation. 5-minute epoxy such as Hobbypoxy Formula 4 or Devcon are quite
useful. Hobbypoxy Formula 1 is used to assemble the wing trailing edge joint and
install the wing tubes.
Our own prototype airplanes were assembled completely with Hot Stuff, except
for the Formula 1 joints and the side nose block joint. Several months of flying
has shown no structural failures and we totally recommend its use. It's not inexpensive
but the time saved in building is fantastic. We framed two ships in the time normally
required for one by using Hot Stuff.
CONSTRUCTION NOTES
STABILATOR:
1) Cut the leading and trailing edges for both panels from 3/16" x 1/4" stock
and pin in position over plan. Cut the tips from 3/16" x 3/4" stock and fit snugly.
Fit the center section strips and glue all outline joints.
2) Cut the ribs from 3/32" x 3/16" stock and fit tightly. Glue all ribs in place.
3) Strip the tapered spars from light 1/8" x 3" sheet and install the spars.
Cut and fit the 1/8" center section sheeting and glue in place. Let this assembly
dry thoroughly.
4) Remove from plan and pin down again in inverted position with the spars and
center sheet against the plan; use scrap 1/8" sheet to shim the leading and trailing
edge.
5) Cut notches in the center ribs for the forward brass tube. Check fit carefully
and be sure tube is square and parallel to the work surface. Insert 3/32" joiner
in aft hole in control horn and 1/8" brass tube in forward horn hole. Cut two pieces
of brass tubing 1 1/2" long and slip over the wire joiner.
6) Position forward tube in the notches and cut notches for the aft tubes using
the horn as a spacer to locate the aft tubes. Check alignment and epoxy all tubes
in place. Crimp the ends of the tubes slightly with pliers.
7) Install tapered spars and center sheet and let dry completely. Use a razor
saw to cut the forward tube flush with the root ribs and remove horn. Block sand
face of root flat and square.
8) Cut stabilator fairings from 1/4" x 1/2" stock and drill 1/8" diameter holes
for the forward brass tube and rear joiner. Spot glue fairings to stab roots.
9) Carve center sheet and root fairings to airfoil shape, plane corners of leading
and trailing edges. Block sand structure blending spar ends into tips as shown on
plan. Round leading and trailing edges and tip. Do not remove root fairings at this
time.
RUDDER
1) Cut the outline from 3/16" x 1/4" stock and pin in position over plan. Cut
tips from 3/16" x 3/4" stock and fit tightly. Glue all outline joints.
2) Cut the ribs from 3/32" x 3/16" stock and fit tightly. Glue all ribs in place.
3) Strip the tapered spars and install the spar and 1/8" x 1/4" filler on the
root ribs. Let dry thoroughly.
4) Remove from plan and install right hand spar and filler.
5) Cut a slot in the rudder post for the rudder hinge but do not permanently
install hinge now. Make slot approximately 1/8" longer than hinge to provide vertical
adjustment when fitting rudder to fuselage. Use hinge as a guide to drill a 3/32"
diameter pilot hole through the root rib, then enlarge hole to 1/8" diameter with
small rat-tail file. Cut a 3/8" length of 1 /8" O. D. brass tube, deburr ends and
epoxy into root rib using hinge and 3/32" diameter hinge pins to check alignment.
6) Carve and sand spars and outline to shape shown on plans.
WING
The wing construction sequence described assumes a limited working area and no
special jigs. If your work area permits we suggest that both wing panels be built
at the same time for reduced building time. If you have a hinged building board
the center and tip panels can be joined on the board permitting even quicker construction.
The plans show optional tubes installed for the antenna of the optional Thermic
Sniffler. We suggest that the holes for these tubes be drilled in the ribs and ply
shear webs before starting assembly. The nylon tubes are installed after basic assembly
is complete and before adding the top sheet and capstrips.
We also suggest that you install the spoiler tubes and spoiler frame even if
you do not plan to use spoilers initially. In this way the opening can be cut out
of the covering and the spoilers added at any time. Do not omit the 1/8" x 1/4"
spruce sub-spar even if you have no intention of adding spoilers since this spar
adds significant strength.
1) Seven sheets of 1 /16" x 3" x 36" balsa are required for the wing. The hardest
stock should be used for the trailing edge strips and the lightest for the tip panels.
Prepare the sheet before starting assembly as follows: (Mark each piece after cutting
for easy identification during assembly.)
a) Cut one sheet into two 18" lengths and trim off triangular piece 5/8" wide
at one end. These are the tip leading edge top sheets.
b) Cut one sheet into two 18" lengths and cut four pieces tapering from 1-3/8"
to 1". These are the tip trailing edge sheets.
c) Cut two sheets 30" long for the center leading edge top sheet.
d) Cut two sheets 30" long and then cut these into four strips 1-3/8" wide for
the center panel trailing edge sheet.
e) Cut one sheet 12-1/2" long and then cut two strips 1-7/16" wide from this
piece for the top sheet out to the spoiler bay. Cut pieces 4" long for the bottom
center sheet. The rest of this sheet and the 6" cut-offs from steps (c) and (d)
are used for the top center aft sheet and the small piece outboard of the spoiler
bay.
2) Taper the aft section of all four trailing edge pieces as shown on the plans.
Pin down trailing edge sheet, fitting the inboard end of the tip sheet tightly against
the center sheet but do not glue this joint.
3) Pin shaped spruce leading edge in place. Cut and fit bottom center sheet and
glue in place. Cut all bottom capstrips to length and glue in place. Note that the
cap at W-3 is not installed until the panels are joined.
4) Glue W-1 in place using the end of W-1 0 to tilt this rib outboard slightly.
Note that the leading edge is 1/4" outboard of the trailing edge to match the fuselage
sides.
5) Cut the 1/8" x 1/4" spruce spars to length and glue the bottom spars to the
center sheet and all capstrips using the ribs to locate the spar accurately.
6) Install all ribs except W-1 A, W-2A and W-3 gluing to capstrips leading edge,
spar and trailing edge sheet. Use the pre-cut shear webs as spacers to locate ribs
and keep them square. Be sure ribs are tight against the bottom caps using pins
as required to ensure proper location.
7) Glue the top main spars in place checking that the spar is flush with the
top surface of all ribs. Add the sub spar.
8) Install the forward ply shear web W-1 0 and all forward balsa shear webs except
in the bays adjacent to W-3. Be sure that the webs fit tightly against the bottom
capstrips and top and bottom spar faces and use plenty of glue to ensure strong
joints!
9) Cut ribs W-1 A and W-2A apart at the spar notch and trim to clear W-10. Install
forward portion of these ribs. Note that the aft section of the ribs and aft W-10
are not installed until later.
10) Glue all aft balsa shear webs in place. Note the gap to clear the spoiler
horn. Fit and install the 1/16" x 3/16" trailing edge supports and the 1/4" x 1"
T.E. filler blocks between W-1 and W-1A. Use the 1/16" ply root rib to locate the
notches for the spoiler cable tubing. Cut notches, drill hole through shear webs
and install nylon tubing. Be sure the tubing does not project above the upper rib
contour. This completes the basic wing assembly. Let it dry thoroughly (at least
eight hours if using aliphatic glues) before removing from work surface. The second
wing panel must be completed through this point before continuing assembly.
11) Sharpen the inside end of the 1 /4" O. D. x 3" long brass wing tubes with
a # 11 X-Acto blade. Using the 1/16" ply root ribs to locate the hole and use the
tubing as a drill to cut through W-1. Leave the balsa plug in the end of the tube
to prevent epoxy from getting inside the tube. Check that the hole is adjacent to
the forward W-10 and the bottom edge of the top spar. Use a rat-tail file to correct
any misalignment.
12) Cut the tapered spar fillers from 1/4" x 1/2" stock and epoxy to the top
and bottom spars and W-10. Sand the outer surface of the tubes with coarse sandpaper
and clean thoroughly with acetone or similar solvent. Push tube through W-1 and
against the end of the spar filler in both panels. Insert the 7/32" diameter wing
joiner into both tubes and set panels flat on the work surface with the trailing
edge facing toward you. Block up both panels so that each polyhedral joint is raised
2-3/16" above the work surface. Check alignment carefully being certain that there
is no sweep in either panel and that the rod is parallel to the work surface then
spot epoxy the tubes in place with 5-minute epoxy and let dry thoroughly.
13) Check alignment again and correct any errors before continuing, then remove
the joiner. Mix up a generous batch of slo-drying epoxy and micro-balloons or use
slo-dry filled epoxy. Pack the cavity around the tube completely with epoxy holding
the panel with leading edge down to keep epoxy in place. Coat the edge of the top
and bottom spars and face of the spar filler as well. Install the aft ply web, W-10,
and use clothespins or clamps to squeeze it tightly against the spars. Clean oft
any excess epoxy and let dry before removing clamps. Install aft portion of ribs
W-1A and W-2A.
14) Trim the tip shear webs and trailing edge supports flush with the top contour
of the ribs and spars. Prop up tip panel so that the bottom surface of W-9 is 1-1/4"
above the work surface and block sand the leading and trailing edges and spar ends
hand launch glider style. Prop up center panel so that W-1 is 2-3/16" above work
surface and block sand. Set center panel flat and raise tip rib 2-3/16" above work
surface and check fit of joints; re-sand if necessary to correct any errors.
15) Pin the center panel in position then apply glue to L.E., T.E., and spars
and butt the tip panel against the .end with the bottom of W-9 is 1-1/4" above the
work surface. Cut a 3/4" length of 1 /4" x 1/2" stock and glue between the spar
ends at the joint. Lay some scrap 1/16" shims under the spars about 1-1/2" each
side of the joint and glue both W-11 dihedral braces in place. Check that the bottom
edge of the braces are flush with the bottom spar face and resting on the 1/16"
shims. Use plenty of clamps to secure the braces. Install balsa webs at each end
of W-11.
16) Cut the lower edge of the 1/8" x 1/4" x 3" spruce leading edge tie to match
the bottom edge of W-11 and glue to the aft side of the leading edge, using Clamps
to hold in position. Cut rib W-3 apart and trim to fit, then glue in position using
a 1/16" shim under the forward section to position the rib properly. Slant the rib
inboard slightly so that it is centered on the spar joint.
17) Apply Hobbypoxy Formula I epoxy to the beveled portion of the center trailing
edge and glue to the top edge of the spar supports and rib surface. Position top
trailing edge sheet and pin the forward edges in place. Lay a strip of 1/4" x 3/8"
or 1/4" x 1/2" balsa over the aft portion of the trailing edge and pin every 2 or
3 inches through this strip and the trailing edge sheet into the work surface. This
clamping strip will ensure a straight trailing edge. Don't use aliphatic glues for
the trailing edge seam as it will warp or curl the thin section.
18) Trim the aft edge of the leading edge sheet with a straight-edge then trim
the end so that it is centered on rib W-3. We recommend contact cement to install
the leading edge sheet as it eliminates tedious pinning and drying time. Use a small
brush to apply cement to the spar, leading edge and rib surfaces, then coat the
inside of the sheet where it contacts these points. Let contact dry and press 2
or 3 pins vertically into the spar to act as alignment guides. Align sheet against
pins and drop onto spar, supporting the sheet so that it does not contact the ribs
or leading edge. Rub down firmly against the spar then lower the sheet slightly
and rub with your palm so that the sheet contacts the ribs. Work forward from the
center toward each end finally rubbing down the leading edge joint. The panel can
be removed from the board as soon as the sheet has been completely rubbed down.
If you prefer to glue the sheet in position be sure that the joints are completely
dry before unpinning the panel.
19) Cut and install the top center sheet, starting with the 1-7/16" x 12-1/2"
piece butting against the leading edge sheet. Note that the outboard end of this
sheet is flush with the outer face of the rib. Install the sheet on the outboard
end of the spoiler blade. It's easier to trim the contour of these pieces after
installation. Fit and install the 1/16" x 1/4" fillers that outline the forward
and aft edges of the spoiler bay. Fit and install all center panel capstrips. We
suggest cutting the caps slightly oversize and then bowing them in place to eliminate
pinning. This completes assembly of the center panel. Remove from work surface when
dry.
20) Prop up the center panel so that the bottom tip spar is flat against the
work surface. Install the trailing edge sheet, leading edge sheet and capstrips
following the methods outlined in steps 17, 18, and 19, Let dry completely and remove
from work surface.
21) Trim the L.E., spars, and sheet flush with the outboard edge of W-9 and epoxy
tip block in place. Set block 1/16" forward of the wing trailing edge. Form the
soft wire reinforcement to the shape shown on the plans (match the second wire to
the first now so that both wing tips will be identical). Notch the trailing edge
to receive the wire and epoxy wire to trailing edge and tip block. The wire serves
as a guide when carving the tips and prevents the tip from breaking during handling
or when bent by curious hands. Rough shape inner surface tip using a scoop gouge
and coarse sandpaper wrapped over a 1" diameter form (a section of MonoKote tube
core is ideal). Carve and sand outer surface using a block, following the wire and
tapering toward the leading edge. Wrapping a strip of masking tape around the wing
inboard of the tip block joint is helpful to prevent sanding the top sheet or capstrips.
Finally carve the forward top portion to match the contour of the leading edge sheet.
Check the photos and cross-sections shown on the plans and work carefully.
22) Trim sheet, spars and leading edge, plus nylon tubing, flush with W-1 taking
care to avoid changing the angle of W-1. Stack the ply root ribs and fuselage fillet
ribs together using the brass tubes to align and shape the leading edge contour
to match the plan. Unstack and glue the ply rib to the face of W-1. Add bottom capstrip
at W-3. This completes the wing panel assembly except for final sanding and spoiler
installation.
23) Use rubber cement or contact to secure a piece of #120 or #180 sandpaper
to a sanding block at least 3" x 10". Be sure that the paper is tight against the
surface of the block to avoid sanding undercamber into the wing. Block sand the
entire lower surface being sure that the block contacts the leading and trailing
edge at all times. Then sand upper surface taking care to follow the rib contour
on the capstrips. Check that all seams and joints are smooth and flush by running
your fingertips over the wing.
24) Use a small block or razor plane to shape the leading edge. Important Note:
The tip panel leading edge must be shaped so that it becomes progressively blunter
toward the tip. Check plan for the correct shape at the polyhedral joint and tip
rib. Work carefully when shaping the leading edge and be sure both wing panels are
identical. Block sand to final contour then Change to #220 or #240 sandpaper and
final sand entire wing panel including tips.
NOTE: The brass tubes for the wing alignment pin are not installed
until the fuselage has been assembled. The fuselage is used as a jig to accurately
locate the holes in the wing.
SPOILER INSTALLATION
1) Cut 1/4" x 1/4" balsa supports and pre-drill holes for screw-eyes. Epoxy supports
to bottom surface of the sub-spar and rib. Install screw-eyes making sure that the
joint of the eye faces aft, and the bottom of the eye is flush with the support.
2) Trim the three ribs marked "X" on the plans to provide clearance for the spoiler
blade. Cut the 1/4" x 1" T.E. stock blade to fit the opening, allowing a 1/32" gap
all around the blade. Sand blade smooth all over.
3) Locate the aluminum control horn as shown on the plans and epoxy or Hot-Stuff
to the lower surface of the blade. Note that the horn projects 1/4" forward of the
blade leading edge and that a right and left hand blade is required. Temporarily
hinge the blade in place with masking tape and fit the 1/8" x 1/8" balsa blade supports
at both ends of the spoiler bay. Use your fingertips to check that the blade is
flush with the surrounding structure.
4) Cut two lengths of dial cord and insert into tubing from the root end. Hold
panel tip down to help feed cord smoothly through tube. Pass end through screw-eye
then back forward to the inboard side of the control horn. Pass cord through the
hole in the horn so that one inch projects past the horn. Cut a 3/8" long piece
from the end of a round toothpick and use this as a wedge to secure the dial cord
by pushing into the horn from the outboard edge. Pull dial cord from root to check
blade action and be sure the horn and retainer clear the shear web.
FUSELAGE SUB-ASSEMBLY
SIDES:
Align right side over plan and draw vertical lines indicating the position of
the aft edge of the nose block, F-1 and F-2. Transfer these lines to the left side
aligning sides carefully. Cut 1/8" x 1/4" spruce doublers to fit between nose block
and forward face of F-2 then glue to sides. Allow a 1/8" gap for F-2 and cut the
1/4" triangular stock top longeron to length and glue flush with the top edge of
the side. Glue bottom longeron in place starting at the tail end cutting kerfs with
a razor saw if necessary to follow the side contour. Use pins as required to hold
side and longerons in position and flat on the board. Repeat for the other side
making sure that you make a right and left side. Cut the aft spacer from 1/4" x
1/4" balsa and glue to either side positioning carefully. Let the side sub-assemblies
dry thoroughly before removing from the work surface.
TAILPOST
Cut two pieces of 1/8" x 1/4" spruce 3-3/4" long. Lay-out the hinge locations
and file a 1/64" deep slot in each piece to receive the tang for the rudder hinges.
Epoxy the two pieces together forming a 1/4" square post with two 1/32" wide slots
in the center. Epoxy hinges into slots and cut off excess flush with the tailpost.
Use 3/32" diameter hinge pin to check hinge alignment.
FIN:
Tack glue the 1/16" ply fin sides together aligning the edges carefully. Cut-out
the template from the plan and use rubber cement to glue the template to the ply.
Drill a 1/8" diameter hole for the horn pivot tube and a hole at each end of the
rear alignment pin slot. Use a coping or jig-saw to cut the slot and file smooth.
Be sure the slot is wide enough (3/16") to clear the boss on the control horn. Separate
the two ply pieces and remove paper template.
Epoxy the tail post to the aft edge of the right fin side aligning carefully.
Cut the 1/8" x 1/4" and 1/4" x 1/4" frame and epoxy in place. Insert a 4" length
of brass tubing into the hole in the plywood and install the stabilator control
horn. Check horn action to ensure that full travel is available. Trim frame pieces
if required.
Coat frame faces with epoxy and push left fin side down the tubing until it contacts
frame. Use a small square or triangle to check that the tube is vertical in all
planes and use weights or tape to hold together until the epoxy cures. Don't epoxy
the brass tube to the sides - it is used only as an alignment fixture, and is removed
when the epoxy has cured.
FUSELAGE ASSEMBLY:
1) Insert the 1/4" O.D. x 3" long and 1/8" O.D. x 4" long aft brass tubes through
the holes in the fuselage sides with the inner edges of the sides facing each other.
Insert F-2 between the sides and push sides tight against F-2. Bring rear edge of
sides together, trimming the 1/4" triangular stock so that the 1 /4" square spacer
is firmly contacting both sides. Apply glue to spacer and clamp sides together tightly
checking alignment of the aft edges.
2) Apply glue to the edges of F-2 and install between sides. Use tape or clamps
to squeeze sides tightly against the former. Invert over top view and check alignment.
Be sure F-2 is tight against the 1/4" tube, and flush with the top edge of the sides.
Do not pull nose together yet!
3) Pin 1/4" sheet top block to work surface over the top view of plan then apply
glue along each side and across the forward edge where the sides and F-2 contact
the top block. Drop sides into place using pins to hold in position. Use a straight-edge
to check that sides are straight between F-2 and the tailpost, pinning as required.
Let this assembly dry completely before continuing.
4) Use your hand to squeeze the front of the sides together against the nose
block, pushing block back against lower longerons and spruce doublers. Wrap the
rubber bands and check alignment over the top view by lining up a square or triangle
against the side. Be sure the nose is centered over the plan. Correct any misalignment
by trimming the doubler and longerons. When satisfied with alignment apply glue
to both sides of the noseblock, squeeze sides together, then use a length of strip
rubber or several large rubber bands tightly wrapped around the sides to clamp the
nose together.
5) Install F-1 between the sides slightly aft of its final position. Apply a
bead of glue to the sides at the former location and slide F-1 into final position.
F-1 will be a tight fit between the sides and pressure will hold it in place.
6) Cut the anti-crush crosspiece from 1/4" x 1/2" stock to fit across the sides
aft of the 1/8" tube for the wing alignment pin. Glue crosspiece to sides, but not
to brass tube. Cut the former reinforcements from 1/4" triangular stock and fit
around F-1, F-2 and bottom edge of nose block. Remove brass tubes.
7) Pre-form the forward ply floor by drawing it across the edge of your bench
pressing down with your hand in the manner you curl or straighten paper. A few passes
with controlled pressure will form the floor to match the side contour. Epoxy the
1/8" ply hook mounts in position on the inside of the floor. Note that the aft mount
projects 1/4" behind the edge of the floor. Position the tow hook extruded bar in
the slot and use a 1/8" diameter drill to transfer the mounting holes to the ply
plates. Enlarge these holes with a 5/32" diameter drill and press-in #4-40 blind
nuts from inside of floor. Epoxy around nuts to secure.
8) Remove the rubber wrapping from the nose and block sand entire bottom edge
of sides to ensure good contact with bottom sheet and floor. Mark aft edge of floor
and apply glue to sides, former edges and nose block. Install floor starting at
aft edge using masking tape to draw tightly against sides. Wrap nose section with
rubber strip or bands to secure. Let this assembly dry thoroughly and remove from
work surface. Remove all tape, pins, etc.
9) Trial fit the fin sub-assembly into the aft end of the fuselage. Check that
the tailpost fits snugly against the 1/4" square aft spacer and that the forward
bottom is seated against the top surface of the longerons. Correct any problems
now and remove fin.
10) Cut a piece of 1/8" O.D. brass tube 13/16" long and insert through the holes
in the fin sides and control horn. Be sure the tube projects equally on each side
of the fin and epoxy the tube to the fin sides. Work the horn back and forth to
check for smooth action. Prepare the aft end of the inner elevator push rod as shown
on plan and snap the clevis over the outer hole on the horn.
11) Check your servo action to determine the best routing for the rudder and
elevator pushrods and the location for the rudder horn. Cut the rear exit in the
appropriate side. You may have to cross the pushrods to obtain correct throw at
the surface. Mark servo position on the plans to eliminate confusion when you are
installing the radio.
12) Scuff the outer pushrod tubing with coarse sandpaper and install the outer
elevator tube. Position tube so that the aft end is 3/4" forward of the fin slot
and epoxy the forward end to F-2 and the trailing edge crosspiece. Insert inner
pushrod into the aft end of the outer tube, pushing forward until fin is positioned
in slot. Check horn throw and epoxy fin into slot and tail post between sides. Note:
This is a permanent assembly - the elevator pushrod cannot be removed after the
fi n has been installed. Be sure that everything fits and works correctly! Epoxy
the aft end of the outer pushrod to the top sheet and against the sides for extra
rigidity.
13) Install the outer rudder pushrod tube, epoxying in place as described above.
When dry, trim flush with the outer face of the fuselage side. Install the optional
tube for an internal antenna installation at this time.
14) Place the fuselage on your work surface, propping up the aft end so the the
top surface is parallel to the bench. Measure carefully! Insert the forward joiner
through the brass pivot tube in the fin and the rear joiner into the horn boss,
then slip the stabilator panels over the joiners against the sides of the fin. Use
pins or tape to temporarily position stabilator. Check fuselage position again and
adjust stabilator position until the leading and trailing edge are the same distance
above the work surface. This ensures that the stabilator is parallel to the top
of the fuselage and provides proper longitudinal decalage. When satisfied with alignment
glue the root fairings to the sides of the fin. When completely dry, cut the stabilator
panels free from the root fairings, but do not remove from joiners yet.
15) Insert rudder hinge pin from the bottom of the fuselage, holding rudder in
proper position. Be sure that the pin is inside the brass tube in rudder root rib.
Check that the rudder is square with the stabilator using a triangle or square.
Correct any misalignment by enlarging the rudder hinge slot and shifting rudder
sideways. When satisfied with alignment epoxy the rudder hinge into the rudder.
16) Remove brass wing tubes from the fuselage and slip joiners through holes
in the sides. Plug the wing panels onto the joiner and rest the trailing edge on
top of the alignment pin. Sight from nose to Check that the empennage is properly
aligned with wing. If misalignment exists it can be corrected by twisting the aft
fuselage when installing the aft bottom sheet, to counter any twist between wing
and empennage. Remove the wing panels from the joiners.
17) Cut aft bottom sheet from 1/8" balsa and install, starting at the end of
the ply floor. Use 5-minute epoxy and pin sheet in place. Work toward tail butting
sheet tightly but don't install last 10-12 inches of sheet until re-checking wing
and empennage alignment. Twist the fuselage if necessary and install the remainder
of the sheet, locking fuselage alignment. Cut a slot in the last section of sheet
for the antenna tube and tailpost and install. Remove stabilator panels and rudder.
18) Glue tapered aft fairing block to top sheet and block sand top sheet to match
the face of the block. Cut the 3/8" sheet fin fairing block 1/16" outside final
shape and fit between stabilator root fairings. Glue to fi n and fuselage top.
19) Build the canopy floor frame from 3/32" x 1/4" spruce, fitting between fuselage
sides. Use the crosspieces to hold side pieces against sides, and epoxy frame together.
Remove frame from fuselage and assemble canopy floor from 1 /8" sheet and glue to
frame. Bevel forward edge to match front fairing block then insert frame back into
fuselage and trim floor flush with top edge of sides. Draw a line 1/32" inset from
edge and trim floor to this line to ensure finished canopy will be flush with sides.
Cut canopy formers from 1/8" sheet and glue aft former to floor against aft fairings.
Cut triangular stock to match angle and glue in place to reinforce joint.
20) Glue forward canopy fairing block to top surface of nose block, using the
canopy frame as a spacer. Bevel lower edge of C-1 and glue to canopy floor. If you
plan to install the optional instrument housing and panel, do so at this point.
Remove the canopy frame from fuselage and spray forward section of frame and housing
flat black, Cover floor and aft former with flat black contact paper. If you prefer
use a color which compliments the color scheme you select.
21) Cut both ends off the canopy and place over the frame. Mark trim lines with
tape, or felt-tip pen, and cut the canopy 1/8" oversize. If you prefer a colored
canopy it can be easily accomplished by dying with household dye and hot water.
Use a whole package of dye in a gallon of hot water in a cake pan or similar utensil.
Place on the stove and heat until the water is just below boiling. Stir thoroughly
and insert the canopy in the dye for 15 to 20 minutes. Check the color often and
remove when you are satisfied with the color depth. Wash the canopy clean and dry
with a lint-free cloth. Use a tack rag to remove dust from the canopy frame and
canopy.
22) Position the canopy over the frame and spot glue to the frame at the high
point of C-1 and C-2. Be careful not to distort frame by applying excessive pressure.
We have had very good results using Hot Stuff to install canopies, but you can use
epoxy or other adhesive that you feel appropriate. Cut two strips of 1/4" square
balsa or equivalent and place against sides of canopy at the floor to act as clamping
strips. Wrap both ends with rubber bands to clamp sides against floor. Glue canopy
to both end formers, using your fingers and/or tape to hold canopy against formers.
Finally, glue the side seams against the floor and let dry thoroughly before trimming
the canopy flush with frame. Check canopy fit and apply 1/4" wide DJ or B &
E striping tape to cover frame edges. Fold tape over the edge of the canopy and
press tightly against floor and formers to help secure canopy. Add the simulated
bow from 1/8" wide tape. Position completed canopy on fuselage and draw outline
on fairing blocks to provide a guide when carving fuselage.
23) The fuselage is now ready for final shaping and sanding. Use a small plane
and sharp knife to slab off the fuselage corners down to the triangular stock. Temporarily
position the fillet ribs on the sides and draw a line 1/8" outside the rib outline.
Do not carve fuselage inside this line. Be careful when carving the cross-grain
bottom sheet not to gouge out chunks of sheet. Contour the nose area following the
detailed photos. Use very coarse (#50 or #80) garnet paper, and/or a wood rasp to
further shape and contour the fuselage, using the photos and plans as a guide. Be
sure to round the aft portion of the fuselage as shown on the plans to avoid a tail
heavy fuselage. Wrap ends of canopy with 2 or 3 layers of masking tape to protect
canopy and install in the fuselage. Use a block to shape the forward and aft blocks
to fair smoothly with the canopy contours. Shape the aft canopy fairing to blend
smoothly into the fuselage top contours. Final shape the fin fairing, blending contours
into the stabilator fairings and fuselage top. Finish all shaping with coarse sandpaper
and avoid using finer paper until all contours are final shaped. Then smooth all
over with progressively finer paper. Add spruce nose and tail skids and fair into
fuselage.
Important:
The completed fuselage without empennage and wire joiners or canopy should balance
level approximately 3-1/2" behind the wing joiner when supported between your fingers.
If the balance point is further aft, excessive nose ballast will be required. Further
shaping and sanding is recommended to move the balance point forward.
24) Insert the main wing tube through the sides and epoxy to the sides and former
F-2, checking that the tube is centered in the fuselage. Insert the rear tube but
do not epoxy. Slip root fairings onto tubes and tack glue to fuselage sides, using
the tubes to hold fairings in proper alignment. Trim the 1/4" O.D. tube flush with
the fairings and remove the rear tube. Insert joiner and install one wing panel,
aligning the root rib and fairing. Use a long 1/8" diameter drill (sharpen the tubing
and use as a drill if you don't have a long drill bit) inserted from the opposite
side of the fuselage to pick up the 1/8" diameter hole in the root rib and drill
3/4" into the wing filler block. Work slowly and carefully. Repeat this process
for the other panel. Insert the brass tube in the fuselage as a temporary joiner
and plug both wing panels in place. Check the fit of the wing root against the fairings
and overall aircraft alignment. Add shims between sides and fairings if necessary,
then epoxy fairings to sides. Remove wing panels. Cut the rear tube into three sections
and epoxy in place in fuselage and wing roots. Be careful not to get epoxy inside
tubes. Trim flush and chamfer ends.
25) Build up fillets around wing and stabilator fairings with 5-minute epoxy
and cornstarch or Sig Epoxylite. By chamfering the end of the main wing joiner you
will have a good tool to smooth the fillets. When fillets are dry, sand smooth and
cut slot in stabilator fairings matching slot in fin sides. Insert rear joiner and
check control action.
26) Cut the 1/4" x 3/8" plywood servo rails to suit your radio installation and
install in fuselage. Add the 1/4" triangular stock reinforcements. Cut the 1/4"
x 1/2" crosspiece located under the aft canopy block and fit to fuselage. Insert
screw-eyes 3/8" in from ends and glue in position using a 3/32" joiner to align
the eyes with the holes in the fairings for the spoiler cables. This completes the
construction of your Aquila. It is now ready for the covering and finishing and
installation of the radio and final assembly.
COVERING AND FINISHING
We suggest that you use Super MonoKote to cover the wing panels and empennage.
The other plastic film materials that we have tried are more flexible and contribute
no skin stiffness to the airframe, causing flutter problems at high air speeds.
For contest work, including speed and distance tasks, you want all the stiffness
possible. For beauty, toughness and light weight this is the only way to fly.
Because of the compound curves the fuselage is best painted. We find the following
process works well and provides a lightweight repairable finish:
1) Check contours and final sand. Fill any cracks or dents with HobbyPoxy Stuff
or Dap.
2) Use a foam brush to flow on one coat of HobbyPoxy Clear Epoxy. Hang the fuselage
nose down and let dry overnight. Most of this coat will soak into the wood. Lightly
sand with #120 No-Load sandpaper.
3) Spray on one coat of Ditzler Primer well thinned. Allow 3-4 hours drying time
and sand with #180 or #240 No-Load paper. Inspect carefully and rework any problem
areas. Most of the primer should be sanded off.
4) Spray a second coat of primer and let dry. This should have completely filled
the grain and resulted in a uniform color. Sand lightly with #280 No-Load and you
are ready for color.
5) We prefer Ditzler Acrylic Lacquer plasticized with Southern R/C Products Flex-All
for final coats. There are hundreds of colors available and custom mixing is very
easy. The finish is durable as well as beautiful and can be repaired very easily.
Spray on two coats and let dry overnight. Rub out with DuPont white compound then
with Wright's Silver Cream and you will have a beautiful gleaming fuselage.
SPOILER FINAL INSTALLMENT AND RIGGING
1) Slit covering in the spoiler bay and fold down and iron all around to the
frame edges. Trim off surplus material and seal edges. Check blade fit and cover
both sides and all edges of the blade. Be sure that you cover top and bottom and
shrink covering carefully to avoid warping the blades.
2) Cut a strip of Slictac or similar material 1/2" wide by 12" long. Drop blade
into opening and center so that the gap is even all around. Press on hinge and then
iron firmly to the wing and spoiler blade. No internal pieces are required. Trim
ends and check blade action.
3) Feed cable through tubing starting at the root end. Use tweezers to feed through
screw-eye and back through horn. Wedge in place and pull cord to open spoilers.
Apply 1/4 ounce stick-on weight on the bottom of the blade and check spoiler action.
The blade must retract freely and be flush with the wing. Correct any binding before
flying. We have found that the return weights work better than spring or band returns
and present less load to the servo. We have flown the ship inverted without any
evidence that the spoilers extended.
4) The final step is terminating the servo end of the cables, which is done after
the spoiler servo is installed in the fuselage. Plug wing panels in place on the
joiner fishing the cord through the holes in the fuselage sides and through the
screw-eyes. Insert a #2 x 5/16" sheet metal screw and eyelet onto the outer hole
of a long servo arm, forming a post. Wrap cord 1/2 turn around the post, pulling
the slack out of the cord and attach the free end with tape. Check spoiler action
to be sure blade opens 90° and retracts fully. When satisfied, place a drop of epoxy
or Hot Stuff on the cord, forming a small loop. Cut off excess cord after the epoxy
sets. Repeat this process for the other panel, making sure that the blades extend
equally. Any further adjustments can be made with the toothpick peg in the spoiler
horn.
Slip loops off the post and remove wing panels. Hook-up, when assembling the
model, is quick and easy by threading the loops through the sides and onto the post.
FINAL ASSEMBLY
1) Install rudder hinge pin and rudder, and check that rudder swings freely.
Insert stabilator joiners through horn and plug on stabilator panels. Install rudder
and elevator servos on rail and mount switch. Be careful to leave room for the battery
lead through former F-1. Position the battery pack and receiver.
2) Mount the rudder horn with two #2-56 x 9/16" long screws. Make up inner pushrod
termination and insert in fuselage and attach to rudder horn. Cut pushrods to length
and connect to rudder and elevator servos. Check control action and throws and adjust
to provide servo throws shown on the plan.
3) Temporarily install the canopy and insert the main wing joiner in the fuselage
and check balance by holding the rod in your hands. Add ballast as required to the
nose block cavity until the fuselage hangs level when supported by the rod. Remove
1/2 ounce of balance weight and affix the rest firmly in the nose block. The 1/2
ounce weight will be used for the first test flights then reduced as the airplane
is trimmed out. Wrap the battery pack and receiver in foam and install in final
position. If using an internal antenna insert through the fuselage tubing, otherwise
run through a hole and down the side of the fuselage.
4) Install the tow hook in the extruded bar and mount the bar in the fuselage.
Position hook approximately 1/2" forward of the main joiner for the first test flights.
Be certain that the lock nut on the hook is firmly tightened as movement of the
hook may have disastrous consequences.
5) Assemble the complete model and hold in one hand and jiggle it up and down.
Check all surfaces for movement. If necessary kink the stabilator joiners slightly
to tighten their fit in the panels. The wing panels are retained by friction only
as we have found hooks and bands across the fuselage unnecessary. When everything
is shiny and new, however, the wings may tend to slip outboard. If this happens,
push the joiner wire ends into an orange or potato and let it sit overnight until
it rusts slightly. Normal handling and weather will keep the rods rusty.
PRE-FLIGHT CHECKS
Before you go out to the flying field we suggest that you run through the following
pre-flight check list. It is a good idea to develop the habit of regularly checking
the model and radio system between flying sessions. Many times you will find a problem
in the shop which, if not corrected, might cause a crash.
1) Inspect the model carefully. Check the radio operation by trying all control
functions and make certain that the surfaces move in the proper direction. Be sure
that the rudder and stabilator surfaces are neutral when the transmitter trims are
set at neutral. Check that the spoiler blades close tightly and extend equally.
Adjust clevises and/or spoiler cables, if required.
2) Check that the servos are firmly mounted and that the receiver and battery
pack are secure. Make sure that the nose trim ballast is firmly mounted and cannot
shift forward or backward. A strong launch can shift things toward the tail.
3) Check all flying surfaces carefully for warps. Remove any warps present by
re-heating the film covering. Be sure that the tip panels are not washed-in (leading
edge higher than trailing edge at the tip). A small amount of wash-out is okay as
long as both tips are the same.
4) Check the span-wise balance by making a string sling and supporting the ship
by the main wing joiner. If it rotates span-wise, add weight to the lighter wing
tip. A slight tilt can be tolerated but excessively out of balance wings will cause
erratic turns. Remove the wing panels and recheck that the fuselage hangs level
when supported by the main joiner. This will provide slightly nose heavy trim which
we find is safer for the first few flights.
5) Check your batteries, both in the transmitter and airplane. If you are using
dry batteries be sure they are fresh; if Ni-Cads, that they are fully charged. Remember
that more radio failures occur from defective or improperly charged batteries than
any other cause. Don't be a statistic!
FLYING THE AQUILA
The Aquila is a very clean and responsive aircraft. It is capable of very tight
turns and will really move out if you feed in down elevator. Be careful not to over-control
on your first flights and make all commands smoothly until you have become accustomed
to the control response.
We suggest using a Hi-Start with 3/16" x 1/16" surgical tubing for your first
flights.
If you have a fish scale available check for 8-10 pounds of Ii ne tension for
winds up to 10 mph. Note your position on the field and adjust accordingly on succeeding
flights. Face directly into the wind and hold the nose up slightly. Release the
airplane smoothly with the wings level. If the ship starts to weave back and forth
during the launch, apply a little down elevator. Control rate of climb by feeding
in slight up or down elevator. Check glide trim and turn response using transmitter
trims, if necessary. All of the test ships have flown well on their initial flight,
so you should experience the thrill of the majestic glide and beauty of this ship
on your first launch. We suggest that you don't use the l spoilers on early flights.
When landing don't set up the approach too high as the glide is very flat and the
tendency is to overshoot. Just get it on the ground smoothly, and don't worry about
hitting a spot. Don't try diving during the landing approach as the speed builds
up, the L/D improves, and the ship just keeps going!
Adjust clevises and throws, if necessary, and you are ready for another flight.
Try a few tight turns by applying rudder and holding a little up elevator. Point
the nose into the wind and pull up stick to check the stall characteristics. Because
of the sharp leading edge radius, the stall will be sharp, but the ship should not
drop a wing. Concentrate on flying smoothly and plan your flight path so that you
are ahead of the sailplane. If you find some lift, circle a few times and watch
the climb. Now you're ready to try the spoilers. Point the nose into the wind and
apply half the stick travel, feeding in up elevator to counteract the nose down
tendency. Watch your altitude carefully and retract the spoilers while you are still
high enough to set up the landing approach. Perhaps you would like to try the spoilers
on this landing. Pop them up halfway and leave them out during the final approach,
controlling the rate of descent with elevator control. Experiment on later flights
with more spoiler throw, starting at altitude as with full throw they are very effective
and will bring the airplane down in a hurry. Leaving the spoilers up during landings
will help to stabilize the ship in gusty weather and we suggest that you use them
routinely.
SPECIAL FLYING NOTES FOR COMPETITION
1) Recent C.D. rule interpretations have been quite strict about loss of landing
points if any part of the model is shifted or detached. This can be a problem, particularly
if landing on concrete or asphalt runways. Use 3M plastic tape or masking tape to
secure the canopy to the sides. Wrap wing roots to fuselage with tape. If the runway
if rough apply masking tape skids to the bottom wing surface at the dihedral breaks
and tip ribs.
2) For spot landing events on asphalt or concrete, tape a pad of Pylon Golden
Foam or G-Pad to the forward fuselage bottoms. This will prevent skating across
the spot on a hot landing.
3) For two minute precision tasks don't worry about maximum height on launch.
The spoilers are very helpful in dumping excess altitude and in setting up the landing
approach. Try to set up a straight upwind approach so that you don't have to turn
when nearing the spot. Concentrate on hitting the center of the spot as our experience
is that more points are lost here than in missing the target time. The ideal landing
would be to stall the airplane out directly over the spot from 6 inch altitude,
but this approach is dangerous in windy, gusty conditions, when it is better to
grease it in with plenty of flying speed during the approach.
4) Be careful when winch launching in high wind. This is a strong airplane and
winches very well, but use a little common sense and discretion. Pulse the winch
to control the speed during climb. With proper technique you can use the ship to
pull line off the winch drum, gaining more altitude.
If the winch line breaks while you are on tow apply full down elevator immediately,
no matter what the altitude. Get the nose down and level the ship out quickly. You
are entitled to a new launch if this happens so don't try to stretch a poor launch
into an official flight, even if you are in a thermal. Your mental concentration
has been broken, so take the attempt and re-launch for your official.
5) For Duration events try to gain maximum height on tow and concentrate on a
smooth release with level wings directly into the wind. During the contest watch
the other ships to see where lift is present, and head for those areas. Concentrate
on flying smoothly and avoid abrupt control movements, particularly when searching
for lift.
In weak lift conditions conserve altitude carefully and make large slow turns.
This ship rides low ground lift very well and will eke out seconds under 50 feet
when other ships are landing. Don't give up any lift or even zero sink air and work
the air for all it's worth. It's amazing how you can pick up an extra minute of
time by fighting for every foot of air. In windy conditions try dynamic soaring
against the wind by flying a slope pattern across the wind. This can be very effective
when thermals are scattered or over-developed and will gain more time than circling.
In calm conditions, in weak thermals, try pulsing beeps of slight up elevator every
2-3 seconds. This seems to work better than up elevator trim and will lower the
sink rate very effectively, if you pulse evenly.
Of course you may get lucky and find a real boomer! If you do keep the circle
constant and feed in up elevator to climb. Don't worry if the ship stalls occasionally
as you are going up all the time. The stall is from excess lift and this trim will
really gain altitude. Just don't let the stall build up excessively. Gain all the
altitude you can-this is a big airplane and easy to see up high. Remember those
spoilers - you can dump altitude faster than a thousand feet per minute.
6) Speed tasks are a very demanding test, both of the airplane and pilot. The
only way to learn is by flying in contests or practicing this type of flying. The
following hints seem to help and we suggest that you try them.
For events timed from the tow release don't use full altitude. Turn the ship
downwind while still on the line and release downwind. Keep the nose down and head
for the first pylon. Turn sharply and fly to the downwind pylon conserving altitude
still keeping the nose down. Make a pylon turn at the far end, kick down elevator
and head back, still keeping altitude, and then pylon turn and start the second
lap. The ship should be in a shallow dive during this lap, depending on the altitude
remaining. The last pylon turn should be at 100 to 150 foot altitude. The last lap
is a real dive with the ship really on the step. Aim for the ground right at the
finish line - ideally you should pass the line 6" off the ground. Once past the
finish line, release the down stick and let the ship zoom to gain altitude from
the excess airspeed.
If the event is timed from entry into the traps, launch to full height and enter
the traps as high as possible. Dive through the whole first lap and finish as above.
The most important thing is to keep the nose down through the course. Momentary
removal of down stick will result in a zoom and lose a great deal of time. It requires
real concentration and a lot of courage to fly this course well, and practice is
the only way to succeed.
We have not flown the ship with ballast for the speed task, and suggest you gain
experience before trying this approach. This design is very fast and contest results
to date have proven that the pilot is the limiting factor. Remember that control
response will be faster due to the high speed so be careful not to over-control.
You may wish to desensitize the controls by using the outer holes in the horns or
decreasing servo throw for speed task.
7) A final caution about the spoilers. Be sure that you always fully retract
them after use. Check before each launch, and while you are flying. If possible
rig your transmitter so that the spoiler control is spring loaded to the closed
position, which will save grief. Several of the test crew, both sport flying and
in contests, have flown with the spoilers partially extended during the flight.
Just develop a mental check list and keep them closed when not in use. 0
Posted October 14, 2020
|