|
If you are a control line flyer and have been itching to
build your first twin-engine model, then this Pirata might be just what you've been looking
for. The plans and building article appeared in the January 1956 issue of Young Men magazine. It features a built-up wing and profile
fuselage and tail section pieces that will make it a quick build. Power on the original was a pair of OK Cub .099s, but you can easily convert
to a couple electric motors. Wingspan is only 32" so even with two powerplants it won't be a budget buster.
Thanks to Bob Balsie for scanning the pages.
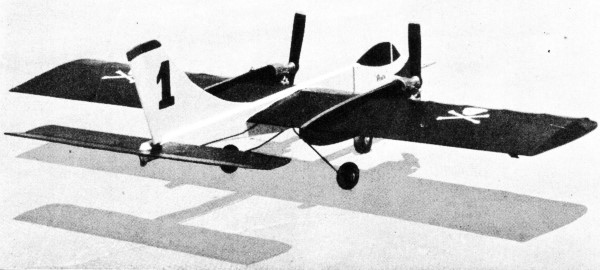
Pirata Twin: 2-Engine Control Liner
By Alexis Poyato
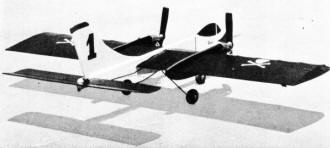
From Cuba comes this jaunty "Pirate" design for young "Sunday Flyers;" 2-engined control liner breezed through 6-mo. test
program with not a single crackup!
Who said "profiles" are not beautiful? Look at this sleek "Sunday Special" and you will think differently. This is a beautiful, simple and
inexpensive model that will give you long hours of fun and action. Although this is my first twin, the flight results pleased me so much I'm
tempted to abandon the single-engine field. I recommend it as your first twin.
If you install the arresting hook, the fun will increase. The only extras you will need are two sandbags, a length of Nylon line and a pair
of hooks to anchor the sandbags in the ground. Install some device in the model to rev-down the two motors or stop one for landings.
Wingspan of the model is 32", weight without motors is 8.5 ozs.; it is powered by two OK Cub .099's. It can be flown in two OK .074's or
.049's with little modification, but what the doctor recommends is a good pair of OK .099's.

Pirata construction details.
Begin construction with the wing. Cut the ribs from 1/16" sheet balsa. Remember to cut out 1/16" strips on top and bottom of six ribs to
accommodate the center section covering of 1/16" sheet. Punch holes in left ribs using the metal top of a pencil with the rubber removed. Cut
wing tips from 3/32" sheet and insert 1/16" aluminum tubes for lead outs. Select good, straight stringers for L.E., T.E., and spars, and assemble
wing in conventional manner. Add small 1/8" gussets to wing tips and remember to put the weight in right wing tip. Cut bellcrank mounts and
spacers from 1/8" plywood and cement the mounts well in place. After dry drill the 3/32" bellcrank pivot holes. Hook up the 1/32" leadouts to
bell crank and install this unit with the 3/32" bellcrank pivot; remember to insert washers and spacers top and bottom.
Install the push rod and cover wing's center section, from motor to motor, with 1/16" sheet, leaving a small opening for the pushrod in the
bottom. Outer panels of wings can be covered with Silkspan. Now cut the fuselage and motor nacelles from 3/8" sheet and make cutouts in them
for the wing. The cabin can be made from scrap stock. Make the cut at rear of fuselage for the stabilizer and make the groove to insert the
rudder. Sand all corners of fuselage round. Bend the landing gear wires. Drill 3/32" hole for front L.G. wire and install it, reinforcing with
gauze. Slip the main L.G. wire in place and fix it with aluminum straps and two 3/32" x 5/8" bolts. Add the 1/32" wire bumper and the 1/16"
nose dowel. Cement the wing in place. Cut the tail surfaces from 1/16" sheet and assemble the elevator-stabilizer unit with fabric hinges. Offset
the rudder 3/8" to the right and cement in place. Cement control horn in elevator and install the unit, remember to connect the pushrod to control
horn at this time. Cut the motor doublers from 1/16" plywood and cement well to nacelles. After dry sand corners round. Cement motor nacelles
in place.
If you are going to use the arresting hook bend it now from 1/16" wire and solder to it a small 1/32" wire hook for the rubber band, then
install in place. Give the entire model a good sanding and apply three thin coats of clear dope, sanding well with very fine sand paper between
coats. Then brush or spray fuselage with two coats of white STA; apply one coat of black STA to wing, nacelles and stabilizer. Paint the cabin
and name "Pirata" in black. Paint white insignia on top and bottom of both wings - outline them with a red line. Paint nose, lines in fuselage
where the props tips pass near fuselage, and rudder tip, with red, outlined with a black line. Solder wheel hubs, add rubber band to arresting
hook, and install tanks and motors. Use 7/4 props.
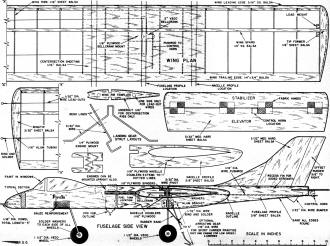
Pirata plans.
Posted November 7, 2015
|