|
 Melanie inherited a very old rolling pin
from her grandmother, and at some point in our many household moves it either got
lost or we gave it away. It has been gone for many years. The one she has been using
was bought at Kohl's - nothing special. Unlike Melanie's grandmother's rolling pin
which was turned from a single piece of wood, including the handles, the replacement
roller is on an axel between separate handles. A couple years back I finally found
a 12" Craftsman wood lathe like
the one I had bought soon after separating from the USAF in 1982, but I sold it
in 1992 prior to a cross-country move. Melanie inherited a very old rolling pin
from her grandmother, and at some point in our many household moves it either got
lost or we gave it away. It has been gone for many years. The one she has been using
was bought at Kohl's - nothing special. Unlike Melanie's grandmother's rolling pin
which was turned from a single piece of wood, including the handles, the replacement
roller is on an axel between separate handles. A couple years back I finally found
a 12" Craftsman wood lathe like
the one I had bought soon after separating from the USAF in 1982, but I sold it
in 1992 prior to a cross-country move.
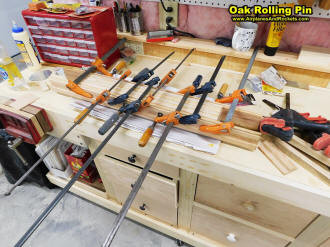 A little over a year ago, we built a house
on our daughter and son-in-law's farm, and needed to cut down a couple very large
red oak and white oak trees. They were cut into 10-foot by 10" wide by 1" thick
fence boards and stacked to dry for a year. I chose some of the best examples of
boards and ran them through my Craftsman planer to have in store for future projects.
Window ledges were made for the house from some of it, and there were a lot of 1-1/2"
wide strips left over. I decided to laminate in alternate strips of red and white
oak. The contrast is not extreme like when using maple and walnut, but it is very noticeable.
After the glue dried, I cut the laminated board into four pieces about 22" long,
then alternated them and glued everything together into a square. A little over a year ago, we built a house
on our daughter and son-in-law's farm, and needed to cut down a couple very large
red oak and white oak trees. They were cut into 10-foot by 10" wide by 1" thick
fence boards and stacked to dry for a year. I chose some of the best examples of
boards and ran them through my Craftsman planer to have in store for future projects.
Window ledges were made for the house from some of it, and there were a lot of 1-1/2"
wide strips left over. I decided to laminate in alternate strips of red and white
oak. The contrast is not extreme like when using maple and walnut, but it is very noticeable.
After the glue dried, I cut the laminated board into four pieces about 22" long,
then alternated them and glued everything together into a square.
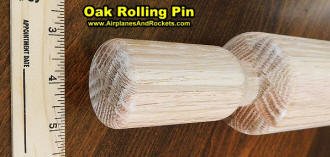
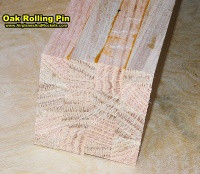 We spent a little time measuring and deciding
what would be the best diameter, length, and handle size based on Melanie's work
method, resulting in a custom, optimized rolling pin. That worked out to be 20" overall length with a
main body width of a little more than 12", and a diameter of 2-3/4". The handles are
about 1-5/8" in diameter. The photo shows four alternating layers of red and white
oak. We spent a little time measuring and deciding
what would be the best diameter, length, and handle size based on Melanie's work
method, resulting in a custom, optimized rolling pin. That worked out to be 20" overall length with a
main body width of a little more than 12", and a diameter of 2-3/4". The handles are
about 1-5/8" in diameter. The photo shows four alternating layers of red and white
oak.
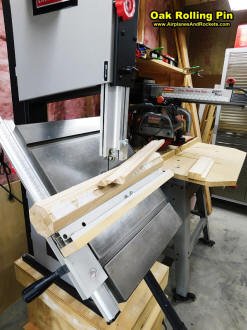 The ends of the square were cut even and
a circle was drawn on the ends using a compass. To avoid excess effort turning on
the lathe, I truncated the corners close to the perimeter using a bandsaw, resulting
in an octagonal cross section. A punch was used to put a center divot in the dead
center end and a cross cut was sawn in the live center end to accept the tool. The ends of the square were cut even and
a circle was drawn on the ends using a compass. To avoid excess effort turning on
the lathe, I truncated the corners close to the perimeter using a bandsaw, resulting
in an octagonal cross section. A punch was used to put a center divot in the dead
center end and a cross cut was sawn in the live center end to accept the tool.
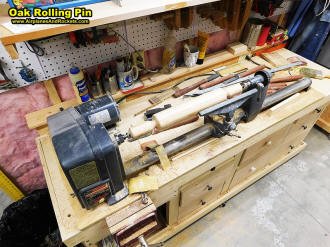 The lathe was set on it lowest pulley combination
speed (875 rpm) for rough rounding and for the initial turning down of the
handle diameter using gouges. The next speed up (1350 rpm) was then used for final scraper
tools on the diameters. A parting tool was used to shape the face of the transition
from the main diameter to the handles. A shape matching tool (the kind with a row
of pins that conform to a profile) helped assure both handles were identical. The lathe was set on it lowest pulley combination
speed (875 rpm) for rough rounding and for the initial turning down of the
handle diameter using gouges. The next speed up (1350 rpm) was then used for final scraper
tools on the diameters. A parting tool was used to shape the face of the transition
from the main diameter to the handles. A shape matching tool (the kind with a row
of pins that conform to a profile) helped assure both handles were identical.
 Finally, the lathe speed was increased to
2250 rpm and sanding was done. Initial sanding with 80 grit paper wrapped around
an 11" long strip of wood got the surfaces perfectly (within <1/32") equal in
diameter along the entire length of the main body and the handles. 150 grit came
next, then 220, then finally 320 grit. Sanding on a lathe is particularly gratifying
both because is it easy to do and it produces a nearly glass-smooth surface. I almost
hated to put a finish on it, but I did. A couple coats of nothing special butcher
block oil were applied, allowing a couple days for drying between coats. Finally, the lathe speed was increased to
2250 rpm and sanding was done. Initial sanding with 80 grit paper wrapped around
an 11" long strip of wood got the surfaces perfectly (within <1/32") equal in
diameter along the entire length of the main body and the handles. 150 grit came
next, then 220, then finally 320 grit. Sanding on a lathe is particularly gratifying
both because is it easy to do and it produces a nearly glass-smooth surface. I almost
hated to put a finish on it, but I did. A couple coats of nothing special butcher
block oil were applied, allowing a couple days for drying between coats.
The crust for a blueberry pie (home-grown blueberries) served as the test bed
for the new rolling pin. It worked as expected.
Posted July 22, 2023
Other Woodworking Tips & Projects:
|