|
A couple weeks ago, Erie, Pennsylvania experienced a major wind
storm with lots of rain. Living just a mile from the shores of Lake
Erie means that we typically get the worst of the winds. The street
we live on has overhead power distribution, telephone, and Internet
lines, so they are more vulnerable than underground buried lines.
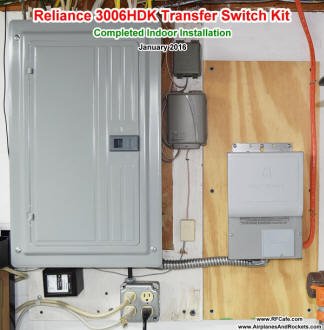
Reliance 3006HDK Transfer Switch Kit indoor components
installation completed
During the aforementioned storm, a very tall pine tree in the
yard right on the corner where the main feeder branches to our road
snapped about halfway up and pulled the lines right out of their
connections on the mains as it fell. To make a long (45 hours to
be exact) story short, our entire street was without power for nearly
two days. That is an unacceptable situation when you run your business
from home, as I do for publishing both my
RFCafe.com and
AirplanesAndRockets.com
websites.
Up until about a year ago, we had a 5,500 W, 230 V
generator that we bought back around 2002 when a similar outage
occurred. The power hadn't been out for more than an hour or so
since then, so we confidently gifted it to our daughter in Greensboro,
North Carolina. They tend to have a major ice storm every couple
years there that wipes out power for a day or two at a time. She
owns and runs
Equine Kingdom
Riding Academy (a gratuitous plug for
her business).
Anyhow, after about 8 hours of no power, we went to Sam's Club
and bought a 3,450 W, 120 V generator. Our house has gas
heat and hot water, so other than a 220 V air conditioner unit
and the electric dryer, everything we actually need runs on 120 V.
A few heavy-duty extension cords fed the refrigerator (18 cu.ft.),
freezer (5 cu.ft.), two computers and monitors, and a couple floor
lamps. Turning on the gas stovetop burners actually kept the house
comfortably warm. I vowed at the time to finally, after many threats
to do it, install a transfer switch to make the whole process as
simple as possible. So, I ordered a
Reliance Controls 3006HDK Transfer Switch Kit from Home Depot.
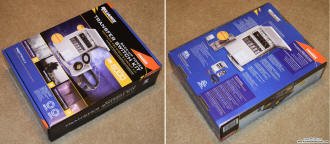
The quality of the components was unbelievably
high, and even the colorful, well-designed box it comes in looks
like the kind of gift any DIYer would love to open.
The Reliance 3006HDK Transfer Switch Kit comes with the fully
pre-wired panel that has six circuit spaces, each one with its own
separate circuit breaker and break-before-make transfer switch.
There are four single pole 15 A breakers and two 20 A
single pole breakers with a tie bar in-between for a 230 V
circuit. I removed the tie bar to use them as single pole circuits.
The bus is broken into two phases to accommodate the standard household
service configuration. Since I am only using single phase, 120 V
circuits everywhere, the two sides of the bus were wire-nutted together.
Because I had plenty of 10/2 Romex wire on hand, two separate
cables were run from the indoor transfer switch box to the outdoor
weatherproof plug enclosure. Even though there is only a need for
a single 120 V, 30 A circuit now, it will be good to have
provisions for a 230 V, 30 A generator if needed. As long
as the second wire was there, I went ahead and connected both sets
of conductors in parallel; that'll result in half the voltage drop
across the Romex wire from the generator to the transfer switch.
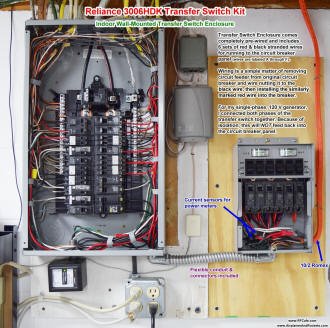
Reliance Controls 3006HDK Transfer Switch Kit
indoor components wiring
A section of 3/4" flexible conduit and 90° connectors are
included in the kit for connecting to the main circuit breaker panel.
Along with a ground and neutral wire for tapping into the ground
bus bar are six pairs of red and black stranded wire (labeled 'A'
through 'F'). For each circuit you want to have fed by the generator,
remove the branch feeder wire from the original circuit breaker
and wire nut it to the black wire, and then connect the corresponding
red wire to the breaker. 'A' and 'B' are the 20 A circuits
and therefore have 12 AWG wire and circuits 'C' through 'F'
are 15 A circuits with 14 AWG wire.
I chose to put the following six circuits on the transfer switch
box:
'A' - 20 A, kitchen with refrigerator
'B' - 20 A, basement with freezer
'C' - 15 A, furnace controls & blower
'D' - 15 A, computer & modem receptacles
'E' - 15 A, bedroom receptacles & lights
'F' - 15 A, living room & basement lights
With the exception of the furnace circuit, there are lights and
receptacles serviced other than those specifically named. In the
1950s, when this house was built, the National Electric Code did
not require receptacle and lighting circuits to be separate, and
for that matter there were originally no GFIC or AFIC circuits either.
The outdoor connector box is supplied with a 4-prong plug for
a 230 V, 30 A cable socket, and the 10-foot long cord
that comes with the kit has a mating plug on the generator end and
socket on the connector box end. My generator needs a 3-prong, 120 V,
30 A plug, so I needed to cut the original plug off the cable
and replace it with the appropriate plug.
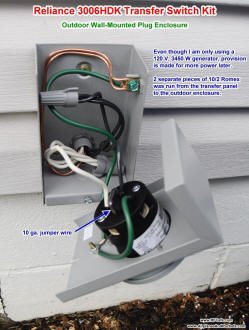
Reliance Controls 3006HDK Transfer Switch Kit
outdoor connector box
Once all the wiring was completed, I connected the generator,
fired it up, and tested the transfer switch operation. It's good
to go. I'm not looking forward to another power outage, but at least
now I'm ready for it! BTW, this generator averaged about 4 gallons
per day while running continuously. At $2.50/gallon that works out
to about $10/day, or $300/month - much more than my typical $90/month
electric bill.
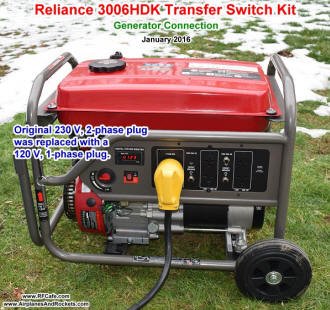
Generator with 3-wire, 120 V, 30 A
plug on interconnect cable
Other Woodworking Tips & Projects:
Posted January 16, 2016
|