|
As
electric power is increasing in popularity for model aircraft locomotion
due to significant advances in motor and battery technology, internal
combustion engine use is decreasing - at least as a percentage.
For those modelers who still indulge the often temperamental habits
of those engines, this article from the American Aircraft Modeler's
For the Tenderfoot series is a good primer on how to break in and
adjust them for long life and reliable runs. My own conversion to
electric power has been purely for the sake of convenience; there
is no substitute for the sound and smell of a model airplane engine
screaming away with the fragrance of hot castor oil emanating from
the exhaust port. Gentlemen, Start Your Engines!
Engine starting, operation, break-in, and trouble-shooting
is a matter of technique and practice. Here's how an expert does
it. G. B. Telfair and William M. Johnson
 Gentlemen,
start your engines! Each Memorial Day this cry, echoing across the
Indianapolis Speedway, brings a score of racing power plants roaring
into life at the start of the Indy 500. But, on the model airplane
flying field, such is often not the case. The Tenderfoot, who has
just bought his shiny, new model airplane engine, is having his
difficulties getting it to run. Gentlemen,
start your engines! Each Memorial Day this cry, echoing across the
Indianapolis Speedway, brings a score of racing power plants roaring
into life at the start of the Indy 500. But, on the model airplane
flying field, such is often not the case. The Tenderfoot, who has
just bought his shiny, new model airplane engine, is having his
difficulties getting it to run. As frustration sets in,
and the Tenderfoot and his Dad are about to decide that they're
stuck with a lemon, an Old Modeler enters the picture. The Old Modeler
goes through a few motions, flips the propeller a couple of times,
and the previously obstinate engine leaps into life and purrs like
a kitten. "Now, what did he do that I didn't?" wails the
Tenderfoot.
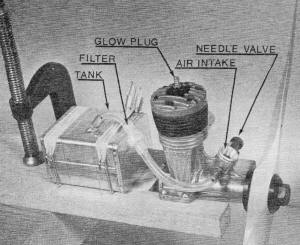
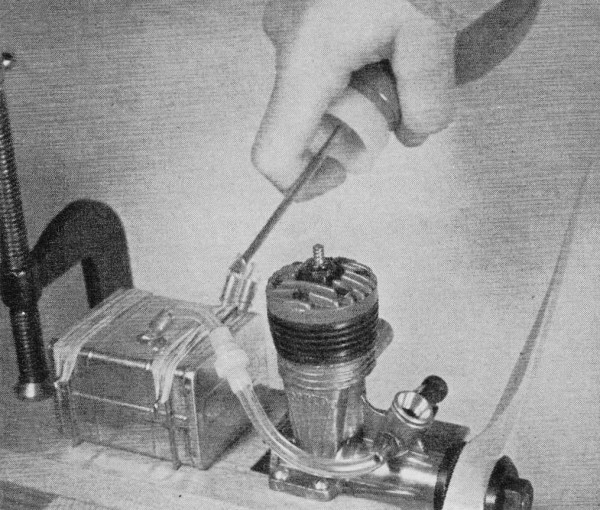
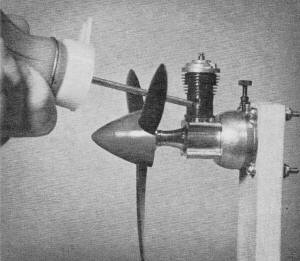
With engine mounted on a board clamped to an outdoor bench,
practice starting and adjusting it before mounting it in
a plane.
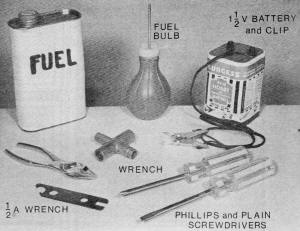
Use fresh sport fuel, new battery, clean glow-plug clip,
and have all the tools for your engine. The wrench is by
Austin Craft.
Tank size is chosen for convenience only, but note that
the tank is about even horizontally with the engine's needle
valve.
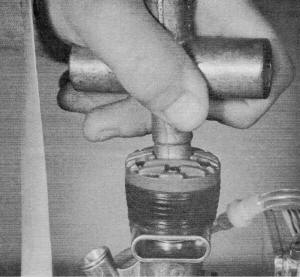
Bolt a radially mounted 049 engine to a sturdy piece of
wood which is then clamped in the work-bench vice. Priming
method shown.
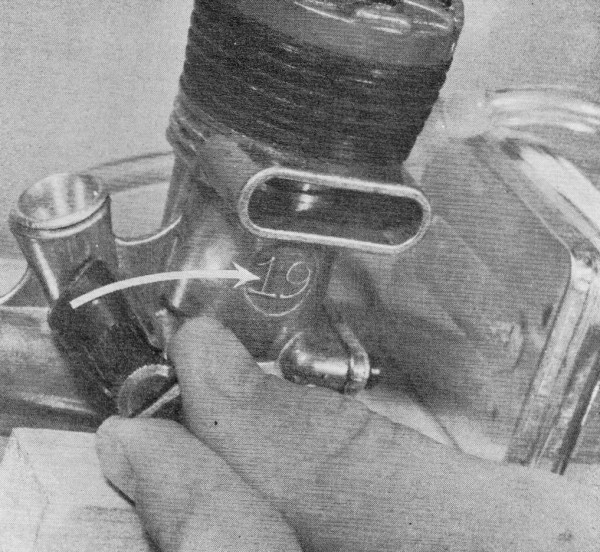
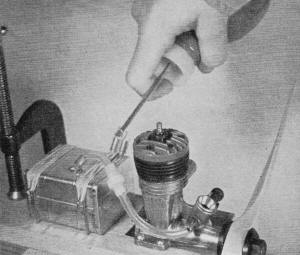
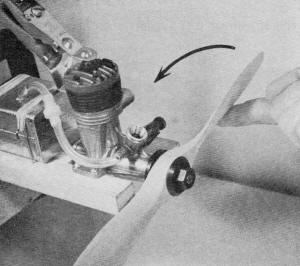
When priming the larger engine, place the prop so that the
piston is at its lowest position, squirt a few drops into
the cylinder.
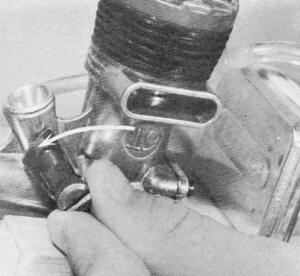
Choking the engine means closing the intake or carburetor
opening with your finger, while holding and rotating the
prop a full turn.
Opening the needle valve will run your new engine slower
with a rich mixture. It will run cooler and have more lubrication.

Engines do backfire and fingers can get cut. A simple inner-tube
rubber finger guard is easy to make. Use it on all sizes
of engines.
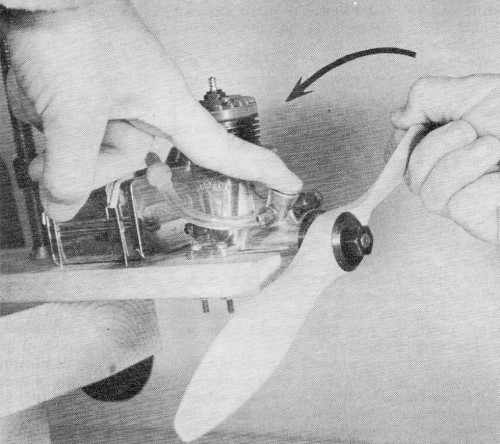
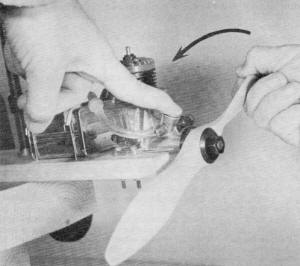
Set the needle valve per article, then clip and flip. With
finger behind prop. pull across forcefully as quickly as
possible each time.

With engine running, adjust needle valve. To run faster
turn valve clockwise. This leans the mixture by reducing
the fuel flow.

Check the plug if the engine won't start. If it lights up,
then both the battery and plug are good, but if not, check
the battery.
Try new plug only if your battery is good. Always use wrench
when installing plug or tightening prop nut. Just get plug
snug. |
In this article, we'll try to give you the answers to his question.
Any experienced modeler can tell you that there's no real difficulty
in operating a model airplane engine. You just have to attend to
some details. Properly cared for, all modern sporting-type engines
will start easily and consistently, will run smoothly, and will
have a long and satisfactory life. So, to get started properly,
study the accompanying photographs as well as this article. We've
based the photos on a popular sport-type engine. However, the principles
are applicable to all conventional model airplane engines.
In addition to the how-to-get-started photos, we've included
ideas on what to do if the engine seems not to want to start. And
we've included a few pointers on operation to assure a long and
useful engine life. If you have a new engine, remember that
all new engines require careful break-in if they are to continue
to give reliable operation. So, please be familiar with the section
"Breaking in the New Engine" before you set out to start it for
the first time. Take it easy, don't overspeed it! There'll be time,
later, to demonstrate its high performance. A few
starting pointers: Priming causes most beginners to stumble.
A couple of turns of the prop with the air inlet choked, plus a
few drops of fuel in the exhaust port is usually all that is necessary.
Some engines may require only the initial choking, while others
may require a juicy exhaust prime. You will need to become familiar
with your particular engine. When you start flipping the
propeller and hear a mild "pop" every flip or so, the engine is
trying to start, so keep cranking! A new engine can be stubborn
and may require quite a bit of cranking before finally catching.
So don't be discouraged if it doesn't fire right away. Many perfectly
good engines have been returned to hobby shops because their inexperienced
owners did not recognize this trait. The experienced modeler's
trick - to tell when the engine is ready to fire - is a useful one.
Don't worry about the propeller being pulled out of your hand; the
explosion force isn't that powerful if you have a firm grip on the
blade. When you feel the light "catch," a few flips should have
the engine off and running. When your engine starts it probably
will run roughly, emitting much blue smoke and raw fuel. That's
because the needle valve is set too far open (too rich). Close the
needle valve slowly (rotate clockwise) and the engine will start
to run smoothly. Disconnect the glow-plug clip. If the engine slows,
the mixture is still too rich, so reattach the clip and close the
needle valve a touch more until the engine runs smoothly with the
glow-plug clip removed. As you close the needle valve further, the
engine will speed up and reach a "peak." Beyond this peak, as the
needle valve is closed further, the engine will slow again as the
mixture be-comes too lean. Don't run the engine at these
over-lean settings, because it will overheat and damage itself.
A well-broken-in engine runs best a a needle-valve setting about
one-half turn richer than the setting for peak rpm on the ground.
In flight, the air stream will provide enough extra air to lean
the engine out to about its maximum speed, When it
wont start! No matter how carefully you have prepared, the time
will come when you crank, and crank, and crank, and nothing happens.
While you're resting your tired arm check a few common causes:
- Are the battery wires loose, at the battery or at the glow-plug
clip? Is the battery run down?
- Are the glow-plug clip contacts clean? Dirt there can prevent
the current from flowing.
- s the fuel line kinked so the fuel won't flow? Soft rubber
tubing often does this. Is the line loose from the engine or
from the fuel tank? Has the fuel line contacted the hot cylinder
and burned a small hole in the tubing wall?
- Is the propeller positioned correctly? Is the propeller
secure on the shaft?
- Are you using the propeller recommended in the engine instructions?
An over-large propeller can be too heavy for the engine to swing.
If your starting preparations and these points show up O.K., then
it's time for serious trouble-shooting. Needle valve set
too lean: A quick, screaming burst, followed by a sudden stop means
that not enough fuel is reaching the engine. All it's doing is using
up the priming fuel. If the fuel line isn't kinked or loose, open
the needle valve another turn and try again after repriming. We've
found a few individual engines that used needle-valve settings quite
different from the manufacturer's recommendations. Dirt
in the fuel supply: If the engine still runs out the prime and quits,
check for dirt clogging the fuel line or the needle valve. If you're
using transparent fuel line, inspect it carefully for specks of
dirt inside, particularly where the tubing joins the needle valve.
These particles can come from several places. An over-aged
fuel bulb may be starting to shed rubber crumbs into the fuel as
you squirt it into the tank. If the fuel tank is an old one, it
probably has dried fuel residue in it, which flakes off when the
new fuel hits it. And dirt may have drifted into your fuel can.
Reputable fuel manufacturers are carefully clean, but if you let
the fuel can sit around with the cap off, dirt will get into it.
Save yourself a great deal of trouble by using a filter between
the fuel tank and the engine. Clean the filter after every flying
session, being careful not to lose the little screen that's inside
and is the heart of the filter. Dirt can be flushed from
the fuel line by squirting a little fuel through it with the fuel
bulb. Or replace the line with new tubing. Then, remove the needle
from the needle valve and attach the fuel bulb directly to the needle
valve inlet. Squirt fuel through the valve to flush out any dirt.
To remove dirt from the fuel tank, re-move the tank from
the test block or the model and flush clean fuel through it. In
the case of a small engine with an integral tank, carefully remove
the tank, following the manufacturer's instructions, and flush it
out with clean fuel. Just be careful that you don't introduce more
dirt than you remove! Loose parts: After
several cycles of the heating and cooling to which a model engine
is subjected, cylinder-head bolts and crankcase bolts and glow plugs
become slightly loose. This looseness can cause the engine to leak
enough to prevent starting. Tighten them up (with the correct screwdriver
or wrench), including the engine-mount bolts, before and during
each flying session. Glow plug troubles:
If the engine shows no inclination to fire, either from the beginning,
or after one of those screaming, too-lean bursts, first check the
glow plug. It may have burned out or have been the victim of vibration.
The easiest check is done by attaching the glow-plug clip and looking
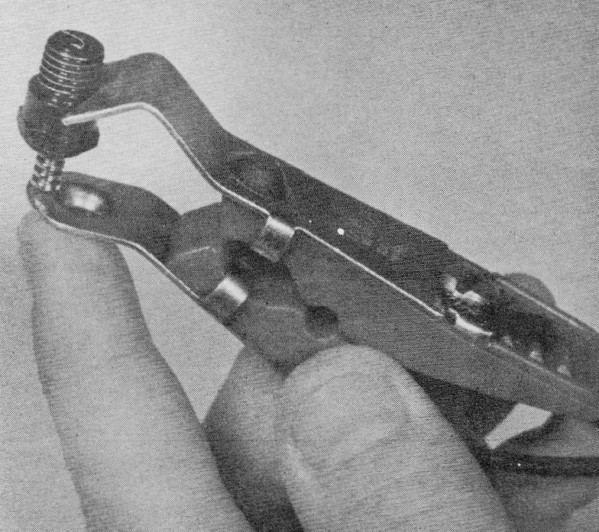
into the exhaust port with the piston down. An orange glow shows
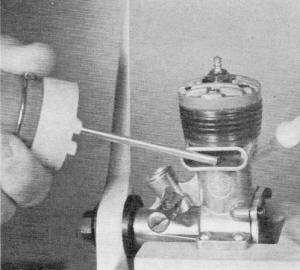
that the plug is O.K. If you're still not sure, remove the plug
and place it across the jaws of the clip as shown in one of the
photos. The plug element should light up (in bright daylight you
may have to shade it to see the glow). If it doesn't glow, select
a new plug, but test it before putting it in the engine. (Funny
thing, the battery might have been dead all along, although new
plugs have been known to be faulty!) If the engine quits
after the glow-plug clip has been removed, the plug may not be holding
its glow in the heat of the combustion chamber. It may be just "tired"
from over age or too much high-speed, high-temperature running.
The only cure is a new plug. Sometimes the glow-plug element,
through use, gets against the plug wall and causes a short circuit.
If this appears to have happened, gently use a straight pin to pry
the element away from the plug wall. This may restore the plug and
save you 50c. Always follow the engine manufacturer's recommendations
for glow plugs. Small engines usually take short plugs; large engines
usually use long plugs. A long plug in a small engine can interfere
with the piston travel, at the least keeping the engine from starting
and, at the worst, damaging the piston. Flooding:
Probably the most common cause of starting difficulties is flooding.
This means that there is so much raw fuel in the engine that the
fuel-air mixture reaching the combustion chamber is much too rich.
This mixture won't burn properly, and also tends to quench the glow
plug. Flooding is caused by over-priming, or a too-open setting
of the needle valve, or both. It can usually be recognized by the
raw fuel being thrown out the engine exhaust and being spit back
through the air inlet when the propeller is flipped. A light
or moderate flooding condition often will clear itself by evaporation
while you're checking the glow plug, fuel lines, etc. So, after
making these preliminary checks, it's a good idea to try a start
with-out any prime, on the chance that there's enough fuel remaining
in the engine for a start. A lightly flooded engine may
emit one loud "bang" and stop when it is cranked. Invariably, the
force of this backfire has loosened the propeller. Remove the glow-plug
clip, reposition the propeller, reattach the glow-plug clip, and
try again. If the engine doesn't respond after a dozen flips, reprime
and try again. If it still won't cooperate, check the glow plug;
the force of the backfire may have damaged it. Heavier flooding
is best cured as follows:
- Disconnect the fuel line and close the needle valve.
- Connect the glow-plug clip.
- Crank until the engine starts. It will run roughly for a
short burst and quit.
- Continue cranking until the engine fires again, runs longer,
smoother, and then stops.
- Reconnect the fuel line, open the needle valve, and proceed
to start as usual.
In cases of very heavy flooding, remove the glow plug and invert
the engine, keeping the inlet low. Rotate the propeller by hand
and fuel will flow out the various openings. Loose
needle valve: If the engine starts well, and runs for a
while, and then starts to slow or run erratically, check the needle
valve. It is probably loose. If the spring clip that retains the
needle is not tight enough, the needle can vibrate open or closed.
Sometimes the spray-bar, into which the needle valve screws, becomes
loose in the air inlet and turns so that its spray hole no longer
points down into the engine. Reposition and tighten these parts,
making sure that the spray hole points directly down the air inlet.
Breaking in the new engine: If you are
starting with a brand-new engine, don't try to get top rpm's from
it until it has had a chance to break in. All you'll accomplish
will be overheating and damage to the engine. This damage will not
show up right away, but it will show up, eventually, in drastically
reduced engine life. There's no trick to breaking in a model
engine. Just run it at a relatively low speed for several tanks
of mild fuel, letting between each run. The first two or should
be only about 30 to 60 seconds. Then, work up through a few runs
to full tankfulls. Control-line modelers often put a new engine
in a trainer after the first couple of test-stand runs, and complete
the break-in program with a rich mixture in flight. The airflow
around the engine keeps it from overheating, As before, let the
engine cool between runs. As the break-in progresses, the
engine performance gradually improves the running characteristics
become smoother and smoother, and the engine becomes easier to start.
You can tell if your engine is properly broken in by practice-flipping
the propeller against the engine compression. If the propeller bounces
back, nice and springy, the engine is broken in properly.
Operating tips: This may sound like a broken
record, but treat your engine right and it'll treat you right. It
never hurts an engine to be run slightly rich. On the other hand,
it can be quickly ruined by over-heating from flight after flight
at high speeds with an over-lean mixture. Don't be fooled by the
way engines are operated in Speed, Rat-Race, Combat, or Navy Carrier
events. The contestants are demanding the most the engine can give
and expect a relatively short life. In Sunday flying, though,
there's no need to beat the engine to pieces. Remember, when the
model is in flight, the engine receives more air than it does on
the ground, so it runs leaner. Therefore, set the needle valve about
one-half turn richer than the setting for peak speed on the ground,
and it won't over-lean in the air. We shouldn't have to
mention it, but every so often someone tries to fly with a nicked
or split wooden propeller. For safe-ty's sake, don't! The prop is
likely to fly apart. Aside from pieces of wood flying like bullets,
the brief, violent vibration that occurs before the engine stops
has been known to rip the engine right out of the model.
Nylon
propellers are popular because of their durability. However, if
the tips become frayed, they should be trimmed and the propeller
rebalanced. Otherwise, the unbalance will rapidly wear the crankshaft
bearing. If you use a "chicken stick" (a short, rubber-padded
wooden stick), don't bat at the propeller with it to start the engine.
The blow can damage the propeller. If the propeller nut
becomes stiff to turn, and you have trouble removing it (the result
of cross threading or crash damage), insert a hardwood stick or
a broken propeller blade through the exhaust port into the combustion
chamber to hold the piston and crankshaft while the nut is turned.
Don't use a screwdriver for this; it will damage the piston and
cylinder liner. When your model is sitting on the ground
between flights, keep a clean cloth over the engine to exclude dirt
and grit. Then, after each flying session, as you clean the model,
clean the engine. Remove the excess oil and accumulated grit and
dust; they have a habit of drifting into the engine's working parts.
Plug the air intake with soft cloths or tissue and encase the engine
in a plastic bag. Properly cared for, your engine will reward you
with many pleasurable flying hours.
Articles About Engines and Motors for Model Airplanes, Boats, and Cars:
Posted February 3, 2013
|